• Home
  • About
    • Personal Posts
  • Privacy
  • Shop
    • My Account
    • Checkout
    • Email
    • Facebook
    • Instagram
    • Pinterest
    • Twitter
    • YouTube
Sawdust Girl®

Sawdust Girl®

Renovation, cabinet building and woodworking plans and tutorials. Build like a Girl®

  • My Home
    • Clinton TN House
      • Clinton TN House in Progress
    • Maryville TN House
      • Maryville TN House Tour – Completed Rooms
      • Maryville TN House in Progress
        • Basement
        • Basement Storage Closet
        • Bedroom Office
        • Craft Room
        • Dining Room
        • Entry
        • Garage
        • Guest Bedroom
        • Hallway
        • Jack and Jill Bathroom
        • Kitchen
        • Kitchen Entry
        • Laundry Room
        • Library
        • Living Room
        • Loft
        • Madison’s Room
        • Master Bedroom
        • Master Closet
        • Pantry
        • Porch
        • Powder Room
        • Wes’ Office
    • Illinois House
    • Calderwood Cottage
  • My Workshop
    • Clinton Workshop
  • Build & Breakfast
  • Cabinet Making 101
    • Cabinets
    • Doors
    • Drawers
  • Projects and Plans
    • Countertops
    • Beds
    • Benches
    • Bookshelves
    • Desks
    • Gift Ideas
    • Holiday
      • Christmas
      • Halloween
    • Home Accessories
    • Kids
    • Kitchen Cabinets
    • Lockers
    • Nightstands
    • Organization accessories
    • Recipes
    • Sewing
    • Tables
    • Vanities
    • Wardrobes
    • Woodworking
      • Wood Finishing
    • Workshop
    • Workshop Storage and Organization
  • Remodeling 101
    • Baseboard and Trim
    • crown molding
    • Demolition
    • Door and Window Casings
    • Door Installation
    • Drywall
    • Electrical work
    • Flooring
    • Home Maintenance
    • Painting
    • Plumbing
    • Resources
    • Safety
    • Tile
    • Wall and Ceiling Treatments
  • Sawdust Squad
  • The Sawdust Diaries
    • Andrea
    • Ava D.
    • Beckie F.
    • Cara C.
    • Courtney B
    • Fawn T.
    • Jenn D.
    • Kelly C.
    • Kristy K.
    • Lara T.
    • Malisa B.
    • Marnie D.
    • Robin C.
    • Val F.
  • Tools
    • Products
    • Tool Reviews & Overviews
    • Inspiration & Ideas

Built-in Window Seat – Bench Plans

All Posts, Benches, Free Plans

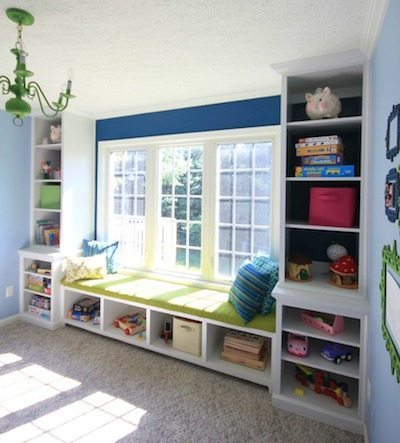
In Robin’s room, this bench is built-in between two bookcases but you could build this plan as a stand along storage bench.  Robin’s bench sat over an air vent so they had to direct the air flow out through the toe kick.  You can read Robin’s Sawdust Diaries here:  Part 1, Part 2, Part 3, and Part 4 and the Reveal.

Built-in window seat plans

This is the first of three free woodworking plans in the Robin Collection.  There are two additional plans in this collection:

  • Bookshelf Base
  • Bookshelf

Built-in Window Seat Bench

Built-in Window Seat Bench - free woodworking plans

Materials:

  • 1/4″ backer material (beadboard, plywood or masonite)
  • 1 3/4″ wood screws
  • wood glue
  • Kreg jig and 1 1/4″ pocket hole screws
  • 1×2 and 1×3 poplar for faceframe
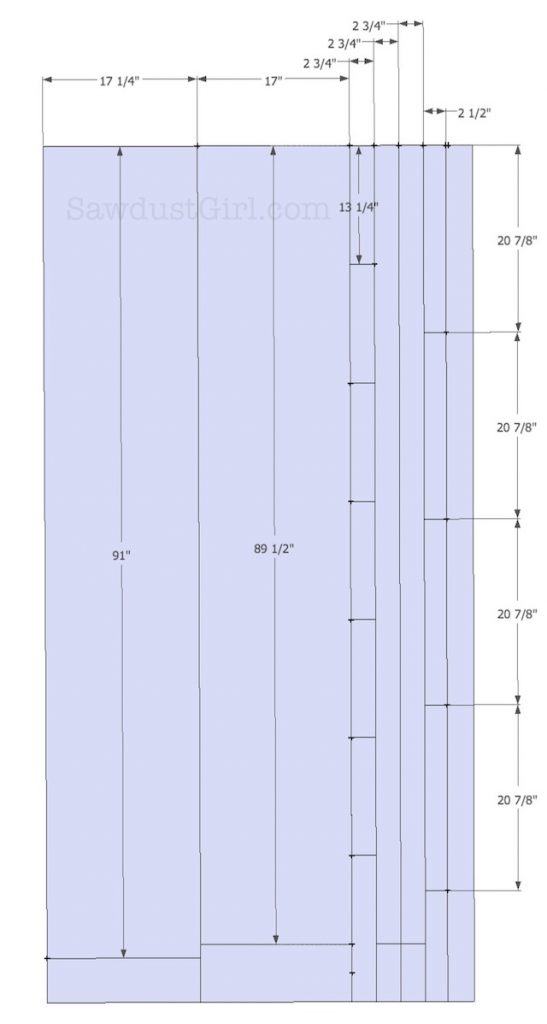
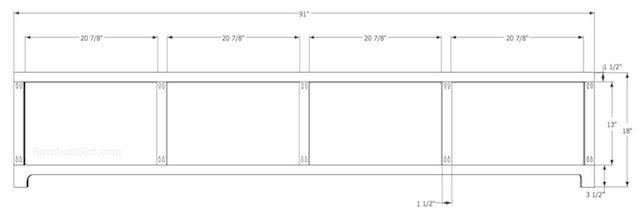
  • 2 sheets 3/4″ plywood cut as shown below

Built-in Window Seat Bench -- free plans from Sawdust Girl.

Built-in Window Seat Bench -- free plans from Sawdust Girl.

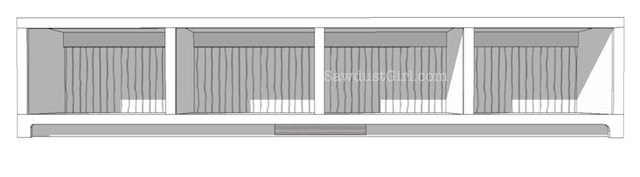
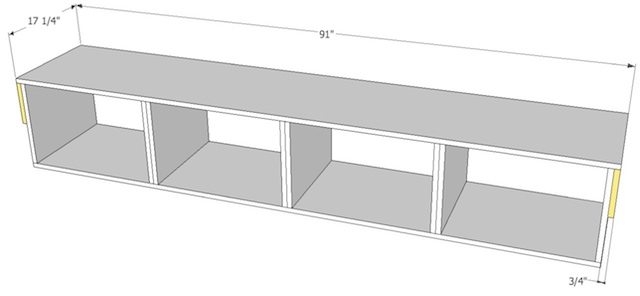
Step1:  Attach Sides and Dividers

  • Drive wood screws up through bottom into sides and dividers.
  • Make sure they countersink

diy window seat bench woodworking plans

Step2:  Attach Top

  • Sides of top should extend 3/4″ on sides and 1/4″ on back.

build a window seat bench

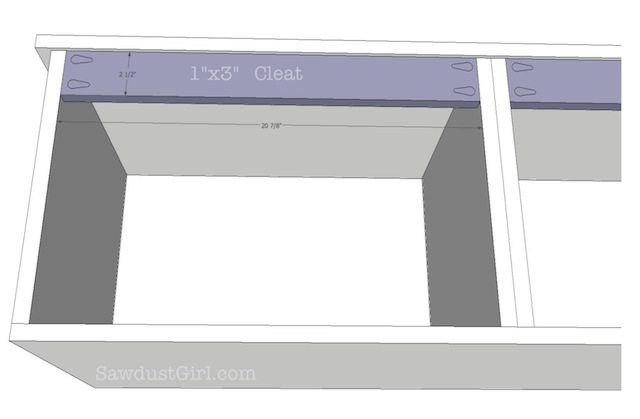
Step 3:  Attach Back Cleats

  • Use pocket hole screws to attach flush with back of sides and dividers

Built-in Window Seat Bench -- free plans from Sawdust Girl.

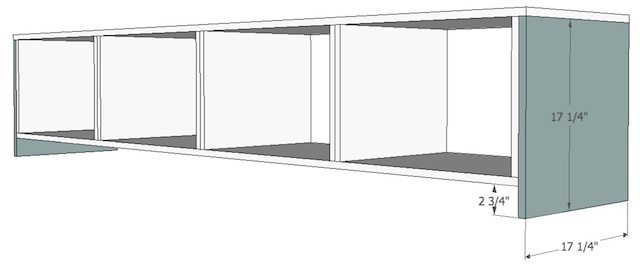
Step 4:  Attach Sides

  • Sides should be flush on front to dividers and extend 1/4″ on back.
  • Use wood glue and brad nails to secure.

How to build a built-in window seat bench

Step 5:  Build and Attach Faceframe

  • Faceframe is built of 1×2 except for the bottom plate which is 1×4.
  • Refer to Faceframe tutorial for help with this step

window seat faceframe

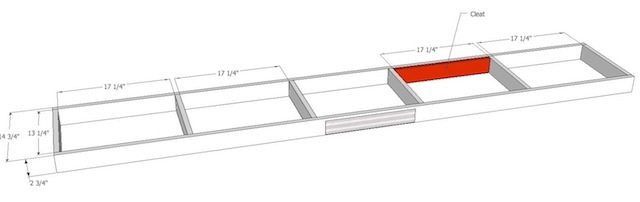
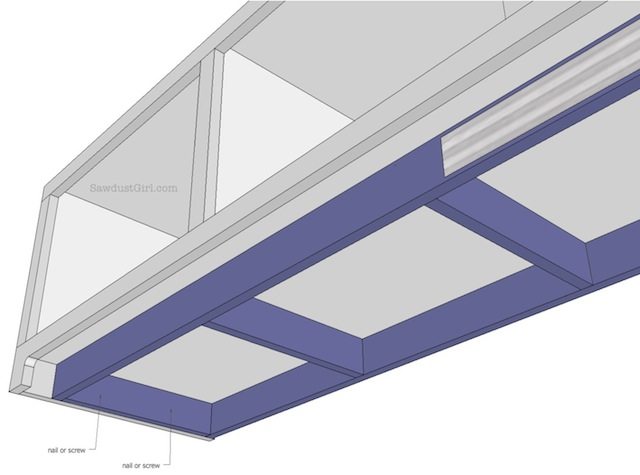
Step 6:  Build and Attach Base

  • Build base out of 3/4″ plywood strips.
  • Use scrap of wood to space all dividers evenly.
  • Attach to bench by driving screws through sides of base into sides of bench

window seat bench with base for air vent

Built-in Window Seat Bench -- free plans from Sawdust Girl.


Step 7:  Attach Back

  • Back should sit into recess created by sides and top.
  • Secure with nails or staples

Built-in Window Seat Bench -- free plans from Sawdust Girl.

Finish and enjoy!

DIY Window Seat

Get the other two free plans in the “Robin Collection” built-ins here:

  • Bookshelf Base
  • Bookshelf

Read Robin’s Sawdust Diaries here:  Part 1, Part 2, Part 3, and Part 4 and the Reveal.

And refer to all my Cabinet Making 101 posts for lots of tips, tricks and techniques to build your own awesome built-ins!

January 27, 2014 · 8 Comments

« Tall Bookcase with Adjustable Shelves
Apothecary Console Table -free plans »

Comments

  1. kim massa says

    January 27, 2014 at 5:17 pm

    this is exactly the bench my daughter wants me to build for their entry, of course, first I have to finish my own project which isn’t happening. I have no heat or insulation in my shop and it has been less than 20 degrees for weeks now. Rather depressing but this can’t last forever, right?

    Reply
  2. Kathy says

    January 30, 2014 at 8:22 pm

    Thank you for these plans. Please, pretty please, can you post plans for the bookshelves that surround it? Please? Sugar on top?

    Reply
  3. Lori Ann says

    February 1, 2014 at 10:12 am

    I really love this I have been looking for windows seat plans theses are great, could you put drawers in the cubbies or doors?
    Lori Ann

    Reply
  4. Joshua Carden says

    February 18, 2019 at 1:00 am

    Hi, great plan! I’m adopting it to make a music cabinet. Can I double check the length of screws that you used? The materials list says 1 3/4”, but that seems awfully long to screw up through the bottom to the sides and dividers. Is that the correct length?

    Reply
    • Sandra says

      February 18, 2019 at 9:32 am

      1 3/4″ is my standard screw length when building with 3/4″ plywood. You want enough screw in the material to pull the two pieces together. Just make sure you hold your driver straight.

      Reply
  5. Amanda Acord says

    December 6, 2019 at 9:09 am

    Would you be able yo be more specific about the type of wood screw, where i can find them, and how may you used.
    Also how much wood glue did you use and could you tell me where i could order that as well.
    Thank you. 🙂

    Reply
  6. Rachel says

    May 2, 2020 at 5:12 pm

    Hi! I’m very excited to make this for my living room and adding storage for our family.
    I have read and studied the notes. My one question is how did you cut the groove out for the bottom of the face frame ?

    Reply
    • Sandra says

      May 4, 2020 at 9:26 am

      I”m not sure what you mean. The faceframe is attached to the front of the cabinet.

      Reply

Leave a Reply Cancel reply

Your email address will not be published. Required fields are marked *

Categories

New Post email notification signup

You Subscribed!

Legal Stuff

Terms of Use

Privacy Policy

Disclosure

Recent Posts

  • Lodge Update – Floors, Cabinets, Countertops, and Appliances
  • Lodge Kitchen Cabinet Progress
  • Halloween Mad Gab – Halloween Party Ideas
  • Concrete Backsplash or Vertical Wall Treatment
  • Building and Installing a Giant Faux Beam on the Ceiling

Disclaimer:

Although it is my intention to provide accurate plans and clear instructions, not all plans have been tried and tested. Using plans or information found on SawdustGirl.com indicates that you agree with the Terms of Use policy and will accept full responsibility for the process and outcome of any project you attempt. All plans are for private use only. Plans and information published on SawdustGirl.com may not be reproduced, republished or distributed in any manner without written permission from Sandra Powell, Sawdust Girl. Actual projects built using Sawdust Girl plans may be published on your own site without instructions or "tutorial" as long as you provide a link to my original post with full post title or "SawdustGirl.com" as link title.

Copyright © 2022 · anchored theme by <a target="_blank"