• Home
  • About
    • Personal Posts
  • Privacy
  • Shop
    • My Account
    • Checkout
    • Email
    • Facebook
    • Instagram
    • Pinterest
    • Twitter
    • YouTube
Sawdust Girl®

Sawdust Girl®

Renovation, cabinet building and woodworking plans and tutorials. Build like a Girl®

  • My Home
    • Clinton TN House
      • Clinton TN House in Progress
    • Maryville TN House
      • Maryville TN House Tour – Completed Rooms
      • Maryville TN House in Progress
        • Basement
        • Basement Storage Closet
        • Bedroom Office
        • Craft Room
        • Dining Room
        • Entry
        • Garage
        • Guest Bedroom
        • Hallway
        • Jack and Jill Bathroom
        • Kitchen
        • Kitchen Entry
        • Laundry Room
        • Library
        • Living Room
        • Loft
        • Madison’s Room
        • Master Bedroom
        • Master Closet
        • Pantry
        • Porch
        • Powder Room
        • Wes’ Office
    • Illinois House
    • Calderwood Cottage
  • My Workshop
    • Clinton Workshop
  • Build & Breakfast
  • Cabinet Making 101
    • Cabinets
    • Doors
    • Drawers
  • Projects and Plans
    • Countertops
    • Beds
    • Benches
    • Bookshelves
    • Desks
    • Gift Ideas
    • Holiday
      • Christmas
      • Halloween
    • Home Accessories
    • Kids
    • Kitchen Cabinets
    • Lockers
    • Nightstands
    • Organization accessories
    • Recipes
    • Sewing
    • Tables
    • Vanities
    • Wardrobes
    • Woodworking
      • Wood Finishing
    • Workshop
    • Workshop Storage and Organization
  • Remodeling 101
    • Baseboard and Trim
    • crown molding
    • Demolition
    • Door and Window Casings
    • Door Installation
    • Drywall
    • Electrical work
    • Flooring
    • Home Maintenance
    • Painting
    • Plumbing
    • Resources
    • Safety
    • Tile
    • Wall and Ceiling Treatments
  • Sawdust Squad
  • The Sawdust Diaries
    • Andrea
    • Ava D.
    • Beckie F.
    • Cara C.
    • Courtney B
    • Fawn T.
    • Jenn D.
    • Kelly C.
    • Kristy K.
    • Lara T.
    • Malisa B.
    • Marnie D.
    • Robin C.
    • Val F.
  • Tools
    • Products
    • Tool Reviews & Overviews
    • Inspiration & Ideas

Tall Bookcase with Adjustable Shelves

All Posts, Bookshelves, Free Plans

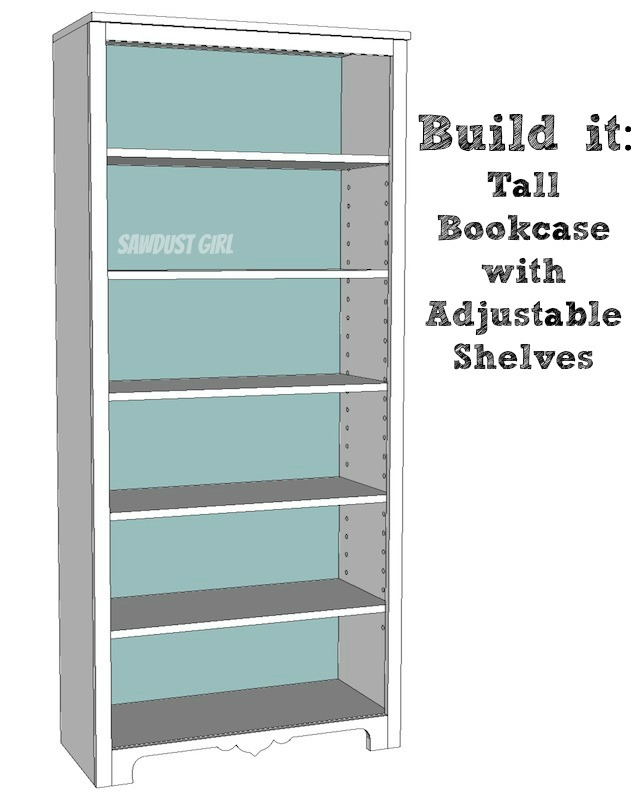
Today I’m sharing easy woodworking plans for a tall bookshelf with adjustable shelves.   The height in this plan is 72 3/4″ but you can modify to suite your needs.  You can build one bookshelf for about $75.

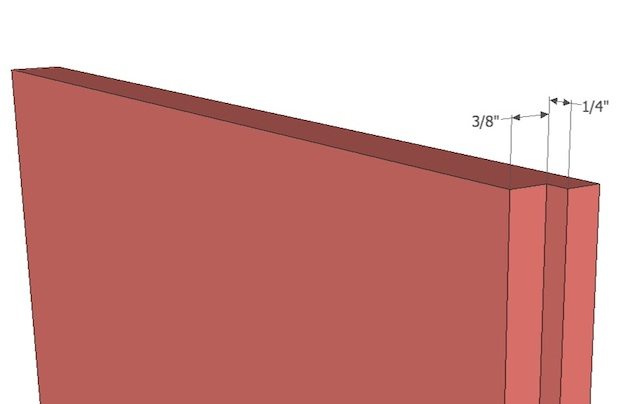
This plan used a rabbet cut into the bookshelf sides to hide the cabinet back.  It’s easiest to cut on a table saw if you have a long out feed table. If you don’t you could use a plunge router or a circular saw and rip guide with the blade set to cut into the material only 1/4 – 3/8″ deep.  Refer to my Dado (and Rabbet) Cabinet building post.

If you don’t feel comfortable with the rabbet, simply attach the back panel to the bookcase back and adjust your face frame to extend 1/4″ on each side to accommodate a side panel to hide the side of the back panel as shown in my Faceframe post.

Free Plans to build a tall bookshelf with adjustable shelves from Sawdust Girl.

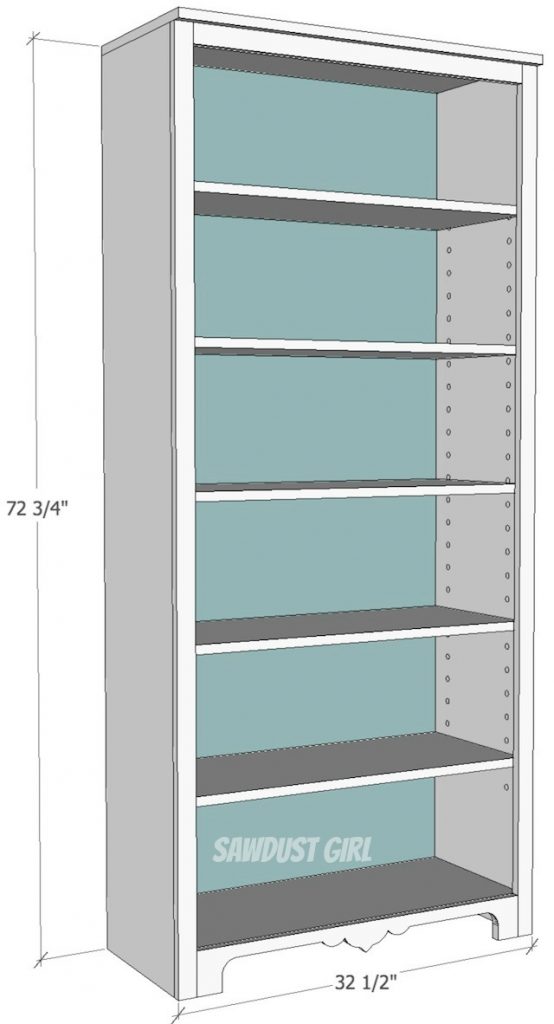
Tall Bookshelf with adjustable shelves


Materials

  • pocket hole jig and 1 1/4″ pocket hole screws
  • wood glue
  • 1×2 pine or poplar for faceframe
  • 1/4″ backer material (beadboard, plywood or masonite)
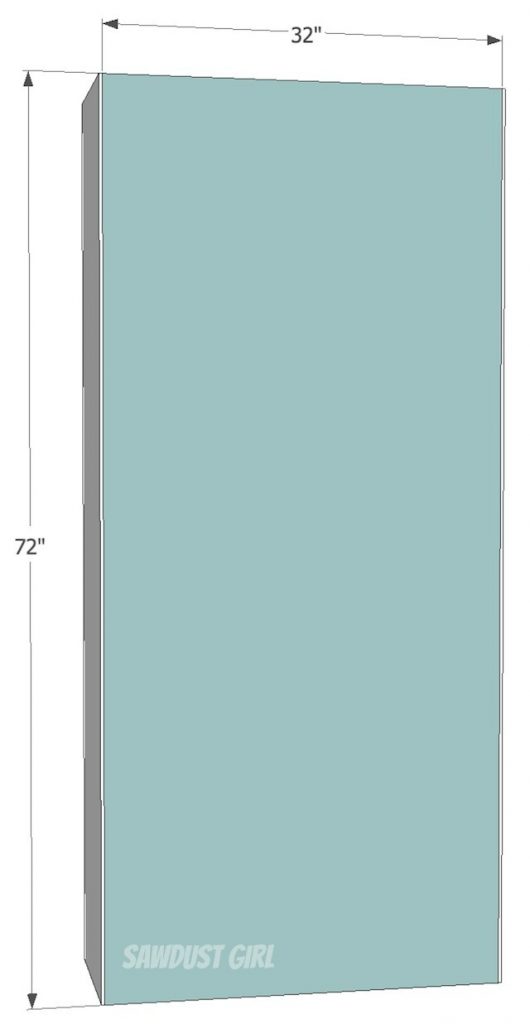
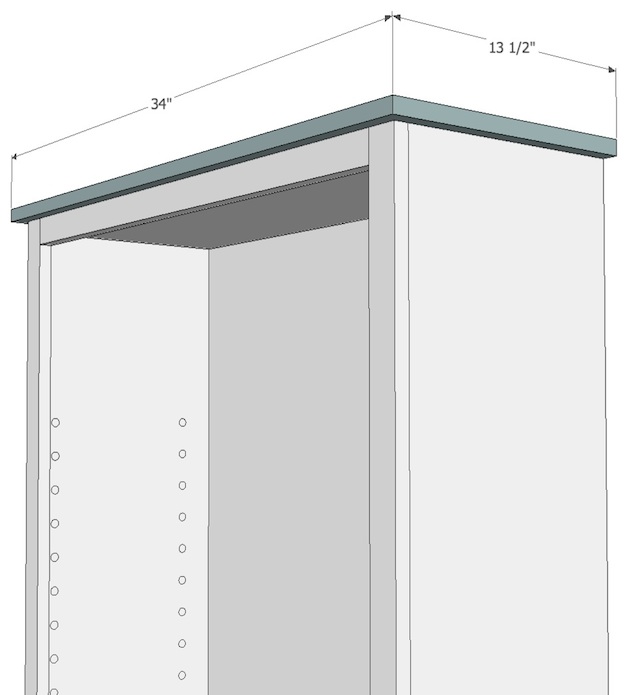
  • 34 x 13 1/2″ solid wood piece for bookshelf top (pine or poplar)
  • 1 sheet of 3/4 plywood or MDF cut as shown below
  • If you want a taller  or shorter bookshelf you can modify the sides to whatever length you like.

Free Plans to build a tall bookshelf with adjustable shelves from Sawdust Girl.


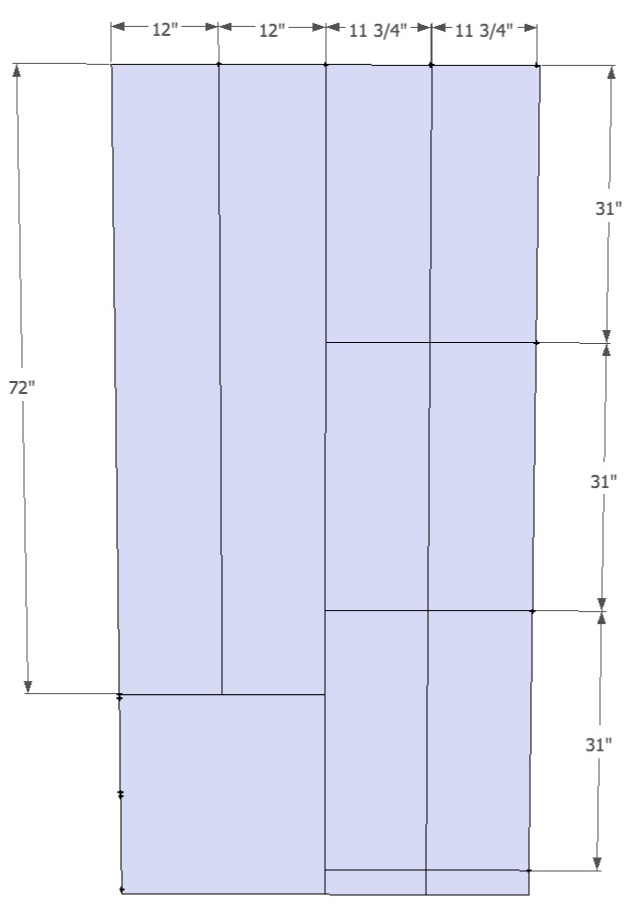
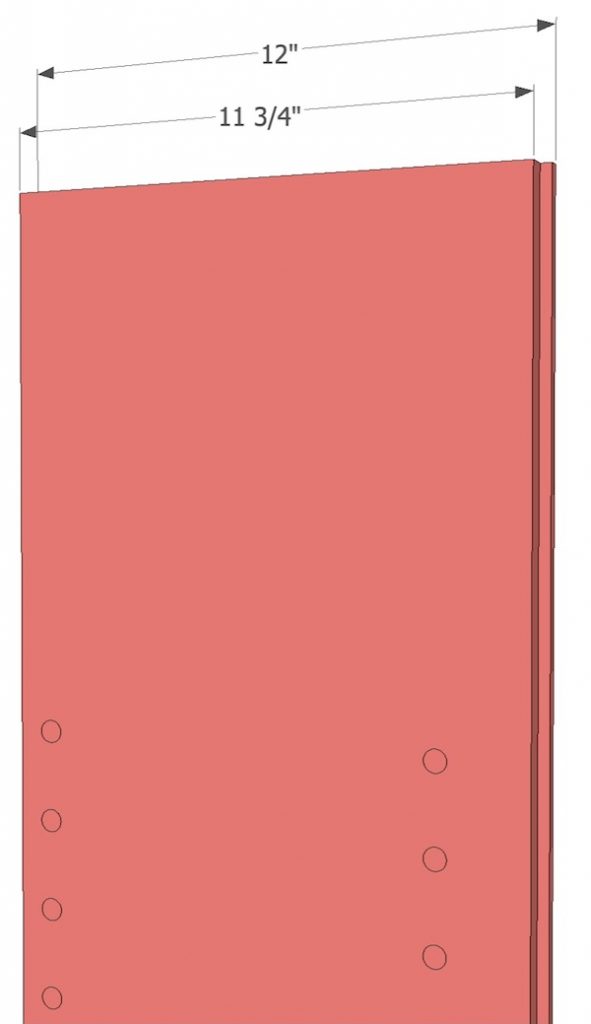
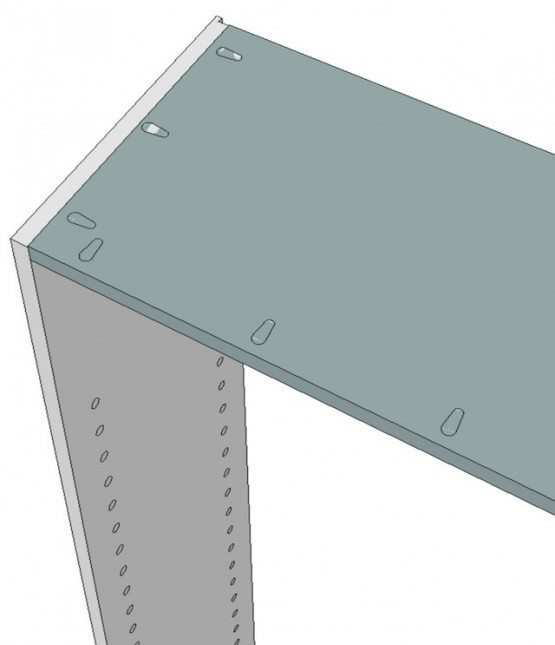
Step 1:  Prepare Sides

  • cut rabbets 3/8″ deep and 1/4″ wide.  (Rabbet/dado/groove tutorial)
  • drill shelf pins (Refer to my tutorial on making a template and stop block.)

Free Plans to build a tall bookshelf with adjustable shelves from Sawdust Girl.

Free Plans to build a tall bookshelf with adjustable shelves from Sawdust Girl.

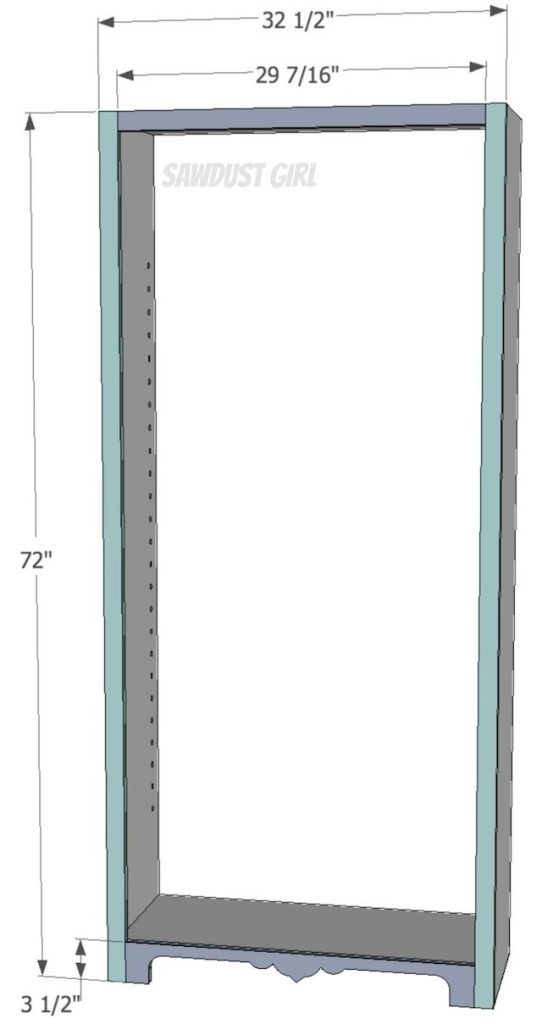
Step 2:  Attach top and bottom to sides

  • Bottom should be located up 3 1/2″
  • Use pocket hole screws from the bottom of cabinet so screws are hidden on the inside of bookcase

Build a basic bookshelf

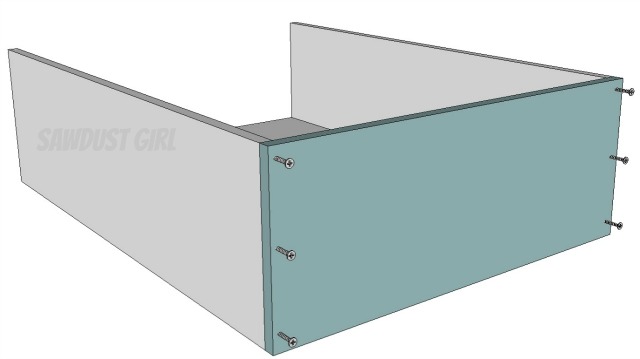
  • When drilling pocket holes, drill 3 holes on on the front of the shelves (top and bottom pieces) too to attach to face frame.
  • All pocket holes and screws should be hidden from the inside of the bookcase
  • Make sure all pieces are flush on the front so the rabbet is open in the back

Build a bookshelf with pocket holes

Step 3:  Build and attach Faceframe

  • Use 1×2 for sides and top
  • Use 1×4 for bottom.  You can leave straight or cut a decorative pattern into it.
  • Use pocket holes to construct
  • Attach with wood glue and brad nails on styles, pocket holes on top and bottom.  Or you can use biscuits. (Build and Attaching Faceframe Tutorial)

Bookshelf faceframe - woodworking plans

Step 4:  Attach back panel

  • If you cut rabbets into your sides, insert panel into that recess and nail or staple in place.  Be careful to keep fasteners IN the wood.  🙂
  • If you didn’t cut rabbets, adjust your back panel to extend across the whole back and adjust face frame to accommodate side panels that will hide that visible back.  (Cabinet Building Basics Tutorial)
  • Make sure you measure your actual cabinet and size your panel correctly.

tall bookshelf

Step 5:  Attach Bookshelf Top

  • Use a piece of solid wood to cover the bookshelf.  It should be flush with the back but extend over the front and sides by about 3/4″.  It will add dimension and interest as well as your pocket hole screws that are in the top.


Free Plans to build a tall bookshelf with adjustable shelves from Sawdust Girl.

Step 6:  Add shelf pins and shelves

  • cover the front of your plywood shelves with edge banding to hide the plywood layers or you can fill and sand really well and paint.

Finish and enjoy!

DIY bookshelf

Refer to Cabinet Making 101 section for additional tips, tricks and techniques.


January 26, 2014 · 3 Comments

« How to cut a tile with a bevel
Built-in Window Seat – Bench Plans »

Comments

  1. Maria B. says

    January 26, 2014 at 4:28 pm

    Thank you for continuing to share your extensive DIY knowledge with everyone even though you are recovering! I hope you find a worthy apprentice cause that is a great idea. Get well soon!
    -Maria

    Reply
  2. Sarah says

    January 27, 2014 at 11:19 am

    Thank you! There are so many bookcase plans that gloss over the details. Thank you for providing such a comprehensive tutorial.

    Reply
  3. Jack says

    August 10, 2020 at 3:05 pm

    Thanks for sharing this.

    Reply

Leave a Reply Cancel reply

Your email address will not be published. Required fields are marked *

Categories

New Post email notification signup

You Subscribed!

Legal Stuff

Terms of Use

Privacy Policy

Disclosure

Recent Posts

  • Lodge Update – Floors, Cabinets, Countertops, and Appliances
  • Lodge Kitchen Cabinet Progress
  • Halloween Mad Gab – Halloween Party Ideas
  • Concrete Backsplash or Vertical Wall Treatment
  • Building and Installing a Giant Faux Beam on the Ceiling

Disclaimer:

Although it is my intention to provide accurate plans and clear instructions, not all plans have been tried and tested. Using plans or information found on SawdustGirl.com indicates that you agree with the Terms of Use policy and will accept full responsibility for the process and outcome of any project you attempt. All plans are for private use only. Plans and information published on SawdustGirl.com may not be reproduced, republished or distributed in any manner without written permission from Sandra Powell, Sawdust Girl. Actual projects built using Sawdust Girl plans may be published on your own site without instructions or "tutorial" as long as you provide a link to my original post with full post title or "SawdustGirl.com" as link title.

Copyright © 2022 · anchored theme by <a target="_blank"