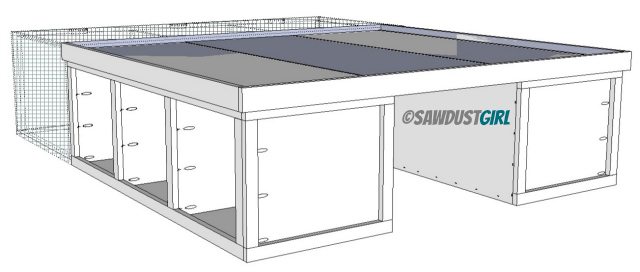
This bed is made for ultimate storage in a small bedroom. This frame consists of a storage bench at the head portion of this Kristy bed. This extra storage is not going to be accessed very often but it’s there for those that need to utilize every inch of possible storage. If you’re looking for a more traditional bed, check out my plans for this Queen bed with storage drawers.
Because of the amount of dividers supporting the top, I’ve chosen to design this plan for 1/2″ material. The entire platform bed will be topped with another piece (or pieces) of material further strengthening the entire platform. You should be well supported!
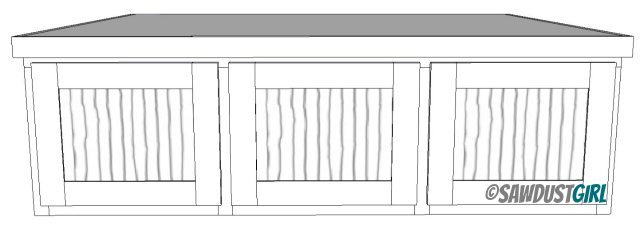
Queen Platform Bed with Storage
Supplies:
- 1/2″ material: MDF or cabinet grade plywood
- wood glue
- brad nails
- wood screws (I use these 1 3/4″ wood screws)
- Pocket hole jig
- 1 1/4″ course thread pocket hole screws
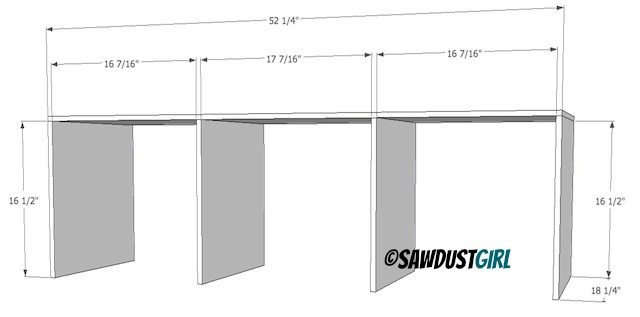
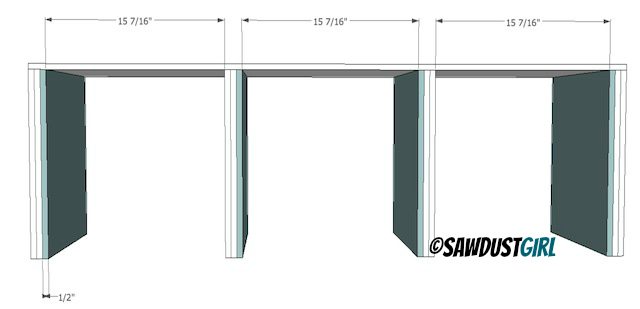
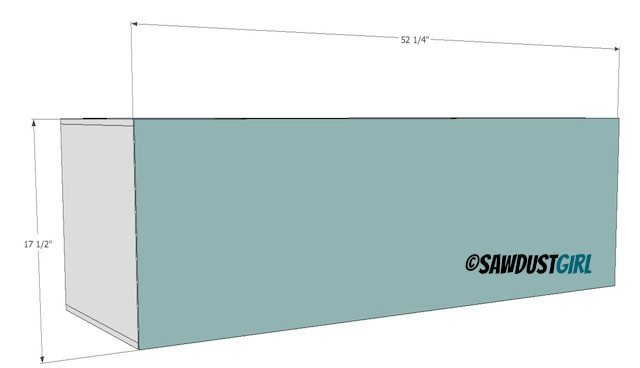
Cut list is for Two Sides.

Boxes – you will need to make two of these side boxes.
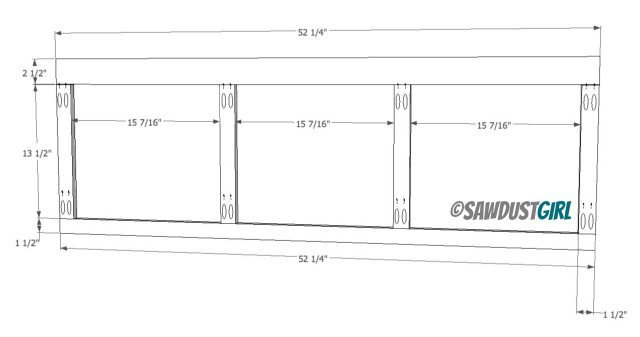
Step 1. Attach dividers to one side of each box.
- Use wood glue and 1 3/4″ screws.
- Drive screws directly through side into divider. (No need to hide these screws.)
Step 2. Add cleats.
- Glue and brad nail 1/2″ cleats to the dividers as shown.
- Make sure you put the cleats on the correct side of each divider!

Step 3. Attach additional dividers.
- Use glue and brad nails to attach this divider to the cleats.
- Use 1 3/4″ wood screws to secure to the side like you did in step 1.
Step 4. Attach second side.
- Apply wood glue on adjoining edge of dividers and cleats
- Use 1 3/4″ wood screws
- Drive screws directly through side into dividers. (No need to hide these screws either.)
Step 5. Square up and attach back.
- see this tutorial for squaring up if you don’t know how to square up. (Coming soon)
- Use an power stapler with at 3/4″ staples if you have one.
- If you don’t have an power stapler use #6 3/4″ wood screws, or finish nails to secure the back onto the box.
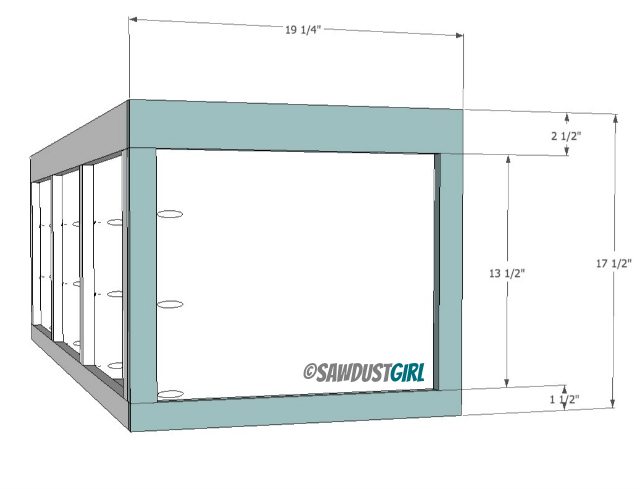
Faceframe Material
-1x poplar wood you will need one for each box.
- One 1×3 at 52 1/4″
- One 1×3 at 19 1/4″
- One 1×2 at 52 1/4″
- One 1×2 at 19 1/4″
- Six 1×2 at 13 1/2″
Step 1. Build front faceframe
- Use wood glue and 1 1/4″ pocket hole screws.
Step 2. Attach front faceframe
- Use wood glue and 1 1/4″ pocket hole screws as illustrated.

Step 3. Build and attach end faceframe
- Build end faceframe with pocket hole screws as illistrated in “Faceframe Step 1”.
- Attach with glue and finish nails.
Now you should have two side boxes for you platform bed frame.
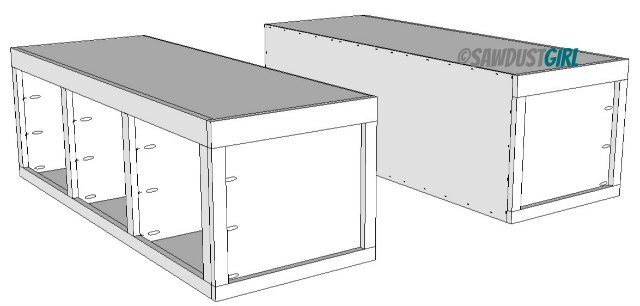
Next you’ll build the center section which I’ve designed as a pullout storage trundle!

Even without drawers you now have a Queen platform bed with storage underneath. You could use baskets and be done. Or you can follow this link to build the drawers.
Make sure to check out Kristy’s bedroom reveal for photos of a beautiful finished Kristy collection bed! Get the rest of the woodworking plans for Kristy’s bedroom furniture here:
- Storage Bench – Kristy Queen Bed Extension
- Drawers and Drawer fronts for Queen Bed
- Pull-out Storage Trundle
- Wardrobes with Side Cubby
Check out my other woodworking plans for Beds too.
Get my Cabinet Building 101 eBook. All the information in one place that you can download and keep on hand!
$9.99Add to cart
Tara says
These are amazing plans and I love the possibility for versatility here. Kristy really did an amazing job! Thanks for sharing Sandra!
Zarah says
I absolutely LOVE this! I am just wondering, since you mentioned that you had to adapt the plans from inches into metric, is it possible to get the metric version, too? I live in Sweden and like the Aussies, we don’t use inches much – except for scrapbooking or getting confused. 😉
I’d be most thankful!
Sincerely,
Zarah
Debbie T says
I LOVE this – thanks so much for sharing these plans! We have a queen size bed + box springs with no frame. I’m ALWAYS looking for more space and this would TOTALLY jazz up the master bedroom and get a lot of clutter out of the way! LOVE it!
mary ann benefield says
I noticed (after printing out the plans) that all the plans are for queen size. Could you tell me an extremely easy way to convert the measurements down to a full size bed please. Thanks so much.
KerryAnn says
As I’m also in Australia (I think about 700kms from Kristy) I would also appreciate the metric plans.
Now I’m off to google brad nails. Thank you, Sandra!
Sandra says
Kristy transposed the measurements into mm for herself. I can’t just flip a switch and have it change. The program is to glitchy and I would have no way to tell if the dimensions were correct or not. Sorry.
Nate D says
Do you have plans for a king bed? If not I can just adjust it and hope I get it right. Thanks!!!
Sandra says
No, This is for a Queen. The easiest way to adjust would be to measure your mattress and make your bench to that dimension. Then space the two storage drawer parts of the platform bed out and just widen the middle caster box.
Lynda says
Sandra
This is fabulous and just what I was looking for thank You for posting plans.
Lynda
Roz says
Thank you so much for sharing your plans. I’m just curious about your approximate material costs. I realize they’ll probably be a bit different for me, but a close guess would be nice. Thank you so much!
Kelly says
Just wondering where the plans are for the drawers, drawer fronts and center box are? My daughter wants to redo her room and this would be perfect.
Sandra says
They are in a separate post. Just click on the “Kristy Collection” under the “Plan Collection” tab on the menu bar.
JPA says
I would also like the plans for the drawers drawer fronts & center box. Please and thank you!
kerry says
Hi-
Great plans,….can you finish them? I need to build this asap. Not sure why only partial plans were posted. Thanks!
kerry says
Ok,…I found the plans for the drawers in your plans folder. However, where are the top and center plans? These side boxes are only 52 1/2″ and a queen mattress is 82″. I assume there are no drawers by the headboard to allow for nightstands etc,….why not just make the side boxes full length with a dead panel at the top?
Sandra says
Kerry you could certainly do that. These particular plans are for the configuration showed in the picture. There are wardrobes beside the bed, a storage box at the top of the bed spanning the full width of the bed and then a trundle storage box that goes between the two sides. If you look at all the pictures of Kristy’s room reveal you can see why I designed it this way for her. All the plans are posted under the “Kristy Collection”.
kerry says
got it!! thanks!!
Lisa Pudil says
I don’t think your diagram for cuts is right. Some of the small boards are 16 1/2 and some are 16 1/4. Is that right? Also which piece is the back piece? There don’t sem to be enough long pieces. I wish you would post a design for this bed in a normal size queen.
Sandra says
Lisa I think you are right. It’s been about a year since I drew up these plans — fixed it now. Looking for a way to get the PDF’s downloadable. Thanks!
kerry says
Do you have the cut list, etc. as a pdf? It’s hard to read at this size. Thanks.
maria says
Will you be including a tutorial on how you installed the drawers?
KT says
Do you think I could modify this for a king?
Mike says
I love this design and I am in the planning process of building it with a few adjustments, thanks so much for sharing it.
I don’t currently have a kreg jig…I noticed that the link above is for the R3…from someone who has used these tools, is the R3 sufficient, I noticed some larger sets as well…I don’t want to buy something with a lot of features I will never use, but at the same time, sometimes upgrading the tool makes the job easier…would love your feedback.
Thanks
Sandra says
Hey Mike, that little Kreg Jr is the one and only one I used for years! I just now bought myself a larger one, the new K-5 and I really like it. I think it was around $99.
Mike says
Thanks Sandra…one more question…I noticed that the plans call for either MDF or furniture grade plywood…do you have a preference? In my area the MDF is about 35% cheaper, so cost has to be an advantage…what are some of the drawbacks?
Brittany says
Would you be able to supply me with plans for a king sized bed. This is exactly what my husband and I want to do for our bed but we need a king as we share our bed with 2 dogs 🙂 Thanks
REBECCA REED says
I’m doing a near identical remodel in my bedroom, and after combing dozens of DIY storage bed instructions that required significant modification to accommodate the flanking wardrobes, I FINALLY stumbled on your blog. Gold Mine!
In your original design with the side boxes, could you explain the purpose of the cleats on the drawer box dividers before adding the “additional dividers”? Is it just to thicken them up so the face frame has something to attach to?
Thanks in advance.
Sandra says
Hi Rebecca. You are correct on the purpose of the cleats. Since this plan is using 1/2″ material, the cleats are there for filler. The faceframe will be 1 1/2″ thick and if you’re installing drawers, you want the inside of the cabinet flush with the faceframe.
Sue says
I love your work, I have learned so much from you. Your instructions are so clear. I have learned how to build drawers from you, something I thought I’d never be able to do. I am going to attempt to downsize these complete plans to a full-size bed, I live in a 600-square-foot cottage by the sea with only one closet.. I really need storage, wish me luck!
Sandra says
Get it Sue! Drawing out the build plans is a great way to work through the build, before any materials are used. Enjoy the whole process. Especially the end when the product you built is all your accomplishment!