Build this Queen sized platform bed frame with storage drawers. Pair it with your favorite headboard for an attractive AND functional storage piece. Material is 3/4″ plywood with a 2×4 base.
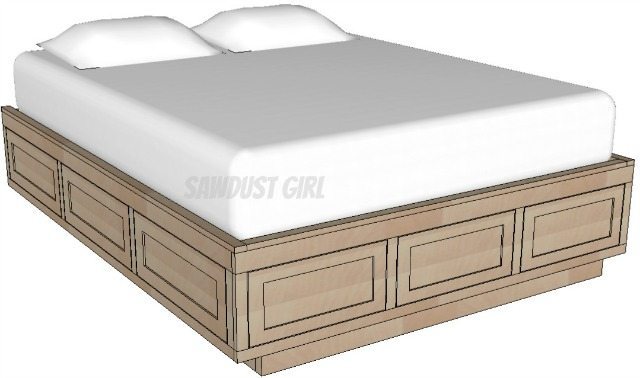
Queen Platform Bed Frame with Storage Drawers
Materials:
- Use 3/4″ plywood or MDF
- Wood glue
- 1 3/4″wood screws
- 3″ construction screws
- 2×4 lumber for base
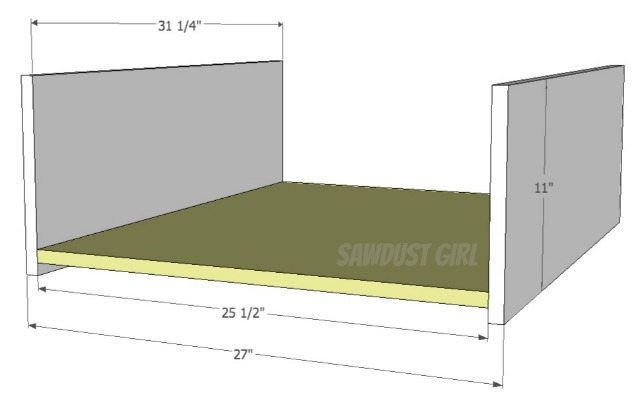
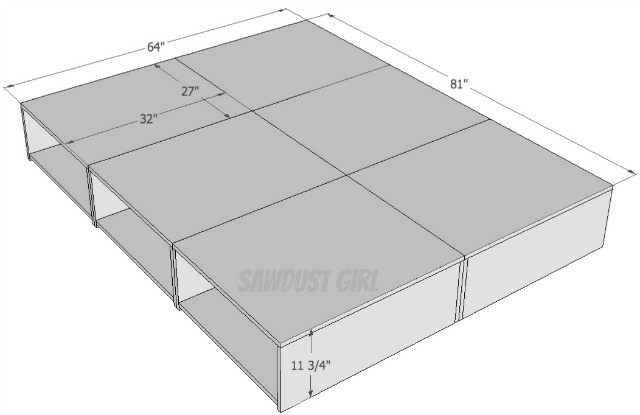
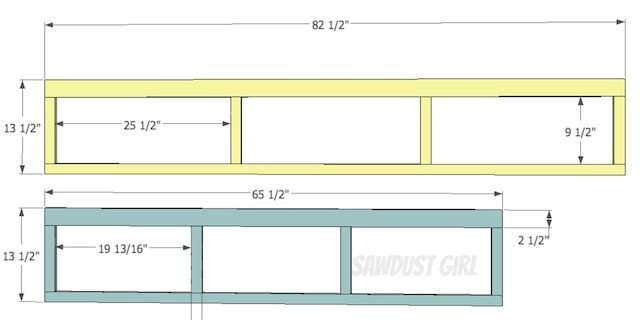
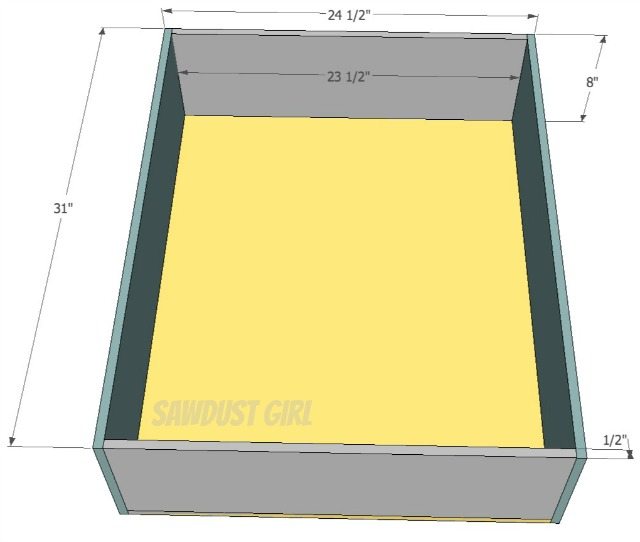
Step 1: Build Drawer Boxes
Build 6 identical storage boxes.
- Attach bottom to sides
- The bottom is attached 3/4″ from the bottom of the sidepieces.
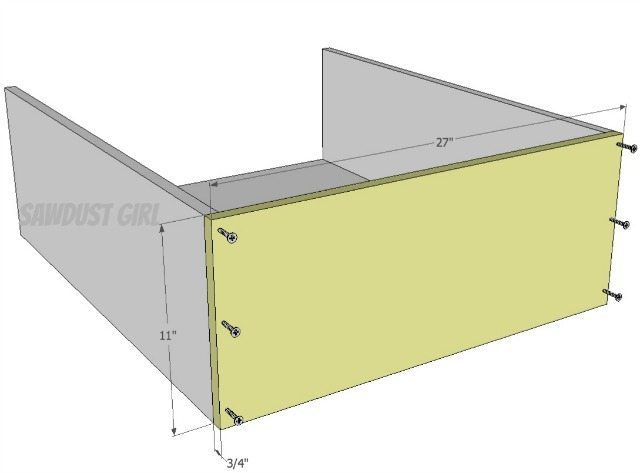
- Attach a back to the box
- Attach top
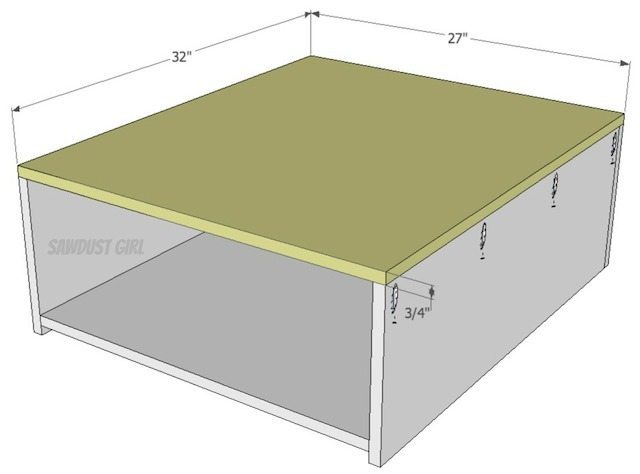
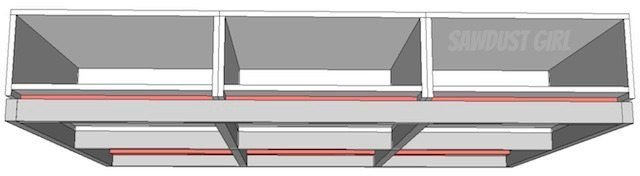
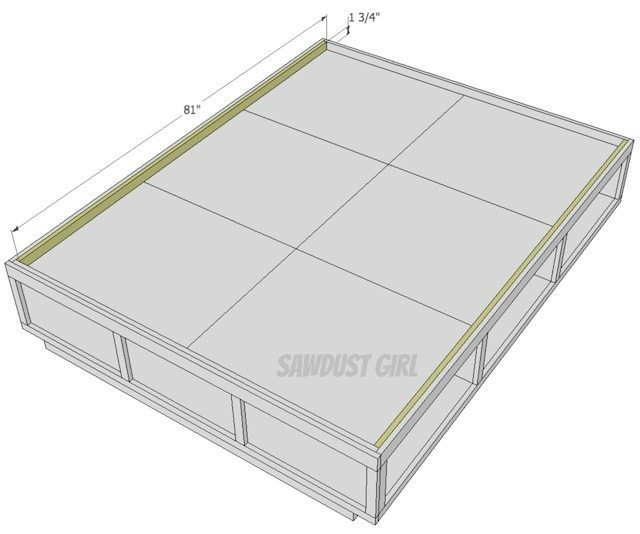
If you put all the compartments together this is what you should have. If your measurements are slightly different, adjust the next steps to fit YOUR compartments.
Step 2: Build the Platform Base
- Use 2×4’s and 3″ constructions screws to assemble as shown below.
Step 3: Secure Storage Compartments to Base
- Attach a 2×4 cleat to bottom of each storage compartment
- Each cleat should fit INSIDE the base.
- Set the storage compartment inside the base and secure the compartments together by driving 1 1/4″ screws into the sides.
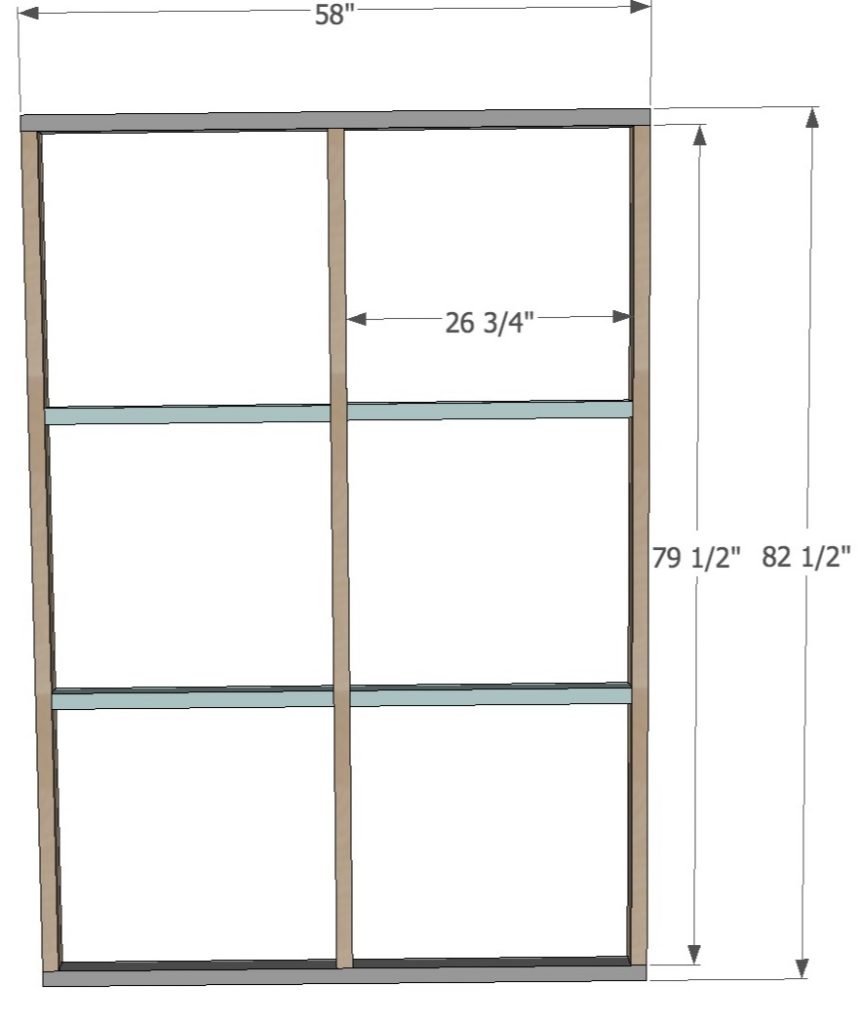
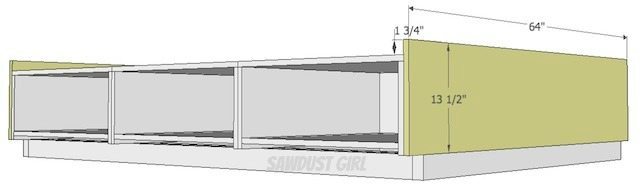
Step 4: Head and Foot pieces
Add “head” and “foot” to the bed frame. These should be 64″ x 13 1/2″ if everything is perfect. However, things are almost never perfect. So adjust the dimensions of your head and foot pieces to fit your actual bed frame. The width should be exactly the same. The height of your head and foot pieces should be 1 3/4″ taller than your bed frame.
- Use 3/4″ MDF or Plywood for your head and foot pieces
- Attach using 1 1/4″ screws driving through from inside the cabinet compartments. (You might have to climb inside to get enough screws in there.
- Each board extends above the platform by 1 3/4″
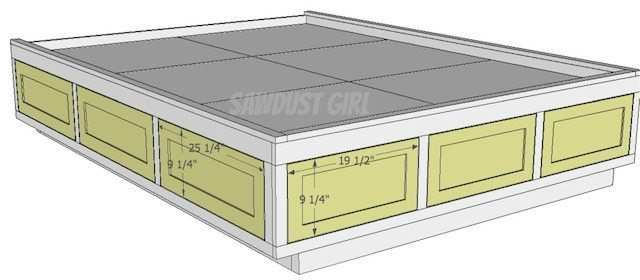
Step 5: Build and attach Faceframes
- Use 1×2 and 1×3 poplar.
- Build and attach with 1 1/4″ pocket hole screws.
- refer to post on building and attaching face frames for basic instructions
- Faceframes match height of head and foot
- side face frames go on first
- Footer faceframe extends to the edge of the side face frames
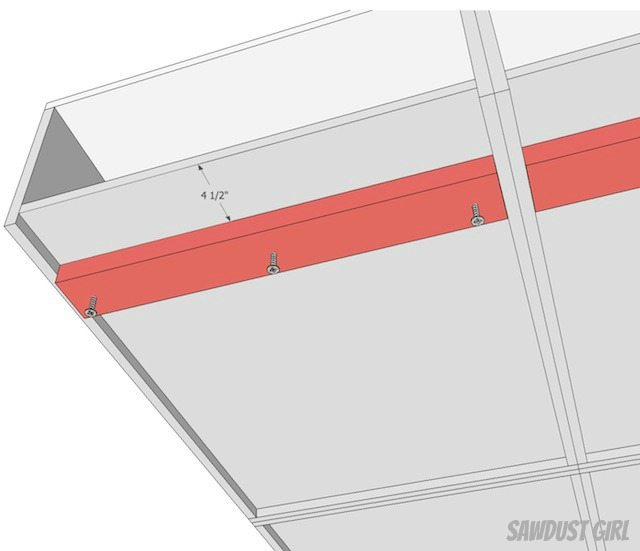
Step 6: Add filler strips
- Add a 1×2 to the inside of the two sides and then the foot
- Glue and nail (from the inside) the 1×2 flush with the TOP of the face frame and “foot”
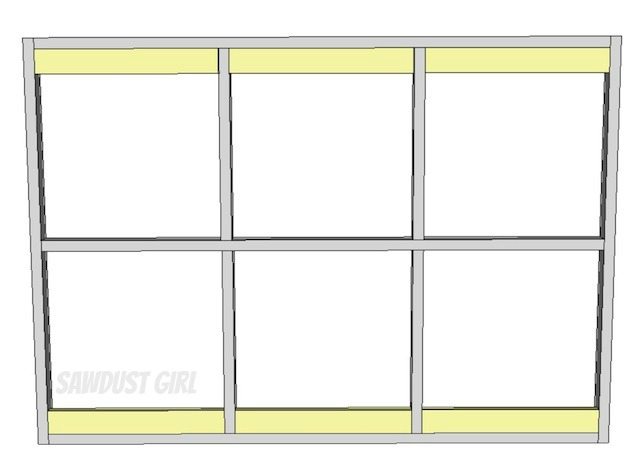
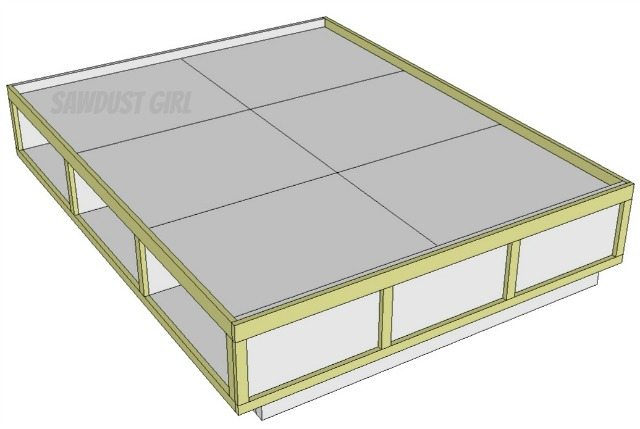
Step 7: Add Top Face
- Add another 1×2 to the top of the U-shaped bed platform
Phase 4: Drawers and Drawer Fronts
- Build and install drawers and drawer fronts using relevant instructional posts
Finish with paint or poly and enjoy!
You might find my Cabinet Making 101 and Painting Tips helpful too.
And if you REALLY like what you see here — I’d LOVE it if you share and pin my posts with ALL your friends! 😀
See other free woodworking plans for Beds
Sara says
Has anyone built this queen-sized bed? I’m wondering about approximate cost. Thanks!!
Donna C. says
This is awesome! I’m studying the plans before attempting this and am wondering if the dimensions for the base in phase 2 step 1 are correct? The boxes built in phase 1 are only 64″ x 81″ and per the pictures, the base is much smaller than the box portion, but the dimensions for phase 2 step 1 show the base as 69.5″ x 85.5″ which would stick out from the bed on all sides! 🙂 Can you let us know what the correct dimensions should be for the 2×4 base?
Thanks in advance for your help clearing up my confusion on the dimensions and for sharing such great projects on your site! 🙂
I’d like to make this but have an idea to do an upholstered version to be similar to a Pottery Barn bed I saw. If I make this, I’ll definitely send you pics!
Sandra says
Donna thanks for pointing that out. It looks like I inserted the photo from the Cal King base. Replaced it with the queen. Sorry about that and good job catching it!
Donna C. says
lol – that would explain it! I’ve never done a big project like this so I’m really going over all the details to make sure I know what I’m doing before I get started. Thanks for responding so quickly & changing the photo. Now it makes sense to me! 🙂 I’m excited to work on this! My poor mattress is sitting on the floor at the moment, so I desperately need to get working! Thanks again!
Karl Hageman says
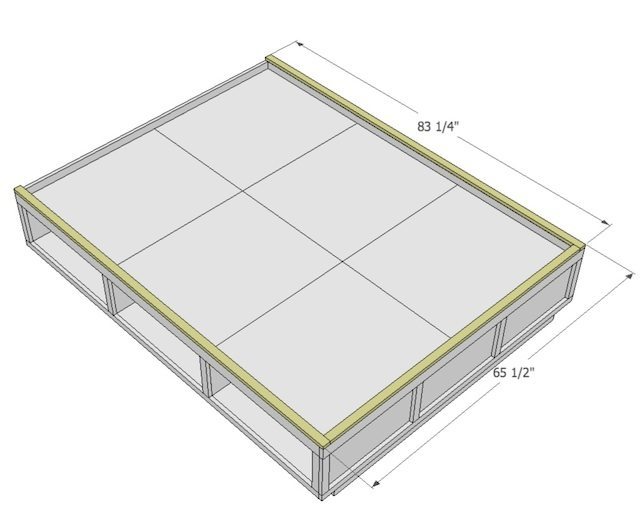
If all your dimensions are correct for a queen size implementation, why is it 84-1/2 wide and 65-1/2 long when the queen size mattress is 80 x 60? I made it to your specifications and, to my chagrin, the platform sticks out way beyond mattress on all sides. Looks kinda weird, let alone scratching legs on wood getting in and out of bed. Really quite surprised and disappointed. Guess I should have done more math before starting the build – bad assumptions on my part.
Karl. [email protected]
Sandra says
Yes the outside dimensions of the bed are 84 1/4 x 65 1/2 which creates a sort of ledge around the mattress. It’s a style – not for everyone. Sorry you’re disappointed.
CJ says
Love this. Are you going to shrink it one more time for a full size? My daughter wants one for her room and I would like to make it for her.
Sandra says
I don’t have it in the works at the moment but I may.
Jen L says
I would also love to see one in a twin size! But I’m thinking maybe two rows of drawers…
Robin H says
Could this be done with a trundle instead of drawers?
Sandra says
Not this particular plan as the drawer boxes are what support the bed. If you took those out to put a trundle in, there wouldn’t be anything supporting the mattress.
Meche says
I love the idea of this bed, but I have never done anything of this magnitude. Do you have the cutting diagram (I can’t remember what it’s called) available. Thank you very much.
Sallie says
A cut list! Yes, please.
James says
On the queen size platform bed with drawers included how many sheets of 3/4 plywood does it need to complete and how to cut to minimize scrap or do you have a list of items needed to make the bed . thank you very much for you time.
misty says
My Boyfriend and I are going to attempt to make this bed do you have a material list. I want to start getting supplies but have no clue how many 2x4s and such to get. Thank you for helping us people that can’t afford $1000 beds afford to have one just as nice and better bc its made by our own hands ??
Sandra says
I’m so sorry. At this time, I do not have a materials list for this project.
Sara B says
i know this is an older post, but my college bound daughter loves it and her and i are going to make it. can you give me a specific amount of plywood, screws and lumber need to buy? take 30 min to get to nearest lumberyard and only have 1 wknd to make it! really appreciate it. if you could either email or let me know you responded on here i would be very thankful!
Mike U says
I would also be interested in seeing a cutting plan for the plywood in order to minimize waste.
Thanks in advance
Sandra says
There isn’t one. You’ll have to draw one up yourself
Bryan says
Has this instructional been updated from previously mentioned dimensional questions?
Alexis Cuervo says
What kind of camera was used? That is a really good premium quality.
George Skinner says
I built this over the weekend for our basement bedroom. Came together very nicely, although I found the bed a bit higher than I was expecting. Material cost was pretty reasonable. I will likely build another one of these for our cabin!
Steve OReilly says
Built a version of this but adjusted a few sizes so as to rely upon available oak planks (max 1×8 for drawer fronts). Total material cost ran about $500 including 4 sheets 3/4 birch plywood (boxes), 2 sheets 1/2” birch plywood (drawer boxes), 6 2×4’s (base), oak for face frames: 3-1×6, 6-1×3, 1-1×2 and 3-1×8 for drawer fronts. I added push to open drawer glides to eliminate handles or pulls and give a clean look. Final product is sturdy and heavy. Lined the bottom of the base with 1/4” thick felt strips so the bed can be shifted without scratching the floor. This bed is a tank but can be broken down into pieces to relocate. Great project.
Sandra says
Nice! Thanks for sharing it was a success!
dan says
I am curious to know how you added the push to open drawer glides. In the instructions, I did not see any steps to add g drawer glides. Can you share the info.
Sandra says
I don’t believe there were any push to open drawer glides used in this project. I did install push to open cabinet doors in my kitchen. You can see that here:https://sawdustgirl.com/kitchen-island-with-hidden-cabinet-doors/
Chase Tinsley says
Could you possibly give me the dimensions for a king bed? Wanting to make this for the wife for extra storage for her shoes, etc.
Sandra says
All the parts would need to be reconfigured for a different sized bed. I don’t currently have plans for a king.
Chase Tinsley says
Wouldn’t you have to only change the width of the bed for a king? As the only difference is a queen is 60″ wide and a king is 76″ wide.
Sandra says
In order to change the total width, you have to change size of the storage cases that make up the base.