• Home
  • About
    • Personal Posts
  • Privacy
  • Shop
    • My Account
    • Checkout
    • Email
    • Facebook
    • Instagram
    • Pinterest
    • Twitter
    • YouTube
Sawdust Girl®

Sawdust Girl®

Renovation, cabinet building and woodworking plans and tutorials. Build like a Girl®

  • My Home
    • Clinton TN House
      • Clinton TN House in Progress
    • Maryville TN House
      • Maryville TN House Tour – Completed Rooms
      • Maryville TN House in Progress
        • Basement
        • Basement Storage Closet
        • Bedroom Office
        • Craft Room
        • Dining Room
        • Entry
        • Garage
        • Guest Bedroom
        • Hallway
        • Jack and Jill Bathroom
        • Kitchen
        • Kitchen Entry
        • Laundry Room
        • Library
        • Living Room
        • Loft
        • Madison’s Room
        • Master Bedroom
        • Master Closet
        • Pantry
        • Porch
        • Powder Room
        • Wes’ Office
    • Illinois House
    • Calderwood Cottage
  • My Workshop
    • Clinton Workshop
  • Build & Breakfast
  • Cabinet Making 101
    • Cabinets
    • Doors
    • Drawers
  • Projects and Plans
    • Countertops
    • Beds
    • Benches
    • Bookshelves
    • Desks
    • Gift Ideas
    • Holiday
      • Christmas
      • Halloween
    • Home Accessories
    • Kids
    • Kitchen Cabinets
    • Lockers
    • Nightstands
    • Organization accessories
    • Recipes
    • Sewing
    • Tables
    • Vanities
    • Wardrobes
    • Woodworking
      • Wood Finishing
    • Workshop
    • Workshop Storage and Organization
  • Remodeling 101
    • Baseboard and Trim
    • crown molding
    • Demolition
    • Door and Window Casings
    • Door Installation
    • Drywall
    • Electrical work
    • Flooring
    • Home Maintenance
    • Painting
    • Plumbing
    • Resources
    • Safety
    • Tile
    • Wall and Ceiling Treatments
  • Sawdust Squad
  • The Sawdust Diaries
    • Andrea
    • Ava D.
    • Beckie F.
    • Cara C.
    • Courtney B
    • Fawn T.
    • Jenn D.
    • Kelly C.
    • Kristy K.
    • Lara T.
    • Malisa B.
    • Marnie D.
    • Robin C.
    • Val F.
  • Tools
    • Products
    • Tool Reviews & Overviews
    • Inspiration & Ideas

Built-in Wardrobe with Side Cubby -free plans

All Posts, Free Plans, Wardrobes

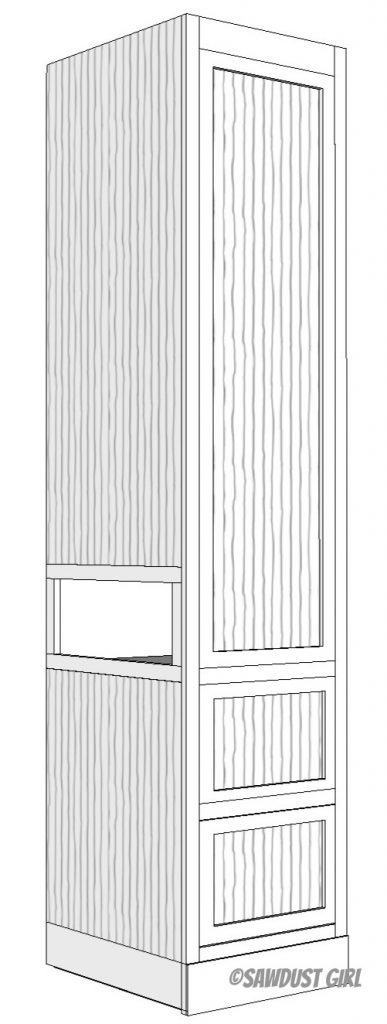
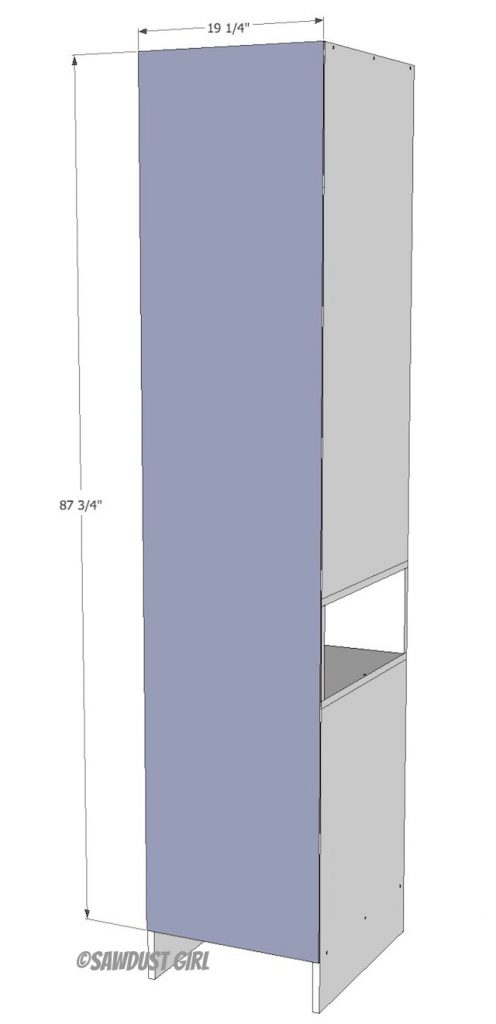
These are the woodworking plans for the built-in wardrobe with side cubby as seen in Kristy’s bedroom.  If building these wardrobes to flank the storage bench and queen platform bed . you would want to build two towers but reverse the cubby in one so the cubby faces IN towards the bed from both sides.

Kristy's bedroom reveal

Built-in Wardrobe with Side Cubby -plans

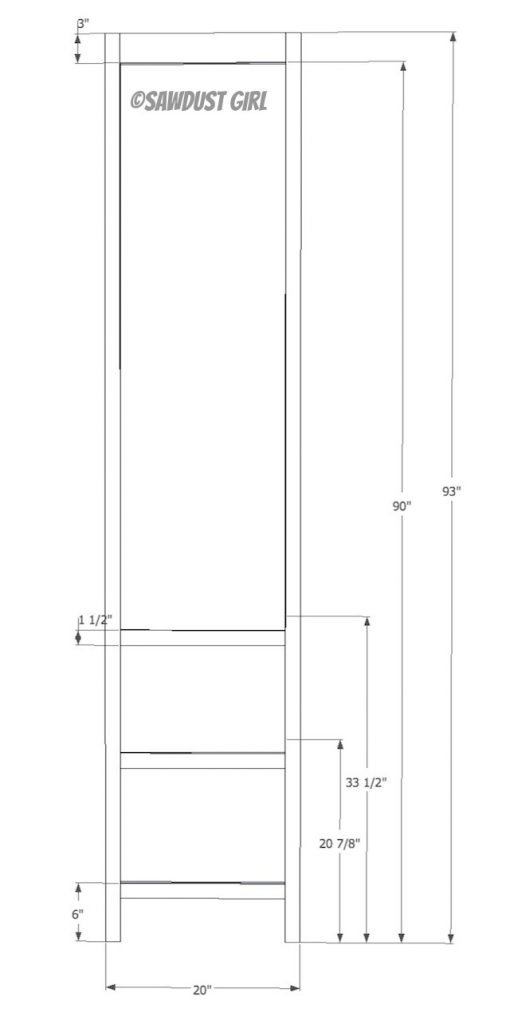
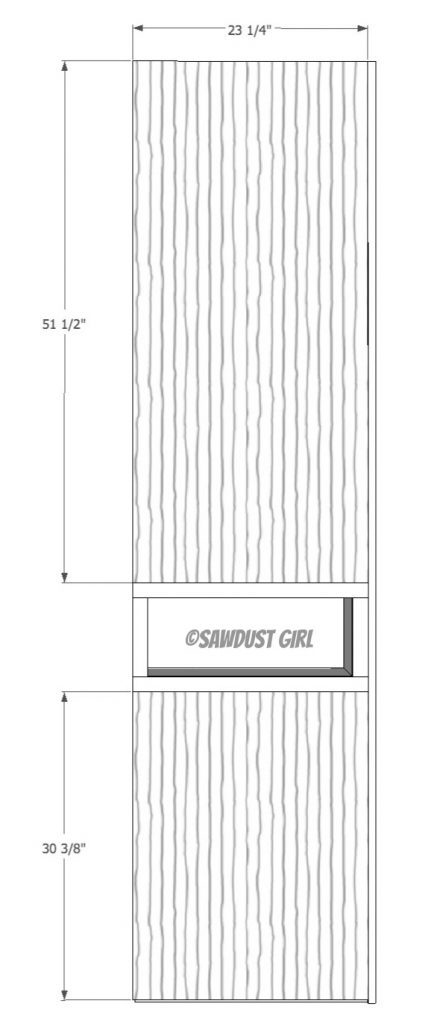
*You should adjust the height and width of your towers to fit your specific room size.

Rule of thumb for cabinet width; I hardly ever build a cabinet wider than 32″.

Bedroom Tower Cabinet

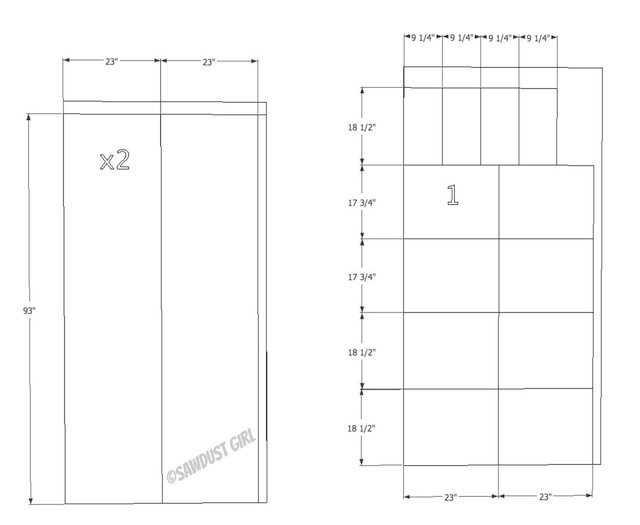
Cut List and Materials

  • 1 3/4″ wood screws
  • wood glue
  • 1 1/4″ pocket hole screws (pocket hole jig)
  • 3 sheets of 3/4″ MDF or Plywood cut as shown.

Cut list for wardrobe towers

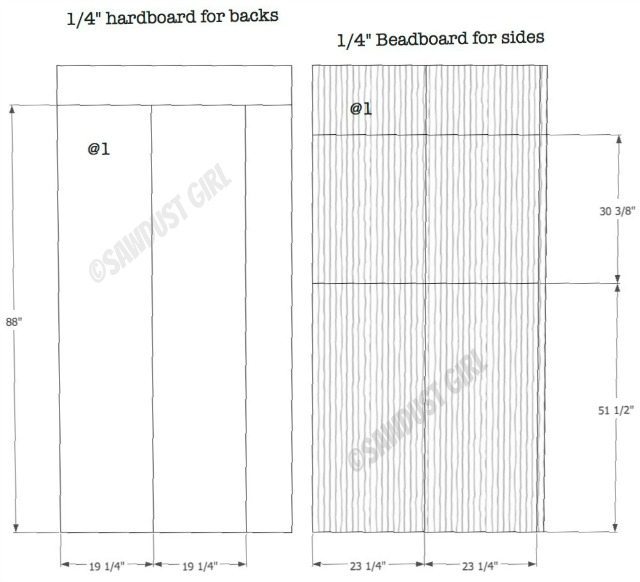
  • 1 sheet of 1/4″ hardboard or plywood for backs.
  • 1 sheet of 1/4″ beadboard or smooth panel for sides

Additional cut list for towers

Build it:

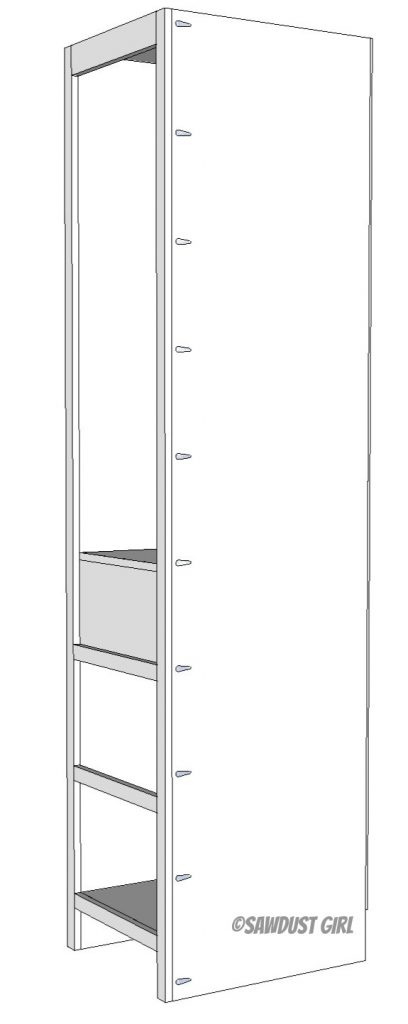
1.  Attach horizontal supports with 1 3/4″ screws through the side that is one full piece.  These will be covered with beadboard or flat panel in the end so there is no need to hide the screws.

Tower Assembly step 1

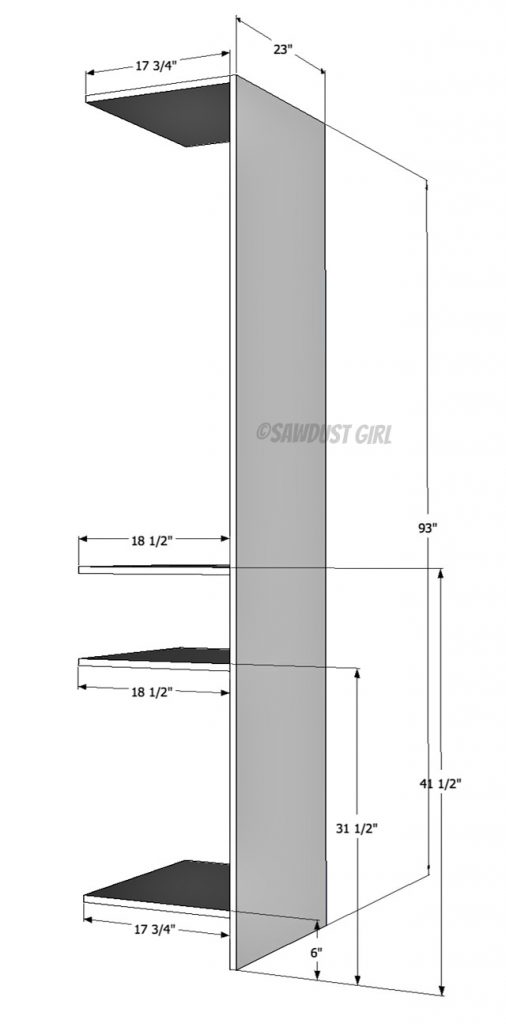
2.  Attach second side in sections keeping the cubby open.  You will have to assemble this cabinet laying on it’s back because this side won’t support itself.

woodworking plans for wardrobe tower with open cubby

Step 2 tower construction close up

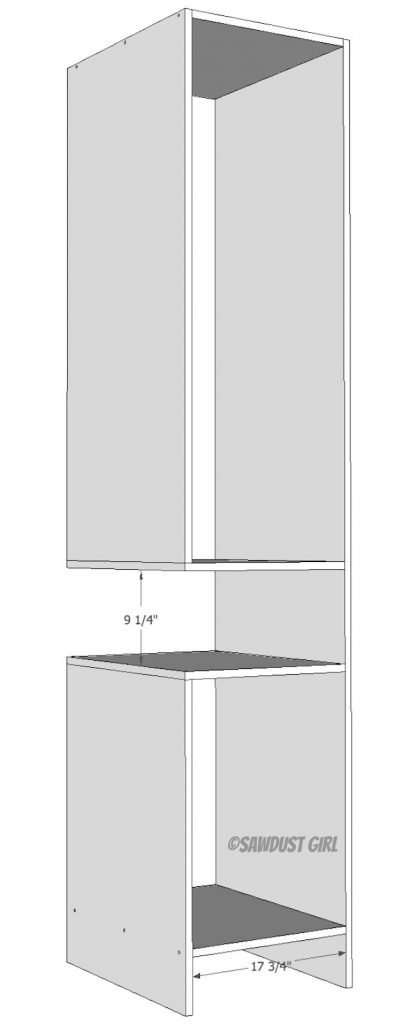
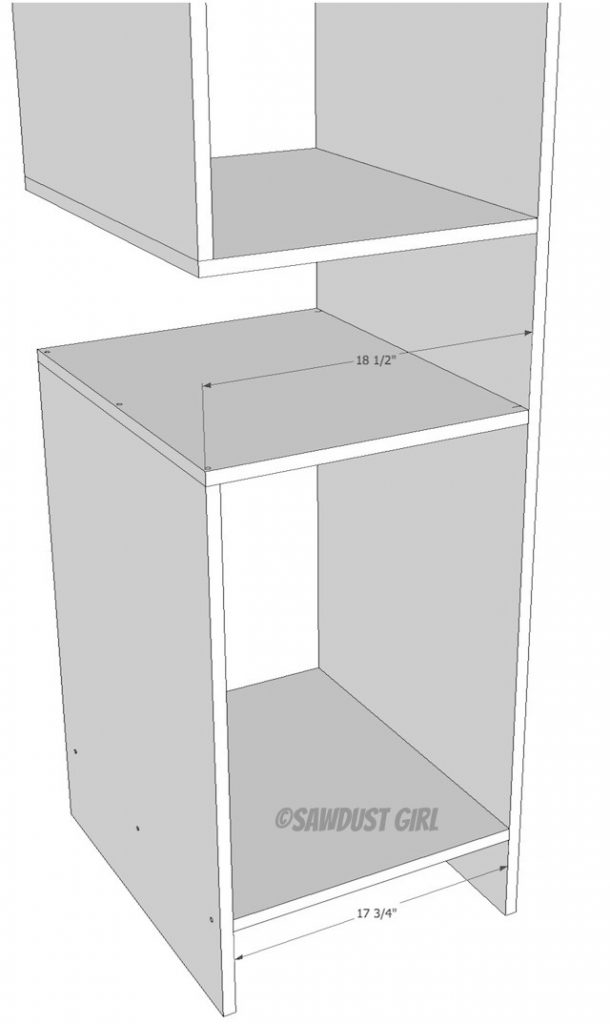
3.  Secure front and back of cubby.

*Remember you are accessing it from the side so you need to make one as a mirror of the other so both cubbies are open INSIDE as they flank the bed.

build a wardrobe

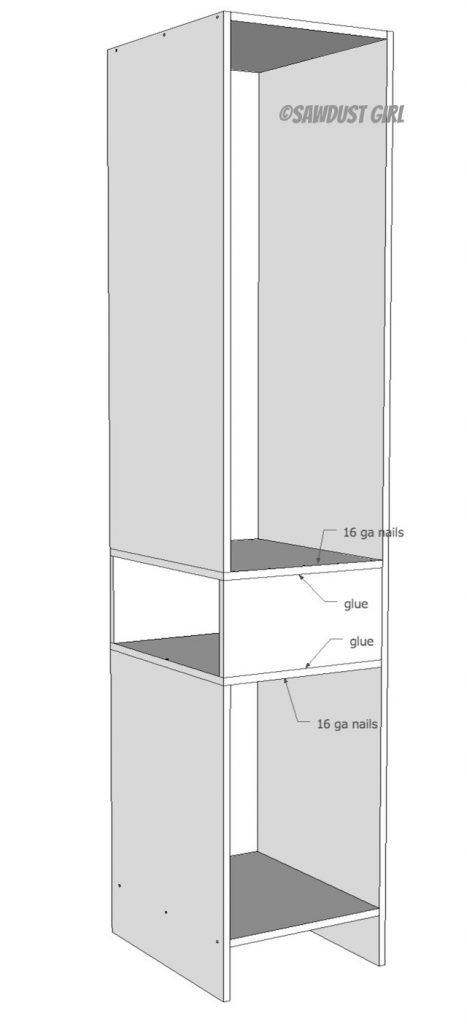
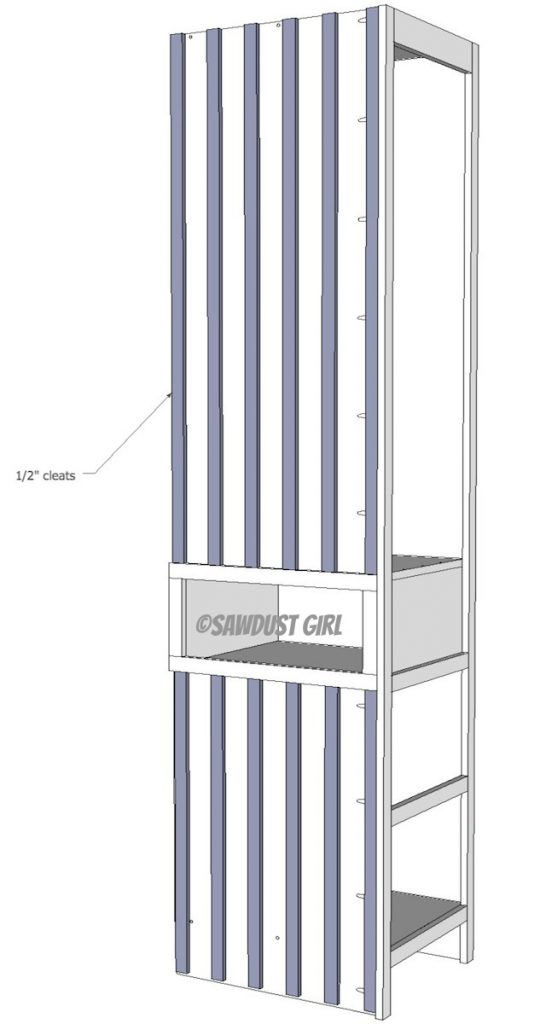
4.  Attach back cleats so you have something to secure the cabinet to the wall through.  Use pocket hole screws.

Tower Assembly step 4.5 attach cleats


5.  Square up and attach the back.  I use an air stapler to attach cabinet backs.

tower wardrobe cabinet

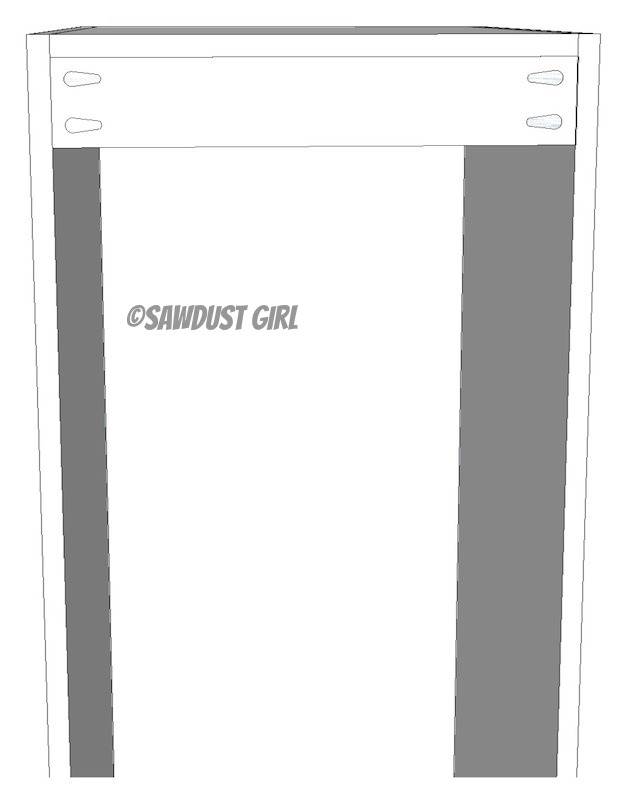
6.  Build and attach the faceframe using pocket hole screws.  The faceframe will have a 3/4″ overhang on the outside of the cabinets.  It should be flush with the inside of the cabinet.

build a face frame wardrobe cabinet free woodworking plans


7.  Build a side face frame to frame the cubby opening.  Glue and nail these pieces into place making sure to use nails that won’t punch through to the inside of the cabinet.

Tower step 8 frame cubby


8.  Add 1/2″ cleats above and below the cubby frame if you want your beadboard panel flush with the outside of your cabinet.  If you want it inset, leave the cleats off.

tower step 9 add 12 cleats to side


9.  Attach beadboard or flat panel to the visible side of your cabinet to cover all the screws and pocket holes.  I use caulk to glue it on or you can nail it on with small brad nails.

Tower step 10 beadboard

10.  Build drawers, doors and drawer fronts using the multitude of tutorials I’ve already provided, install and BAM —  You’re done.  🙂


Bedroom Tower Cabinet


Check out Kristy’s bedroom reveal to see what this all looks like in real life.  So much prettier than the drawings.  🙂  Get the rest of the free plans for this collection of Built-ins:

  • Queen Platform Bed with Storage
  • Storage Bench – Kristy Queen Bed Extension
  • Drawers and Drawer fronts for Queen Bed
  • Pull-out Storage Trundle

Kristy's bedroom reveal

Get my Cabinet Building 101 eBook.  All the information in one place that you can download and keep on hand!

$9.99Add to cart

October 4, 2013 · 5 Comments

« another toilet in my living room
Protect your fingers -use a drive guide with retractible sleeve »

Comments

  1. kristin says

    October 4, 2013 at 12:13 pm

    I am getting a kick out of the “Kristy Collection” title. Little did she know she would also have a (small) furniture line named after her.

    Reply
    • Sandra says

      October 4, 2013 at 9:25 pm

      LOL Coming up with names for furniture is hard — I decided that naming it after the Sawdust Girl that built it was perfect!

      Reply
  2. Sara says

    October 4, 2013 at 5:35 pm

    Just found your website a couple of days ago – love it!
    The projects are well thought out, and the plan write ups are so clear.
    The cutting layouts are especially helpful.
    Last night I was reading a lot of the collection posts and spent about an hour looking for THIS cabinet plan.
    Didn’t know it hadn’t been posted yet. Go, me ;-p

    Love the idea of having a project coach, so you may be hearing from us!!!

    Reply
    • Sandra says

      October 4, 2013 at 9:26 pm

      Why thank you Sara. Those cut list diagrams are time consuming so I appreciate hearing that they are helpful! Make sure you post some pics of your finished project on The Sawdust Diaries!

      Reply
  3. Kristen Lancaster says

    December 31, 2013 at 12:07 pm

    This is great! My partner and I will be doing this project over the next few weeks! I am havinbg some issues understanding the cuts for the faceframe though. There isn’t a cut list… help?

    Reply

Leave a Reply Cancel reply

Your email address will not be published. Required fields are marked *

Categories

New Post email notification signup

You Subscribed!

Legal Stuff

Terms of Use

Privacy Policy

Disclosure

Recent Posts

  • Lodge Update – Floors, Cabinets, Countertops, and Appliances
  • Lodge Kitchen Cabinet Progress
  • Halloween Mad Gab – Halloween Party Ideas
  • Concrete Backsplash or Vertical Wall Treatment
  • Building and Installing a Giant Faux Beam on the Ceiling

Disclaimer:

Although it is my intention to provide accurate plans and clear instructions, not all plans have been tried and tested. Using plans or information found on SawdustGirl.com indicates that you agree with the Terms of Use policy and will accept full responsibility for the process and outcome of any project you attempt. All plans are for private use only. Plans and information published on SawdustGirl.com may not be reproduced, republished or distributed in any manner without written permission from Sandra Powell, Sawdust Girl. Actual projects built using Sawdust Girl plans may be published on your own site without instructions or "tutorial" as long as you provide a link to my original post with full post title or "SawdustGirl.com" as link title.

Copyright © 2022 · anchored theme by <a target="_blank"