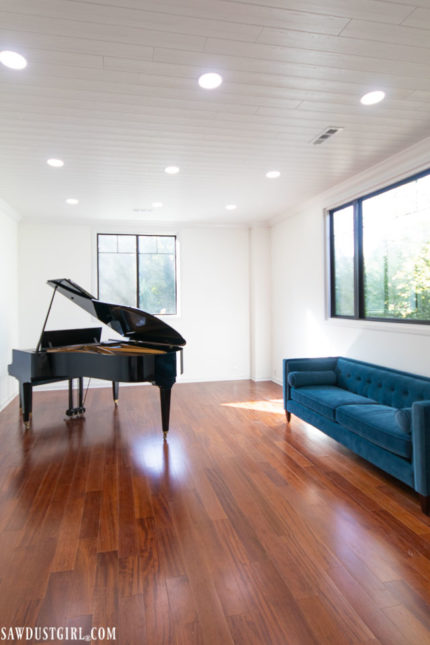
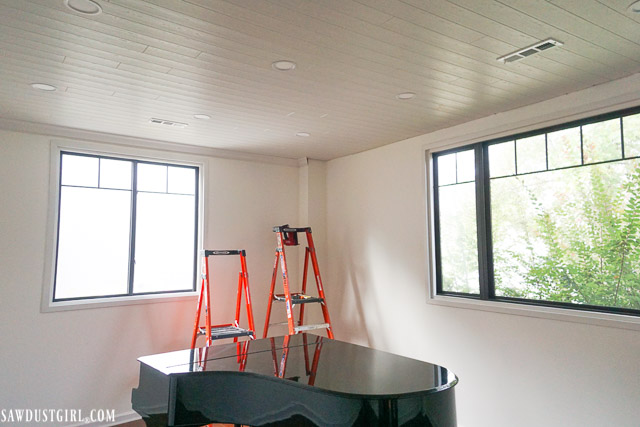
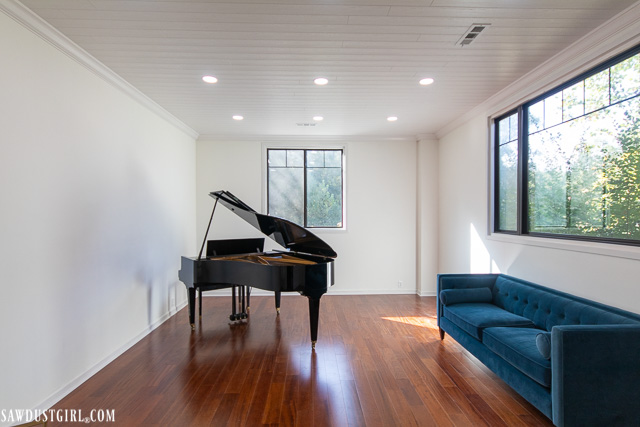
Guys, I’m so excited! Look at the new ceiling in my Piano room! What a big improvement over the unsightly acoustic tile, suspended ceiling that was there before! This ceiling was SO easy to install and I didn’t even have to take down the grid! I installed WoodHaven Planks from this post’s sponsor, Armstrong Ceilings, right onto the existing grid.
Before
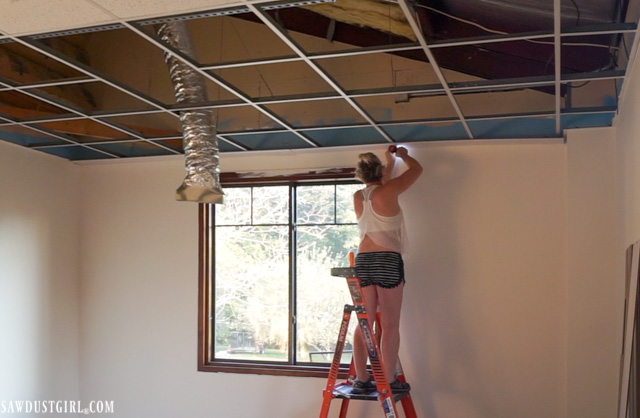
You remember what this room looked like before, right?
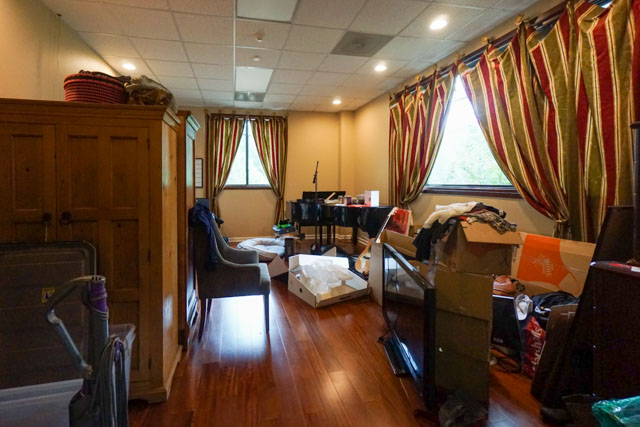
When I showed you guys the house tour, everyone commented on the drop ceilings. Apparently, a lot of you have them in your basements. I see them all the time in schools, medical buildings and commercial spaces, but I’ve never seen them on a main level of a residential home –before now.
A few months after the house tour, I got an email from Armstrong Ceilings about their product, WoodHaven Planks. When exploring their website, I saw the planks could be used on drop ceilings–AND that you can install them onto a drop ceiling grid! Life changing!
I’m not ready to tackle my whole house right now but we need one pretty room in this house! We need a space to escape from the rest of the “not our style” house. The Piano room made the most sense for this quick makeover.
Installation Video
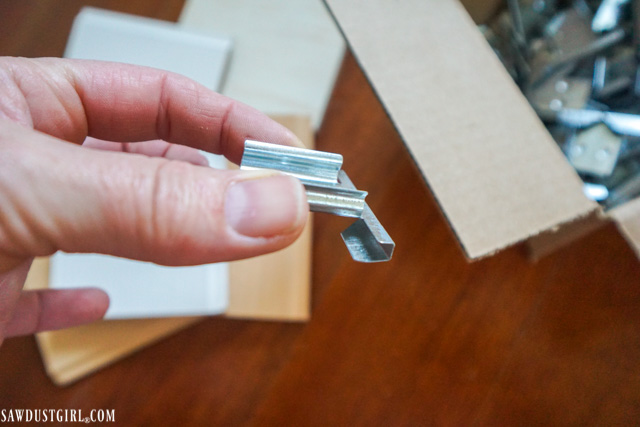
Easy Up Clips
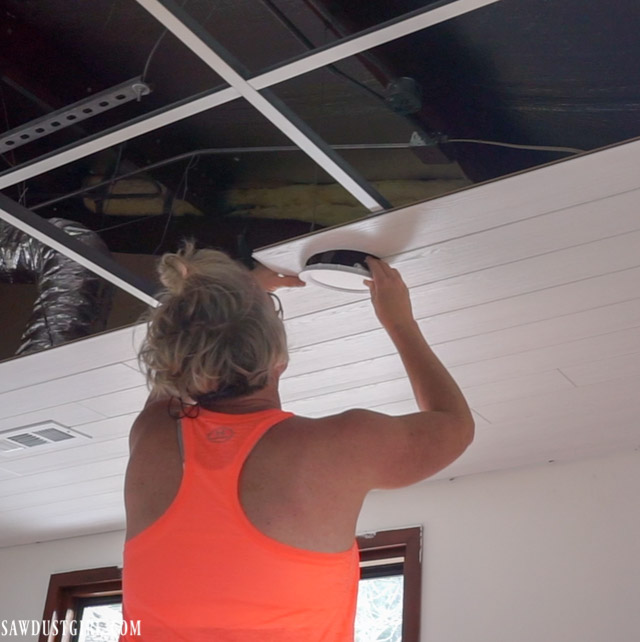
The magic of this system is in the Easy Up clips which fit onto a 15/16″ grid. The Easy Up clips snap onto the grid and have a hook that slides into the groove on the planks to secure them. When the ceiling is finished, there aren’t any visible fasteners or nail holes to fill.

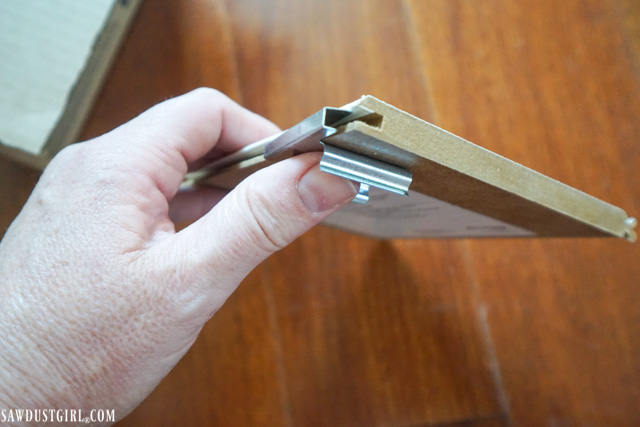
A great thing about the clips is that you can install and remove the WoodHaven planks easily; if you make a mistake (or realize you need to resize your light hole for the third time), you can just back the clips up, take the piece down, and go trim the piece again. Awesome!
Installing WoodHaven Planks to Drop Ceiling Grid
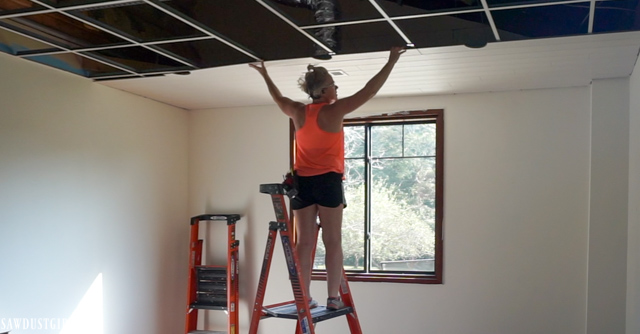
For the first row, I used a laser level to ensure the whole row ran in one solid line. Then, I secured these planks to the grid with screws so they wouldn’t move around as I tapped subsequent rows in place.
Once that first row was in, the rest of the planks tapped into place really easily. And pretty quickly. All by myself! One person ceiling installation is a game changer. The planks are 84″ long and I could install one full plank all by myself without moving the ladder, if I place it correctly.
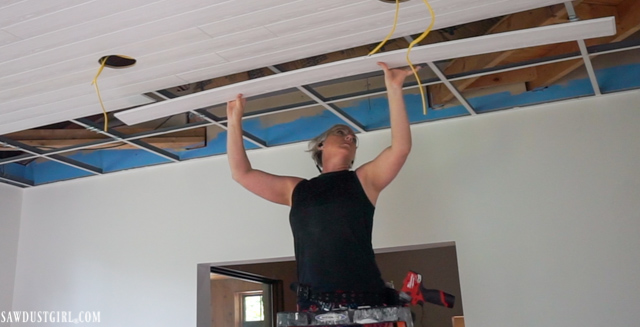
When I did have to move the ladder (a couple times), I just pushed the clips in on the right side, got down and moved my ladder, then pushed in the rest of the clips.
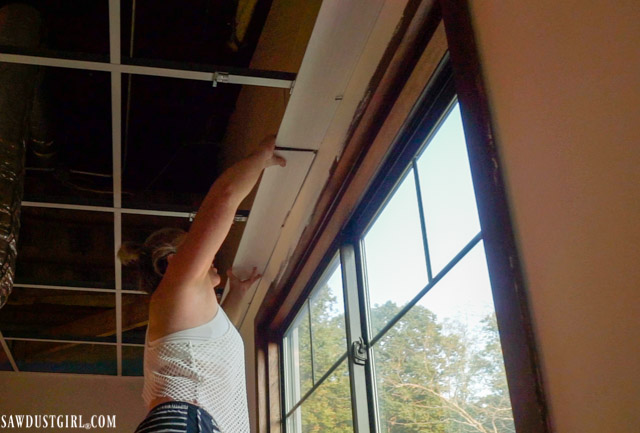
Vents
There are two vents in this room. Obviously, I wasn’t going to use the existing, big, 2’x2′ drop ceiling vents!
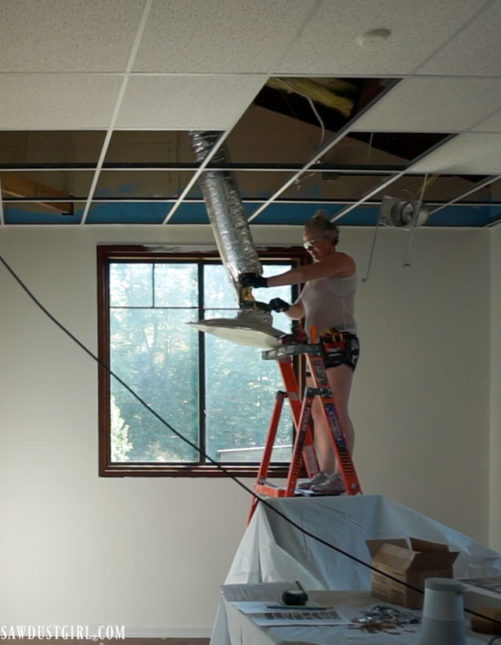
A traditional vent is more aesthetically pleasing, IMO.

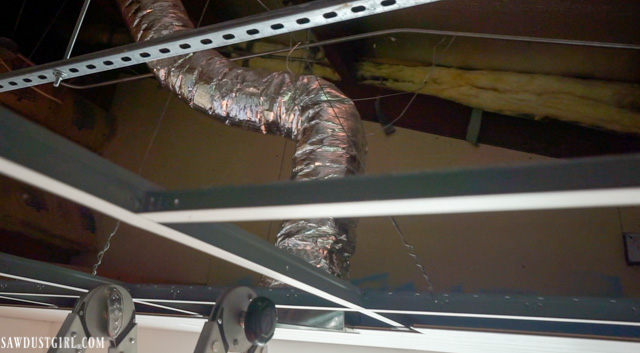
The suspended ceiling (and attached planks) can’t support any substantial weight so ducting needs to be suspended with 12-gauge hanging wire.
Switching out from the 2×2 square, drop-ceiling, vent to a normal looking vent wasn’t that difficult!

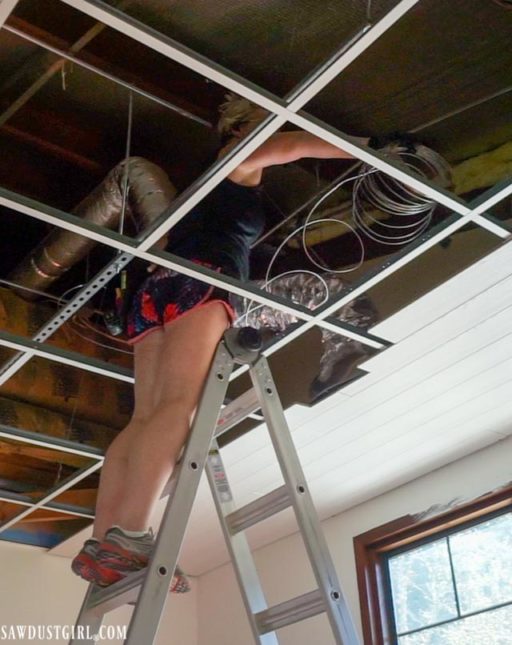
- I cut through the mess of tape on the flexible ducting to create a clean end
- Pulled back the outer layer and insulation
- Attached the inner liner to the vent boot with a heavy duty zip tie
- Secured that joint with metal foil tape
- Pulled the insulation and outer layer back down and secured it to the boot with another zip tie
- Covered, reinforced, and sealed that joint with more metal foil tape

I attached a block of wood to the vent to keep it positioned, flush with the planks. In hind sight, I probably didn’t need to because once I screwed the grill in place, it would have held the boot in place….but anyway).
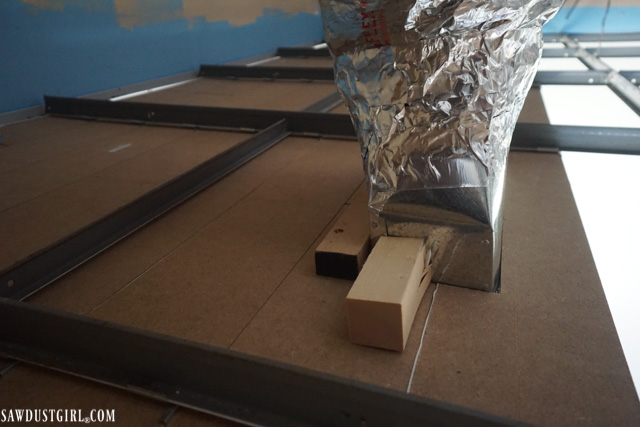
I also held a scrap of wood above the planks while driving in the screws that secured the vent cover. The screws that come with those covers are about 3″ long and the planks are less than 1/2″ thick. I wanted some extra material to drive those long screws into. (It’s not pretty but it did the trick.)

Lights
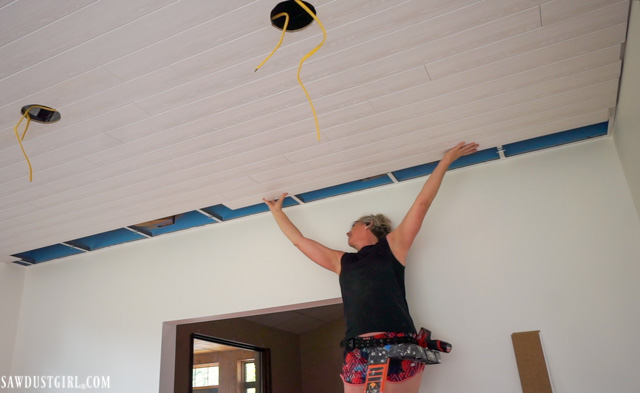
The previous light situation included; two, 2’x4′, fluorescent lights on two separate switches, as well as seven can lights. Three on the left and four on the right that were each operated with their own switch. I had my electrician come in and give me ONE dimmer switch to control all nine of the new, integrated LED, canless lights I installed.
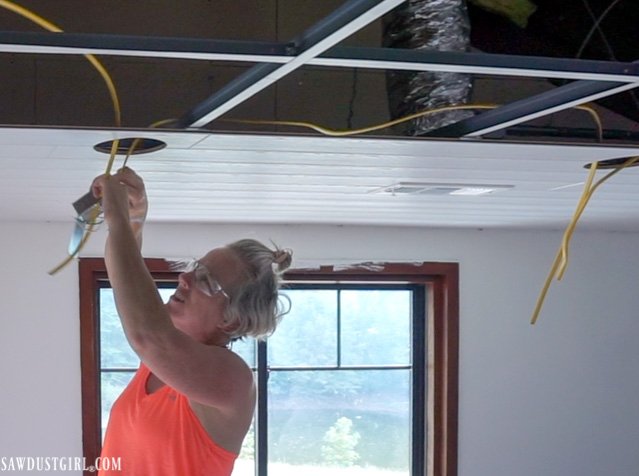
Typically, lights would need to be independently supported by something other than the ceiling planks. I didn’t really want to deal with all that hassle, so I ordered some lights that would lessen the load… These recessed lights are very light so I didn’t need to suspend them from anything! All I had to do was set them in through the hole and rest them on the planks. Then, I snapped the trim kit in place, and voila!
Well, I shouldn’t say voila like it was that easy…It wasn’t THAT easy. I had to cut all the holes before installing the planks. I put tape on the grid to remind me of the general location of where I wanted a row of lights. Then when I got to that area I:
- put up a couple rows of planks
- measured and marked the location for the three lights in that row
- took those rows of planks back down
- cut out the holes
A few times I had to remove multiple rows of planks to resize holes because I hadn’t made them quite big enough. There’s not a lot of leeway with the trim. You can’t cut the holes too big or you might have to use some caulk to zshoosh the hole… I’m not saying I did, but I’m not saying I didn’t.
I installed the lights, centered between two adjoining rows of planks — to make it easier to cut the holes. After marking the center for each light, I used a paper template to draw the correct size circle. I cut the holes using a jigsaw.

This technique made it easy for me to cut out the holes, even if it made the spacing between lights not EXACTLY symmetrical. There’s enough space in between the lights that I don’t have to worry about a couple inches difference.
Clip Spacing
When installing the planks, the clips have to be installed on the grid that is perpendicular to the planks. Each row of planks should be secured with a clips on every perpendicular grid line. In a couple locations, the cross braces were in the way so the clips couldn’t slide into place. I just took those pieces out.

Final Touch
One thing to note is you have to leave expansion gap around the perimeter of the room to allow for contraction and expansion. In addition to being a lovely, architectural detail, crown moulding hides the expansion gap and supports the planks around the perimeter of the room. Although I did install the whole ceiling by myself, crown moulding is a two person job (for me) so Julie helped me with that.
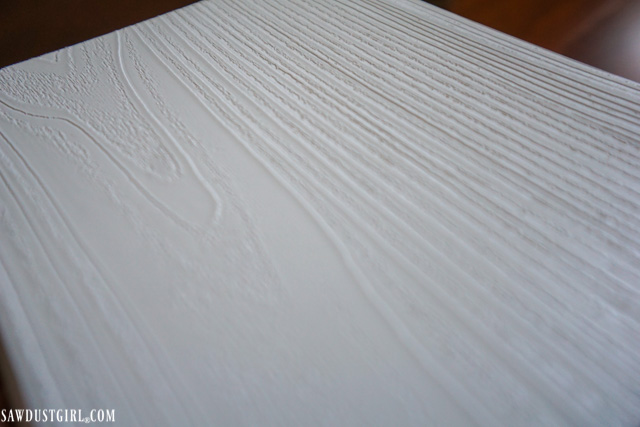
The WoodHaven planks come in a variety of finishes. They are pre-finished, so no need for painting or finishing. You just put them up and Boom, you’re done.
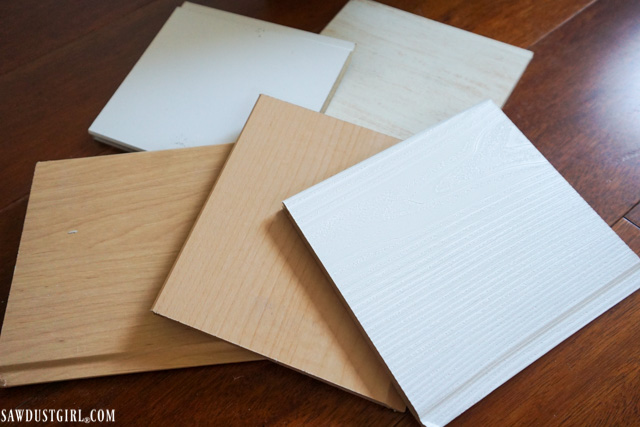
I chose WoodHaven Classic White because, you know me and white ceilings. I like the look and feel of the real wood grain on the Classic White planks.
Finished! (but for art and furniture…)
So, here is the progress on the piano room so far:
- A fresh coat of paint made a big improvement.
- New ceilings are a HUUUUUGE improvement.
- New, normal looking vents.
- Much better lights (on a dimmer switch to create ambiance in the evening when someone is giving us a piano concert). Woohoo!
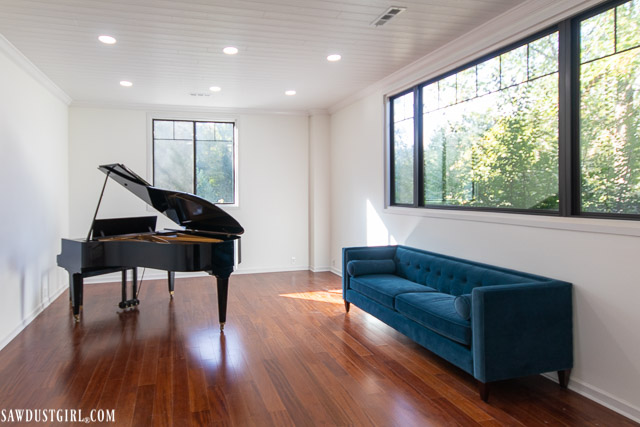
Even though it’s not actually furnished, I can go into my beautiful room and sit on the sofa or play the piano, and just enjoy! I won’t even let myself be bothered by the windows, which are oddly high. Eventually we will add on a new wing to this house and probably change a lot of the existing space and make the whole house more…our style. Because we don’t yet have a “big picture” plan for this house we aren’t doing any major renovations. This “room redo” made a world of difference without any major demo. Wes is especially happy about that!
I can’t wait to bring in some art, a rug, and additional furniture to create a little oasis of loveliness in our odd little house. The transformation of this room almost makes me shed a happy tear. After moving out of Richwood, right after making it reaaaaly beautiful, it’s nice to have one beautiful space in this house.
Big thanks to Armstrong Ceilings for partnering with me on this room makeover!
Check out more of my Ceiling Projects
- Whitewashed pine ceiling I installed in the Lodge
- X shaped Box beam ceiling tutorial
- Faux V-Groove plank ceiling I put in my previous craft room
- Build and install a Faux Wood Beam on the ceiling
Karen says
Huge improvement, and I’m so happy to know that this product exists! I’m shopping for a new house and have seen some otherwise-great candidates that have ALL drop ceilings on the main floor. Armstrong to the rescue!
Sandra says
I’m so glad you saw this post Karen. I was so excited to find this product could be installed on a suspended grid. I really didn’t want to build a traditional ceiling (if that is even possible in this house) but really want a normal looking ceiling for a house. So this is an awesome discovery!
Josh says
I have a quick question. Your ceiling turned out great! We’re finished installing and now putting up crown. Since the instructions said to not nail the crown into the ceiling, did you just nail the bottom of the crown into the crown into the wall?
Sandra says
It’s been a couple years since I did this project so I don’t remember but I probably didn’t read that part of the instructions. 😉
Casey says
Do you still have the option to access behind the ceiling? We were looking to install this in the basement instead of Sheetrock to still be able to access pipes and ductwork in an emergency. Curious if you would have to take the entire molding out and then the entire thing down until you got to the problem if there was one…
Sandra says
No, there isn’t access above without removing the planks. The good thing is there are no nail holes (except on the perimeter under the crown) so the planks can go back up after dealing with the issue… Unless there was water damage which is the only reason I’ve ever ripped out a drywall ceiling. In which case I had a huge drywall mess to deal with.
Julie says
Great job, looks fabulous!
Sandra says
Thanks so much Julie! Hope you are doing well. It’s been a while… 🙂
Pam says
Your ceiling is lovely. I wonder if they have ceilings for ceilings without a grid.
Sandra says
The WoodHaven Planks can be installed over traditional framing, drywall or popcorn ceilings too. Not just on a grid ceiling. It’s just super duper fantastic that they can also be installed on a grid (for those of us that have grids).
Tammara says
Wow never knew there was an alternative. Ceiling looks fantastic!
Sandra says
Thanks Tammara. I wasn’t aware of this product (and installation process) either. So glad to have found it!
AJ says
Who knew this product existed? It looks great! I have some of the 2×4’ ugly panels in my basement that I would love to get rid of and this is a wonderful option! Thanks.
Sandra says
I certainly didn’t and was so excited to find out about it! Share pictures of your basement when you’re done.
John K. says
So excited to see this! I want to do this in ‘Woven White’ in my master to cover the popcorn!
Sandra says
I want to see that before/after John!
Janina says
You are truly Wonder Women!! So much talent . I am so jealous. AND you do fabulous work too!
Sandra says
Thank you Janina. I definitely love this room SOOOOOoooooo much more now!
Karen Crabtree says
Once again you did it! Wow from pretty bad to gorgeous.
Sandra says
Thank you so much! I love walking into that room now. It’s definitely the prettiest room in the house.
Alan Ross says
Great job as always! Let me know when you are going to sell those beautiful drapes!???✌?️
Sandra says
I think Penny took those to the donation center while I was on vacation last week. Otherwise, I’d gift them to you! 🙂
Bill Coghlan says
Great ceiling improvement.
Sandra says
I 100% agree! Thanks Bill.
Tracy says
Love this idea. Do you have to have drop ceilings? Could this be used on a drywall ceiling that has the popcorn look? Thanks.
Sandra says
Thanks Tracy. You can install WoodHaven planks on walls and ceilings utilizing quite a few different installation methods. This would be a great option for covering popcorn ceilings!
Joan says
Could you please put in a link to Pinterest!
Sandra says
Hi Joan. Do you mean a link so you can pin this post? There should be floating share buttons on the side, including Pinterest.
Margret B. says
That looks fantastic! Really wish you had posted it about six days ago, when my sister had the great idea of updating the drop ceiling in their den and we had to scrape, sand, and prime the grid and replace all the tiles before they put their house on the market. That would have looked so much better!
Sandra says
Oh wow that sounds like so much work! Wish the timing would have worked out better too. 🙂
sweetfe says
Brilliant ceiling solution! That room looks amazing! The weirdly high windows do not seem to matter anymore…. do you think the previous owners were nudists? The room looks just amazing! WTG!
Sandra says
LOL I’d never wondered about that before. Ha There are so many weird things in this house I don’t even try to imagine “why” anymore. LOL
Teresa Kirkland says
Monumental improvement! As much as I detest drop ceilings, I have it in the basement. It’s nice to know that there is something else out there that can be used, that is much more eye appealing without having to resort to drywalling. It’s a pain in the back side when something leaks or you need to get access to anything else. Thanks!!
Shannon says
Can you tell me what the finish (sheen) is like? Two different people at Armstrong gave different answers. One said ‘flat’ and one said ‘semi-gloss’. Just wondering if it’s pretty shiny. By the way, your room is gorgeous!!
Sandra says
I would say “satin”. It definitely doesn’t look like a semi gloss but it’s not “flat” either. There is a slight sheen.
Amanda says
Gorgeous! About how many sqft is the ceiling and how long did this take to complete? Thanks!
Sandra says
The room is about 19×20 and it went pretty fast. I had to deal with lights and vents which tool the longest.
Toni says
Hi! Great idea! If there is a need to get to anything in the ceiling or a plank needs replacement from a leak, would it be a pain to remove a few planks?
Sandra says
Since they are fitted together via tongue and groove, you wouldn’t be able to remove them other than from the border in. Meaning, you would have to remove the crown moulding, and then take out enough planks to achieve access. I have access to my attic in two rooms in the house and don’t anticipate needing to access above this room. Other than needing to replace the lights when they burn out, and they are replaceable from below.
Megan says
We are finishing our basement. My husband wants to put in a drop ceiling so pipes and such can be accessed but I’m not excited about it. You mentioned the planks were easy to remove. Is it only when installing? Or would they be removable on a drop ceiling grid if we need to access the pipes in the future after we completed the renovation? Thanks did your help!
Sandra says
It won’t be easy to access pipes (or anything) in the middle of the room because the planks are secured together with tongue and groove. They are easy to pull out, but you have to pull them out starting at an edge.
Maha says
That’s amazing! I appreciate the video and all the tips! I have to ask, how much did this ceiling cost you?
Sandra says
This is a project that I partnered with Armstrong Ceiling on so they provided the product to me.
Christine Nickerson says
Hello, Can you tell me which led lights you used? Thanks!
Sandra says
The exact ones I purchased are currently unavailable but they are like these: https://low.es/3cZu3RZ
Christine O says
I really like how your ceiling turned out! How are you liking the ceiling so far and would you do it again? Do you think this would be a viable long-term solution for a kitchen ceiling? Any thoughts would be appreciated!
Sandra says
I would totally do it again in a room that I don’t need access above through traditional inserts. There aren’t any mechanicals or water…anything I would need access to above this room, so this ceiling is a good option.
Connor S says
Looks amazing! Was the grid suspended from a ceiling above, or is it strong enough to support the weight of the planks?
Sandra says
The grid is suspended and is adequate for these planks because they are made for this.
Helene says
Is it expensive?
Sandra says
Expense is subjective and prices change. Best thing to do is price it out and decide what you think.
Eva says
Hello! How has this held up? We’re looking for options for our drop ceilings and love this look and how easy it is- but the product is expensive for the square footage we need. We’d love to hear how it’s been since the install before we splurge!
Sandra says
It looks exactly the same as when I installed it. Beautiful!
David says
Looks amazing, planning to do this with our basement 2’x4’ grid. Appears that you installed planks perpendicular to the “main beams” and parallel to the 2’ cross beams. The Armstrong directions say do the opposite, but I think they got it wrong, you think?
Tasha says
Amazing!! I’m moving into a home that has drop ceilings throughout (yuk) and this is a game changer. Thank you for the article!
Celeste says
What type of recessed lights did you use?
Sandra says
Lighting is changing super fast so availability of exactly what I purchased is not likely. I go for 5000K high CRI led lighting and the newer ones available that don’t require a can are amazingly easy to install.
Chris says
Wow those planks look so much better then the drop ceiling tiles.
Doreen says
This is EXACTLY what I want to do in my condo bedrooms which both have hideous acoustic (drop) ceilings. I googled “installing wood plank on drop ceiling grid” and your article/video came up. Thank you so much for the detailed explanation and video. Your piano room looks beautiful. I hope to have a similar outcome. Peace
Cathy says
Your room is beautiful!Looking to mine .It is 20×20. Can I ask the cost to do yours??
Reba Morrison says
Can you provide me with a person name that can give me a estimation on removing my ugly drop ceiling and replace it with a sheet rock ceiling please.
Sandra says
You would have to find someone in your area that can give you an estimate.
suzanne says
Looks great! What size crown molding did you use?
Natalee Esposito says
Have you had to access underneath the panels yet? i heard you have to take all of the panels down up to the point you need to access, which seems like a real pain in the a**
Sandra says
I haven’t needed to but yes you would have to pull them down to that point. The panels are super easy to pull down and put back up. If you installed crown moulding and caulked it, like I did, that’s going to make removal more difficult.
Cody says
This turned out great, thank you for sharing the process, always love to see it!
Keith Heimann says
This is terrific — we’re really grateful to have found this! If you need to remove a plank to get access to the plumbing/electric, etc., is it difficult to take a few down and then reinstall? Thanks very much for posting this!
Sandra says
They are easy to remove but you can’t remove out of the center because they are tongue and groove. You have to pull them out from start- to where you need to access.
Kristeen says
I’m super excited to have found your post. My house has drywall drop ceilings on the lower level, except the one unfinished room. We’re have been remodeling it for my son’s basement room for about a year now and I was going to cheap out and get the regular drop ceiling until I saw your post. We had some set backs, one of them being these planks being out of stock because production was behind, but as soon as they became available, I placed my order, so I’m excited to see how it all turns out.
I did see your mentioning removal for plumbing. Would you recommend starting where the plumbing is or ending where the plumbing is? I was thinking the latter, so last installed first to be uninstalled if need be.
Sandra says
The planks are tongue and groove so it’s not possible to remove them from the middle of the room. If you have to remove you have to work backwards from the edge where you ended. So, yes, last to be installed – first to be uninstalled.
Anna Richmond says
Beautiful ceiling!!! Wonderful video and photos demonstrating the installation. I’m about to start my project for a basement ceiling and was wondering what pink color you would recommend for the final crown molding that would match the ceiling?
Anna Richmond says
I meant paint color for the final crown molding. Sorry for the typo.
Sandra says
LOL I was confused at the “pink” question. I used Falling Snow (I think it’s a Behr color) in sherwin williams ProClassic semi gloss.