• Home
  • About
    • Personal Posts
  • Privacy
  • Shop
    • My Account
    • Checkout
    • Email
    • Facebook
    • Instagram
    • Pinterest
    • Twitter
    • YouTube
Sawdust Girl®

Sawdust Girl®

Renovation, cabinet building and woodworking plans and tutorials. Build like a Girl®

  • My Home
    • Clinton TN House
      • Clinton TN House in Progress
    • Maryville TN House
      • Maryville TN House Tour – Completed Rooms
      • Maryville TN House in Progress
        • Basement
        • Basement Storage Closet
        • Bedroom Office
        • Craft Room
        • Dining Room
        • Entry
        • Garage
        • Guest Bedroom
        • Hallway
        • Jack and Jill Bathroom
        • Kitchen
        • Kitchen Entry
        • Laundry Room
        • Library
        • Living Room
        • Loft
        • Madison’s Room
        • Master Bedroom
        • Master Closet
        • Pantry
        • Porch
        • Powder Room
        • Wes’ Office
    • Illinois House
    • Calderwood Cottage
  • My Workshop
    • Clinton Workshop
  • Build & Breakfast
  • Cabinet Making 101
    • Cabinets
    • Doors
    • Drawers
  • Projects and Plans
    • Countertops
    • Beds
    • Benches
    • Bookshelves
    • Desks
    • Gift Ideas
    • Holiday
      • Christmas
      • Halloween
    • Home Accessories
    • Kids
    • Kitchen Cabinets
    • Lockers
    • Nightstands
    • Organization accessories
    • Recipes
    • Sewing
    • Tables
    • Vanities
    • Wardrobes
    • Woodworking
      • Wood Finishing
    • Workshop
    • Workshop Storage and Organization
  • Remodeling 101
    • Baseboard and Trim
    • crown molding
    • Demolition
    • Door and Window Casings
    • Door Installation
    • Drywall
    • Electrical work
    • Flooring
    • Home Maintenance
    • Painting
    • Plumbing
    • Resources
    • Safety
    • Tile
    • Wall and Ceiling Treatments
  • Sawdust Squad
  • The Sawdust Diaries
    • Andrea
    • Ava D.
    • Beckie F.
    • Cara C.
    • Courtney B
    • Fawn T.
    • Jenn D.
    • Kelly C.
    • Kristy K.
    • Lara T.
    • Malisa B.
    • Marnie D.
    • Robin C.
    • Val F.
  • Tools
    • Products
    • Tool Reviews & Overviews
    • Inspiration & Ideas

Decorative Legs- Cara Collection – Free Plans

All Posts, Free Plans

This is the fourth installment of the Cara Collection built-in office furniture.  I’ve already posted plans for the Base Cabinets, Upper Bookshelf and the Printer Storage Cabinets.  This post includes plans to build and install the decorative legs on those built-ins.

Add a decorative leg to base cabinets

Decorative Legs Base Cabinets

Materials:

  • 1 sheet of 3/4 MDF cut as shown will make 3 decorative legs
  • If you build 2 outer bookshelves with bases and the center section you will need 6 legs
  • finish nails
  • wood glue
  • 1 3/4″  wood screws

Decorative Legs- Cara Collection - Free Plans1. Build each leg by glueing and nailing three 2 1/2″ MDF cleats to two sides.

  • Make sure one cleat is flush with the front of the two sides.

Decorative Legs- Cara Collection - Free Plans


2.  Sand, Sand, Sand!

  • Sand the MDF smooth on the front edges.  Make sure you sand out ANY AND ALL texture like saw marks.  Paint will NOT hide imperfections. It will make them stand out.
  • Refer my to post on Random Orbital Sanders if you want to know my favorite sanding tool.
  • Prime with a water or oil based primer (Either one will likely raise the wood particles in the MDF edges”
  • fill any cracks in the seams with wood filler
  • lightly sand again
  • prime again if needed to get an even coat.

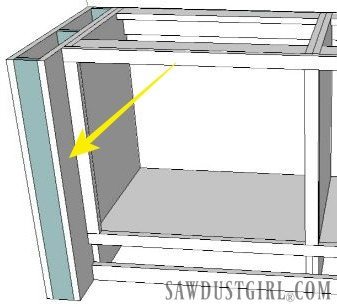
3.  Attach legs to cabinets

  • Snug the legs up to the cabinets making sure the legs are flush with back of cabinet so as to hide the raw edge of the backing.
  • Use 1 3/4″  screws to secure the leg to cabinet driving screws in from inside the cabinet.  You can use cabinet screws that have a washer head and won’t countersink so you can remove legs in the future if you want to move the unit.  OR, you can use wood screws that have a tapered head and sink the screw below the surface of the cabinet then fill and paint so you don’t see the screws.


This is the approximate width of the Center Printer Storage Cabinets with legs attached.

Decorative Legs- Cara Collection - Free Plans


This is the approximate width of the Bookshelf Base Cabinets with legs attached. Decorative Legs- Cara Collection - Free Plans

4.  Paint and add optional decorative trim

  • After the MDF is sanded really well, once you paint you will most likely not be able to see any seams.  You can leave the legs like this. OR
  • You can nail on a decorative trim.  Small finish nails work great because it won’t split the wood and you can fill the holes easily.


This is what Cara’s finished Built-ins look like with the decorative legs attached and painted.

Bookshelf base

Decorative Legs- Cara Collection - Free Plans

 Center Printer Storage CabinetsDecorative Legs- Cara Collection - Free Plans

You can get the rest of the Cara Collection office furniture plans here:

  • Desk Base
  • Upper Bookcase
  • Printer Storage Cabinets
  • Doors and Drawers


You might also be interested in this detailed post on how Cara built her Oak Countertops and reading all of Cara’s project update posts here: part 1,  part 2, part 3, part 4, part 5, part 6, part 7, the Reveal

January 10, 2014 · Leave a Comment

« Printer Storage Cabinet – Cara Collection
Drawers and Doors for Bookshelf Base Cabinets – Cara Collection »

Leave a Reply Cancel reply

Your email address will not be published. Required fields are marked *

Categories

New Post email notification signup

You Subscribed!

Legal Stuff

Terms of Use

Privacy Policy

Disclosure

Recent Posts

  • Lodge Update – Floors, Cabinets, Countertops, and Appliances
  • Lodge Kitchen Cabinet Progress
  • Halloween Mad Gab – Halloween Party Ideas
  • Concrete Backsplash or Vertical Wall Treatment
  • Building and Installing a Giant Faux Beam on the Ceiling

Disclaimer:

Although it is my intention to provide accurate plans and clear instructions, not all plans have been tried and tested. Using plans or information found on SawdustGirl.com indicates that you agree with the Terms of Use policy and will accept full responsibility for the process and outcome of any project you attempt. All plans are for private use only. Plans and information published on SawdustGirl.com may not be reproduced, republished or distributed in any manner without written permission from Sandra Powell, Sawdust Girl. Actual projects built using Sawdust Girl plans may be published on your own site without instructions or "tutorial" as long as you provide a link to my original post with full post title or "SawdustGirl.com" as link title.

Copyright © 2022 · anchored theme by <a target="_blank"