• Home
  • About
    • Personal Posts
  • Privacy
  • Shop
    • My Account
    • Checkout
    • Email
    • Facebook
    • Instagram
    • Pinterest
    • Twitter
    • YouTube
Sawdust Girl®

Sawdust Girl®

Renovation, cabinet building and woodworking plans and tutorials. Build like a Girl®

  • My Home
    • Clinton TN House
      • Clinton TN House in Progress
    • Maryville TN House
      • Maryville TN House Tour – Completed Rooms
      • Maryville TN House in Progress
        • Basement
        • Basement Storage Closet
        • Bedroom Office
        • Craft Room
        • Dining Room
        • Entry
        • Garage
        • Guest Bedroom
        • Hallway
        • Jack and Jill Bathroom
        • Kitchen
        • Kitchen Entry
        • Laundry Room
        • Library
        • Living Room
        • Loft
        • Madison’s Room
        • Master Bedroom
        • Master Closet
        • Pantry
        • Porch
        • Powder Room
        • Wes’ Office
    • Illinois House
    • Calderwood Cottage
  • My Workshop
    • Clinton Workshop
  • Build & Breakfast
  • Cabinet Making 101
    • Cabinets
    • Doors
    • Drawers
  • Projects and Plans
    • Countertops
    • Beds
    • Benches
    • Bookshelves
    • Desks
    • Gift Ideas
    • Holiday
      • Christmas
      • Halloween
    • Home Accessories
    • Kids
    • Kitchen Cabinets
    • Lockers
    • Nightstands
    • Organization accessories
    • Recipes
    • Sewing
    • Tables
    • Vanities
    • Wardrobes
    • Woodworking
      • Wood Finishing
    • Workshop
    • Workshop Storage and Organization
  • Remodeling 101
    • Baseboard and Trim
    • crown molding
    • Demolition
    • Door and Window Casings
    • Door Installation
    • Drywall
    • Electrical work
    • Flooring
    • Home Maintenance
    • Painting
    • Plumbing
    • Resources
    • Safety
    • Tile
    • Wall and Ceiling Treatments
  • Sawdust Squad
  • The Sawdust Diaries
    • Andrea
    • Ava D.
    • Beckie F.
    • Cara C.
    • Courtney B
    • Fawn T.
    • Jenn D.
    • Kelly C.
    • Kristy K.
    • Lara T.
    • Malisa B.
    • Marnie D.
    • Robin C.
    • Val F.
  • Tools
    • Products
    • Tool Reviews & Overviews
    • Inspiration & Ideas

Cara’s Office Built ins – 5

Cara C.

Cara is cruising along with her office built ins! She always cracks me up with the way she describes her DIY adventures.  Need to catch up on her project? Here are part 1, part 2, part 3, part 4.

I like to think of this day as the day that damn bubble almost got the best of me!!


Now that all of the electrical issues are taken care of, now it’s time for me to get to business and install these bad boys into the walls.  I used a stud finder to determine where I needed to screw through the cleat and hopefully (fingers crossed) hit a stud, and no, I don’t mean my husband.

Before installing though, everything needs to be level.  I thought, sure, this will be easy.  I’ll use a couple of shims and that would be it.  Was I wrong!!  Seriously, there is not a darn thing straight in this house.  I lay in bed at night wondering if my house is built solid enough to not fall down.  My husband assures me everything is fine, however when we go to install these cabinets into the wall, three things are apparent:

1. My walls are bowed
2. The floors are uneven
3. My ceiling is buckled.

What the hell???

Every time I used a shim to level something out, it threw it out of whack somewhere else and that darn bubble in the level would move.  Doesn’t that darn bubble know that I need it perfectly in the middle????  I’m not trying to scare anyone at all, but this is probably the one and only time during this project where I had to step away for a while.  I finally decided that I’m not going to be able to get it exactly correct everywhere, and that I would have to live with it knowing that it wasn’t perfect.  My husband said that if I came into the house and this was an existing built in desk, I wouldn’t know the difference, and no will anybody else coming in after me.  So, after hearing this and deciding to be a reasonable, rash person, I decided that as long as that darn bubble on the level was SOMEWHERE, ANYWHERE within the two black lines, that it would be fine. In the pictures that follow, you will see how many shims I used to get these cabinets level.

Cara's office built ins

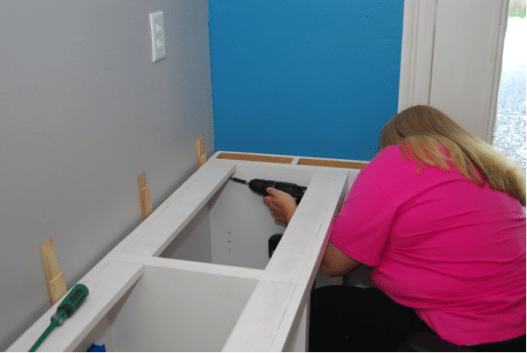
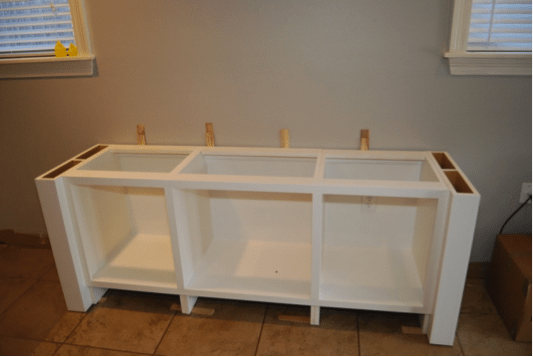
See all of those sticks on top and under the cabinets??

Cara's office built ins

Cara's office built ins

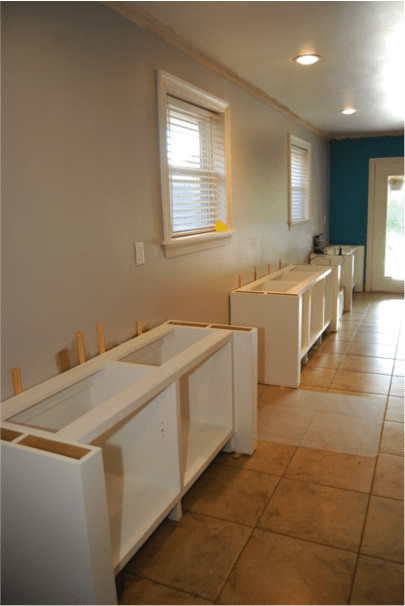
Ahh, that is all done and I can now concentrate on my upcoming vacation!

Read all of Cara’s posts here: part 1, part 2, part 3, part 4, part 6, part 7. And you can get the free plans for the Cara Collection office furniture built-ins.

August 23, 2017 · Leave a Comment

« Declutter with DIY Storage – Cheap Storage in a Snap
Cut Crown Molding and Install like a Pro – Tips and Tricks »

Comments

  1. Adrienne says

    August 24, 2013 at 12:40 am

    Ahh Cars.. I feel your pain. I would have had the same issues. LOL I can hear my husband telling me, no will notice but you! Have a great vacation!

    Reply
    • Adrienne says

      August 24, 2013 at 12:42 am

      Ahh, sorry about the typos Cara!Guess I should put my glasses on….

      Reply
  2. Chantelle - ThousandSquareFeet says

    August 29, 2013 at 11:01 am

    You have certainly earned that vacation! Looks so great!

    Reply
  3. Fawn Teresi says

    August 29, 2013 at 7:11 pm

    Leveling anything is the worst process of all of it! Well I thought that until I had to start caulking everything. So feel at ease to know that there will be something later on that you will dislike as much or even more 🙂 Looks great so far! 🙂

    Reply

Leave a Reply Cancel reply

Your email address will not be published. Required fields are marked *

Categories

New Post email notification signup

You Subscribed!

Legal Stuff

Terms of Use

Privacy Policy

Disclosure

Recent Posts

  • Lodge Update – Floors, Cabinets, Countertops, and Appliances
  • Lodge Kitchen Cabinet Progress
  • Halloween Mad Gab – Halloween Party Ideas
  • Concrete Backsplash or Vertical Wall Treatment
  • Building and Installing a Giant Faux Beam on the Ceiling

Disclaimer:

Although it is my intention to provide accurate plans and clear instructions, not all plans have been tried and tested. Using plans or information found on SawdustGirl.com indicates that you agree with the Terms of Use policy and will accept full responsibility for the process and outcome of any project you attempt. All plans are for private use only. Plans and information published on SawdustGirl.com may not be reproduced, republished or distributed in any manner without written permission from Sandra Powell, Sawdust Girl. Actual projects built using Sawdust Girl plans may be published on your own site without instructions or "tutorial" as long as you provide a link to my original post with full post title or "SawdustGirl.com" as link title.

Copyright © 2022 · anchored theme by <a target="_blank"