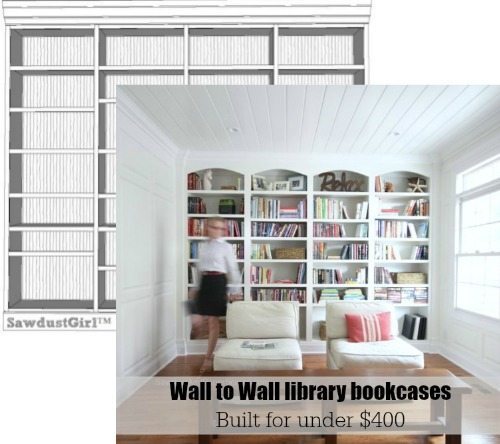
Today I’m sharing detailed bookcase plans for my wall to wall bookcases. These plans utilize straight top rails instead of arches in the faceframes. If you want to do arches, simply follow my tutorial to create uniform arches for the top rail when you get to the faceframe.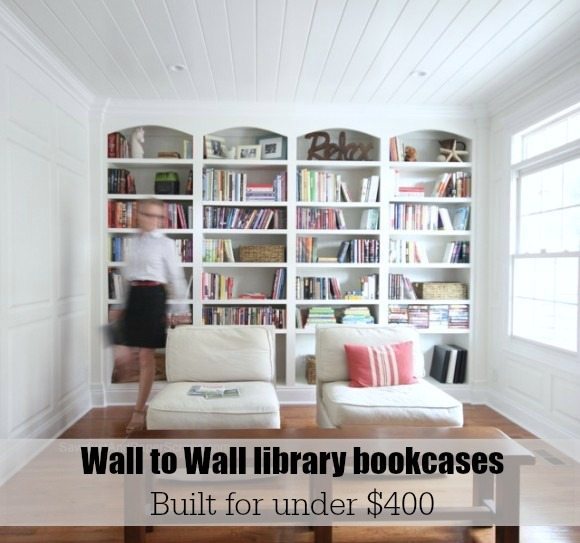
These plans utilized the most basic and simplest cabinet building techniques. You can modify this plan to utilize other building methods if you have the tools to implement them. Check out my Cabinet Building 101 eBook for all my cabinet building tips, techniques and instructions for different building methods. Links in this post may be affiliate links.
How to build wall to wall bookcases
Materials:
- 3/4″ plywood or MDF
- 1/4″ beadboard or plywood for backs
- material for faceframes (3/4″ hardwood)
I built my bookcases out of MDF because, at that time, MDF was much less expensive than plywood. However, lumber prices vary and fluctuate so make sure to price out your materials. Look at my post on selecting the right material for your project for help deciding.
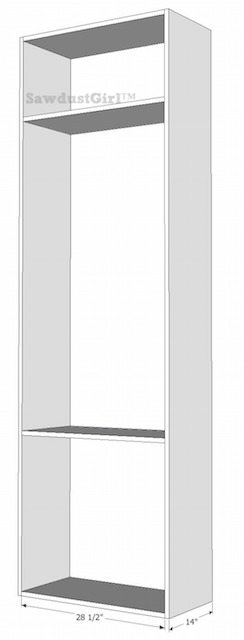
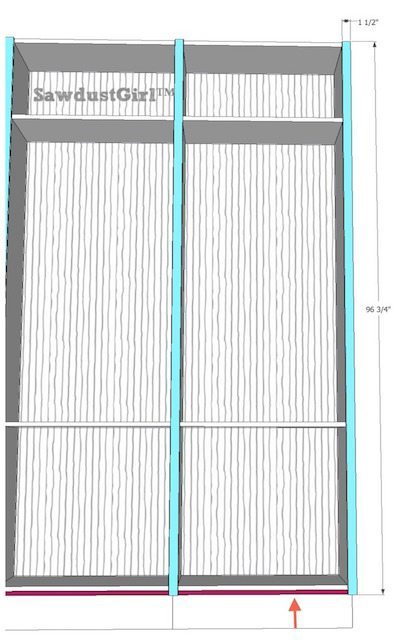
These bookcases are 8′ tall and 14″ deep. The shelves are cut at 28 1/2″ wide. When installed inside 3/4″ thick material, each case is a total of 30″ wide.
The cutlist below is for four bookcases. The 6″ piece left over can be cut down and used for cleats.
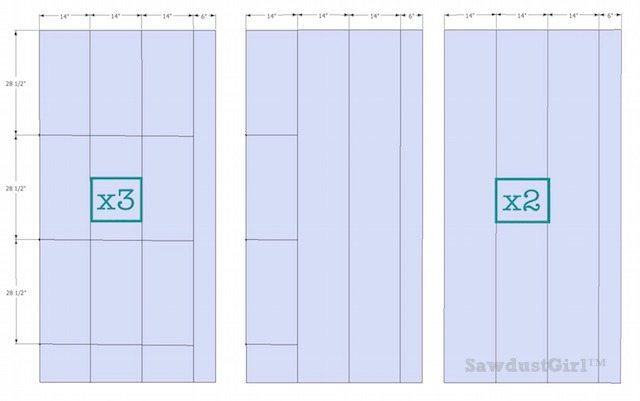
Bookcase Plans
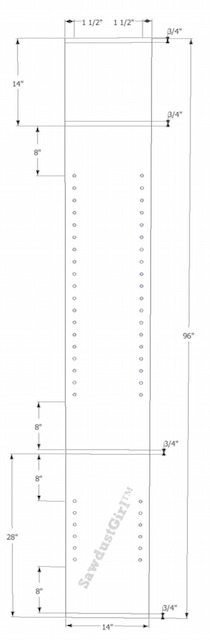
Step 1: Mark and Drill
Mark location for fixed shelves and drill shelf pin holes for adjustable shelves.
It’s definitely easier to drill your shelf pin holes before you assemble your cabinet. I create a custom template out of inexpensive pegboard. This ensures that my shelf pins are even and perfectly spaced and located. Follow my tutorial for drilling holes and using a stop block.
These bookshelves are too tall to have adjustable shelves span the entire case. For stability, I’ve installed a fixed shelf near the top and in the bottom 1/3.
Step 2: Install fixed shelves to one side
Use wood glue and 1 3/4″ wood screws to assemble the fixed shelves to side 1. Use right angle clamps to make sure your shelves are square to the side.
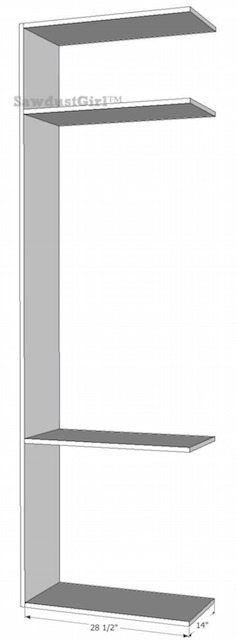
Step 3: Attach second side
Attach side 2 with wood glue and screws as well.
Step 4: Install cleats
Cleats are necessary for securing the cabinet to the wall (into studs) during installation for built-ins. Use pocket holes to secure the cleat at the back of the cabinet. For tall cabinets like this, sometimes I put a cleat at the top and under a fixed shelf near the bottom.
*The cleats should be made out of the same material as the rest of the cabinets so they are not noticeable once the cabinet is painted or stained.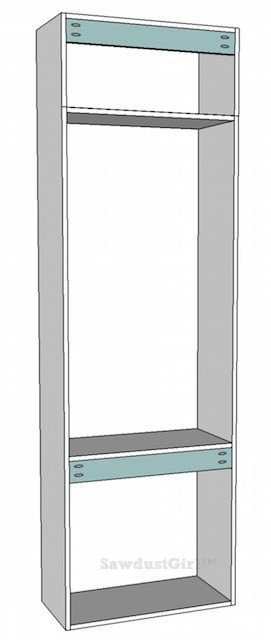
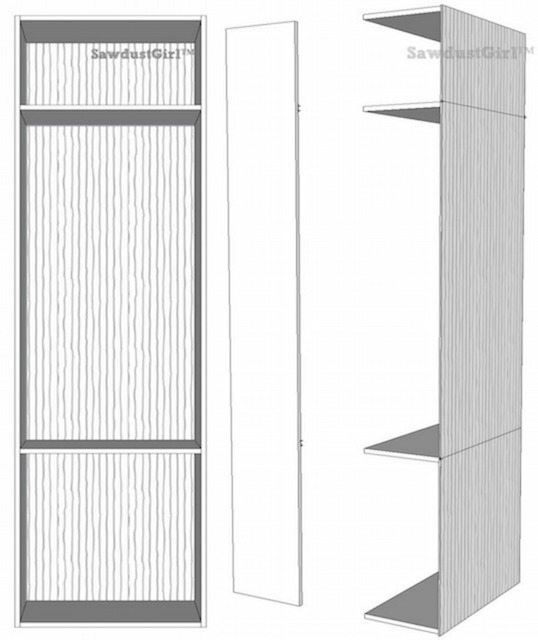
Step 5: Attach back
Square up your bookcase and then attach your backing material. This can be secured with 1″ or longer staples or wood screws.
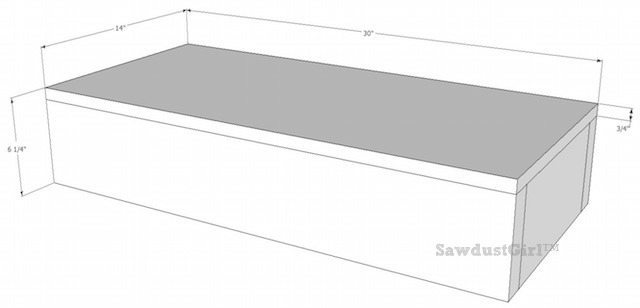
Step 6: Build Cabinet Base
Depending on the height of your baseboard, you will need to adjust the height of your cabinet base so your baseboard doesn’t cover your bottom faceframe once installed.
My baseboards are 5 1/2″ tall so I built my cabinet base out of 2×6 (which are 5 1/2″ tall) and topped it with 3/4″ material.
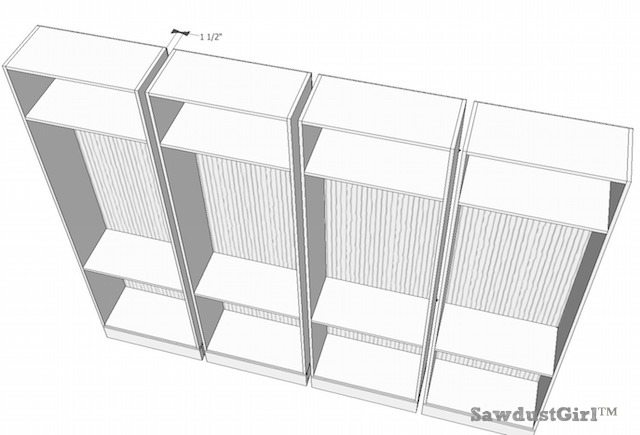
Step 7: Configure and Install Bookcases
Configure your bookcases depending on the space you have to fill and the look you want to create. Butt the bookcases up together or leave some space in between each. Your custom configuration will require you to modify your faceframe.
*Secure your bookcases to the wall studs through the cleats you installed at the back of the bookcases. Use shims under or behind the bookcases to ensure each bookcase is level and plumb before securing it to the wall.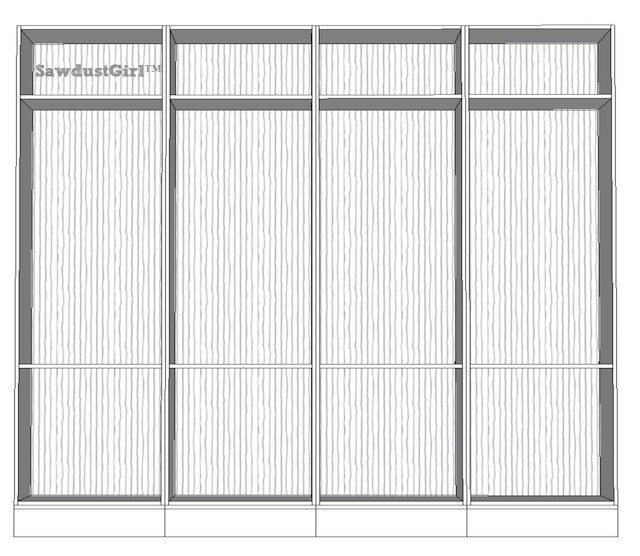
I left 1 1/2″ in between each bookcase. I put scraps of 2×4 in between to maintain even spacing. This allowed me to use a wider faceframe for a chunkier look (which I like).
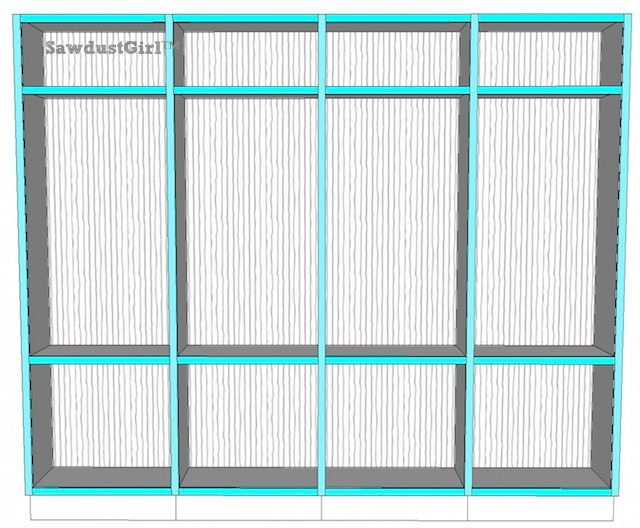
Step 8: Install Faceframe
Because the built-ins are so large, it would be super difficult to impossible to build and attach a one piece faceframe. The faceframe will be installed in pieces using wood glue and brad nails. The drawings below show 1×2 faceframe material.
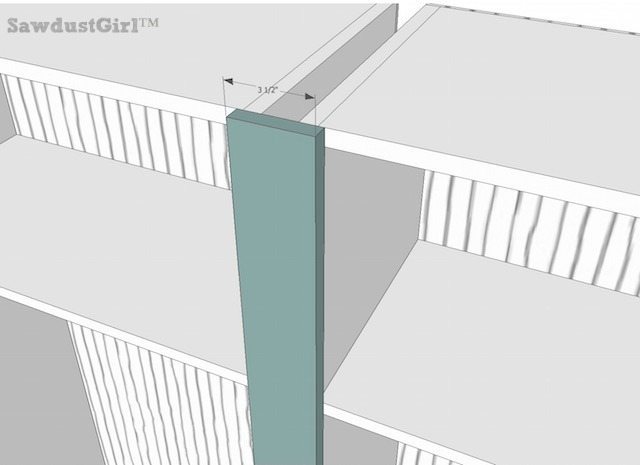
Stiles
Start with the vertical pieces (stiles). A 1×2 should completely cover the 3/4″ sides of the adjoining bookcases leaving no overlap — so the faceframe is flush with the bookcase sides. To maintain uniformity, make sure to install the outside stiles flush with the bookcase side. This will mean the outside faceframe sticks out beyond the outside bookcase by 3/4″.
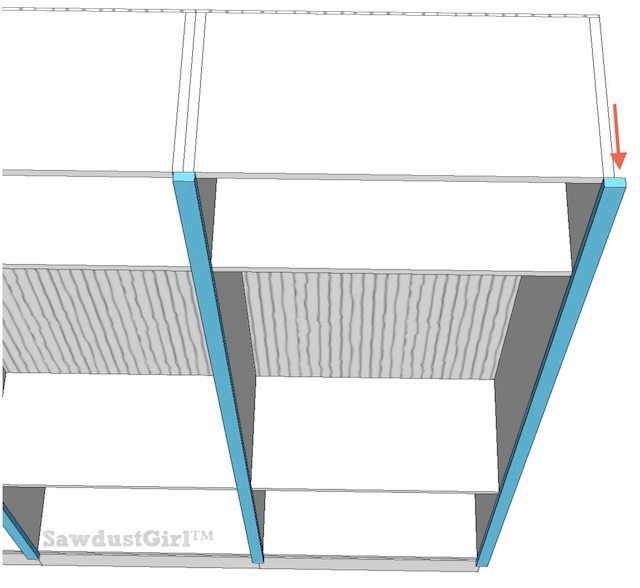
The faceframe stiles should extend beyond the bottom of the bookcases by 3/4″ so it will be flush with the bottom rail once installed.
If you left space between each bookcase, you’ll have to use a wider faceframe stile.
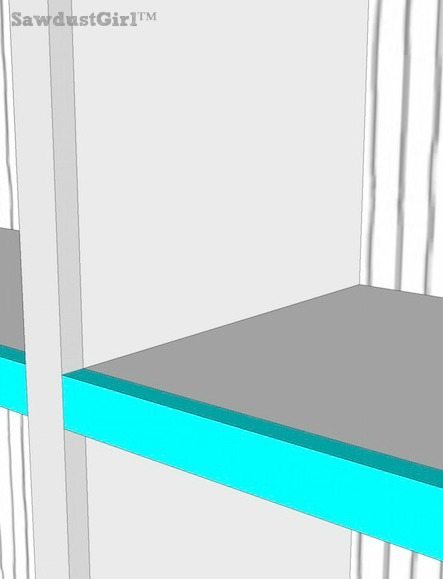
Rails
Install faceframe horizontal pieces (rails) with wood glue and brad nails as well. The rails should be flush with the top of each fixed shelf.
If wanting arched bookcases, simply cut arches into your top rail and install with pocket screws.

Step 9: Install baseboard
Make sure to leave a portion of your bottom stile exposed. This is why the height of your cabinet base is important. Install with brad nails.

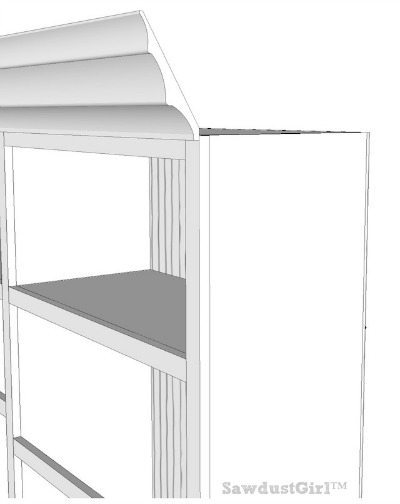
Step 10: Install Crown Moulding
Depending on how much faceframe rail you leave exposed, you may need to add some scrap wood blocks behind your crown moulding to give you something into which you can nail the crown.
Check out my post on Crown Moulding Templates for easy as pie crown moulding installation!
*Install adjustable shelves. I put my shelves in place and then glued and nailed a faceframe rail onto each shelf, leaving enough space on the sides of each rail to allow the shelves to be removed and relocated.
Paint or stain and enjoy.
Did you like these bookcase plans? You might also like these posts:
- How to get smooth edges when painting MDF
- Graco 390 paint sprayer
- HomeRight Command Pro paint sprayer
- DeWalt 18 ga nail gun review
Get my Cabinet Building 101 eBook!
$9.99Add to cart
Cabinet Building 101 eBook
TwoPlusCute says
Awesome instructions (thank you)! Wall to wall bookcase <3 <3 <3
Argentina Callo says
Omg, these are gorgeous !! (And ranunculus is one my favorite flowers)I used these for my blog banner
Jessica says
Thank you for the tutorial Sandra! It has been super helpful for the built in bookshelves I am making. I made my bookshelves fixed instead of adjustable. Would you caulk the seams of fixed shelves or do you just leave them as is? Thank you!
Josh says
The only part that is not clear is that the cleat is installed and then a backing installed. Does the cleat go behind the backing or in front?
Christopher Walker says
You are very kind to post these plans online. Thank-you. I would be willing to pay you for your plans. If you would develop a place to download project plans, I would definitely pay for them. I’m retired now and I would like to build some shelving for my home office. Your plans seem like they will work for me and I’m going to use them. I don’t have all the fancy tools you have; but, I have a nice compound miter saw, a nice circular saw, and Kreg pocket hole and pin hole jigs. I think I’m good to go to build some shelving for my office by modifying your plan online a little bit. Again, I would love to compensate you. I really think you would do well by selling individual project plans. I you already do, please direct me to where I can purchase. BTW, I’m a man–and we like to build too!
Dimitri Tarassenko says
Thank you for these. One thing that seems odd is the cleats installed in #4 don’t show on the picture in #5 and I thing they would be visible as they are in front of backing? Am I missing something?
Sandra says
Yes the cleats would be visible in all the rest of the steps. I probably forgot to add that when I was modeling the plans but when I was writing up the tutorial, had to go back and create that step. Then didn’t want to recreate the rest of the photos for each step in the model…
Janet says
I’m thinking of trying these during my social distancing time at home (if I can figure out a socially responsible way to get the supplies), but given my lack of experience, I have a couple of questions! I would need to buy some of the tools for this and I’m wondering what minimal supplies will be needed. First, for someone with limited space and no dedicated workshop, what would be the best saw for cutting the boards? I could ask to have it done at the store, but if I do this during this Covid-19 mess, I don’t want to ask for that. Can I do this with a circular saw or jigsaw? I currently only own a Sawzall and a hacksaw! Also, for the face frame, do I need to buy a nailgun or could that be done with glue and manually nailing it? The wall where I plan to install these has crown molding and baseboard – I was thinking of removing those and using them on the face of the shelves, rather than buying any separate material for the top and bottom. Does that sound feasible? Thanks you so much for any guidance!!
Sandra says
Hi Janet. You can cut down your sheetgoods (MDF or Plywood) with a circular saw (along with a straight edge and clamps). That’s what I used before I bought a track saw. Your faceframe material is too narrow to easily and safely cut with a circular saw. A miter saw would be your most handy tool for that along with base and crown and tons of other projects.
A nail gun is very useful too. If you have a helper, you could use glue and hand drive nails with a hammer. Without a helper though, it’s going to very tough to glue, hold the wood in place, and hold a nail and hammer…
I like to remove base and crown before installing builtins. Then reinstall both mouldings, over the built-ins. You have to make sure you plan the cabinetry so sits off the floor at the right height for your baseboard. Same with the crown. Leave enough room at the top so the crown moulding will rest on the top faceframe but not cover too much of it.
Lucas Darby says
I see that you used 1-3/4″ long screws…..waht diameter? #8, #10??
I have built my bases out of 2×6 and 3/4″ MDF for the tops of the bases. I’m almost ready to begin building the units individually. Thanks in advance for your help.
Sandra says
#8 is what I use
Eric Flett says
Hi Sandra. Thanks for these plans. I’m using them as a basis for customizing a built-in for my basement. I had a couple of questions….
1. Step 8: Stiles. You note that the outside stiles should overhang the ends of the bookcase by ¾ of an inch. Do you fill that overhang in any way, with another sheet of ¾ material? Or is ¾” the assumed gap between the wall and the side of the case? Only one side of my built in will be against a wall.
2. Step 9: Baseboards. What material are you nailing your baseboard into? It looks like there is an additional piece of material attached to the front of the 2x base that the outside stile buts onto.
Thanks so much!
Sandra says
Hi Eric.
1. Since my bookcases were enclosed by walls, the 3/4″ space on the outside of the faceframes is hidden. If you have one or both ends exposed, you can do something decorative on the exposed end or modify the placement of the faceframe (place it flush with the outside of the end cabinets).
2. I use nail some scraps of wood at the bottom of the base before attaching the baseboard. (Generally off cuts of faceframe material.)
Nick T says
Can this also work as a stand alone?
Sandra says
You would need to make the sides look good if they are going to be visible. This method, the fasteners are visible on the sides.
Kris says
Thanks for these useful, wonderful instructions. How did you fasten the bookcase to the cabinet base? Also, how did you fasten the cleats to the studs? If screws, what screws did you use? Did you hide the cleat to stud screw heads?
Sandra says
I use 3″ “cabinet screws” through the cleats into the studs. SPAX makes self drilling ones -that’s generally what I use. I don’t hide the screw heads other than a dab of paint. If you countersink and fill over those screw heads it’s hard to find them if you ever want to disassemble the cabinets/bookcases without destroying them.
I don’t generally secure floor to ceiling cabinetry to the base but I secure the base to the wall. Then cabinets get anchored to the wall.
Randy says
Did you predrill the holes to secure the fixed shelves?
Sandra says
I use SPAX or another screw that drills and countersinks itself so it’s just one step. Makes building so much faster.
Hannah says
Hi Sandra,
Thank you for these instructions. I plan to tackle this project next. I did have a question about the face frame material, and forgive me if this is a novice question, but you mention using 3/4” hardwood for the face frame. Then further into the instructions you mention using 1x2s. Was that just rounding up? I’m fairly new to woodworking and want to make sure I fully understand the instructions. Thank you for you time!
Sandra says
Good question: The actual size of lumber these days is referred to as the nominal size.
A 1x is 3/4″ thick, 2x is 1 1/2″ thick…
With the width, the wider the board, the smaller the actual size gets. A 2×12 is 11 1/4″ wide.
I think a long time ago lumber used to actually be the size that we call things: a 2×4 was 2″x4″ but now it’s 1 1/2″ by 3 1/2″.