I got lots of questions about my Office wood floor countertop after I posted said that I built it out of Oak Flooring. So, I created some sketches to try to give you a better idea of how you can make all your dreams come true…if you’re wondering how to build counters out of hardwood flooring!


How to Build a Wood Floor Countertop
*I’m purposely not giving you any surface dimensions because you have to build the countertop to fit your work space.
My work space happened to be T-shaped, you could do the same thing with a straight countertop, or L or X or + shaped for that matter!
1. Create a plywood base
- Cut a plywood base the shape of your countertop but subtract the thickness of your finish material from the desired final width. (I used 3/4″ flooring for my countertops so I made my plywood base 3/4″ narrower!) Why? Because you are going to put a “face” on your countertop to make it look thicker, which will add to the total width.
- Use two layers of plywood to create a strong base. If you have seams, stagger your second layer so you’re seams do not end up in the same place. Screw both layers together to secure the seams.

- If the ends of your countertop are going to be exposed, do the same “adjustment” for the length. (My countertop goes wall to wall so the ends don’t matter)
2. Attach Hardwood
I used unfinished 3/4″ Oak wood floor material because it was cheaper than buying regular 3/4″ Oak from the lumber store. Plus, the tongue and groove helped secure each row together without using glue and clamps which I would have done had I used regular wood.
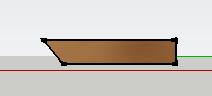
I started on the front and worked my way back. In order for the countertop to appear to be 1 1/2″ thick, I added a 1 1/2″ front edge that was joined with a bevel.

Bevel the first row of wood planks
- Rip enough of your wood floor planks at 45* angles on a table saw. You’ll need enough planks for the whole first row plus a front edge.
- The front edge pieces will need to be ripped to 1 1/2″ wide planks. (My wood was wide enough to get 2 strips out of each plank so I mitered both sides before I cut it to width)
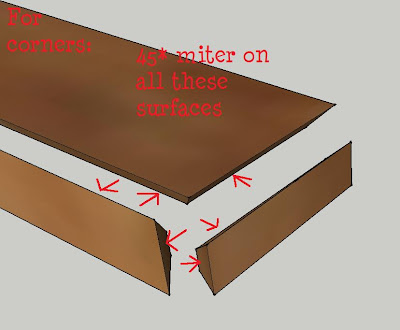
Miter front edge corner pieces
- The corner pieces had to be mitered at 45* angles for the corners as well as the top bevel. I used my miter saw for the end cuts.
Nail wood floor onto MDF countertop base
- I just nailed right through the top since it was unfinished wood. Wood putty in all the nail holes, cracks and corners. The whole thing had to have a good sanding anyway.
- (Make sure you use the proper length nail! I didn’t calculate for that and had to go back after I was finished and pound UP a few nails from the bottom. Don’t want to snag your knees…!)
- Finish! I used (ebony tinted) Tung oil (which I LOVE but make sure you use a RESPIRATOR and the proper gloves if you go that route.)

Lynn from For Love or Funny says
I am always impressed at what you can do! Well done!!
Sheer Serendipity says
Wow! I would not think of using wood flooring for a counter top. What a great idea and your projects turnned just gorgeous!Thanks for sharingSherry
Dianne says
I want your office!!!! I love everything about it…
[email protected] says
That is alot of work. WOW! and i completely understood most of your instructions. Though I dont have a table saw… guess I wont be doing that.
Kristi says
I have a table saw (a hand me down from my dad when he upgraded) but I have no idea how to use it yet. Plus it's buried in our mudroom under the outdoor stuff right now…guess I need to get on that 'cleaning spree' huh? Great job with your tutorial!! 🙂 I use MDF for my 'counters' in my craft room too 🙂 Just paint 'em white and call it good LOL I screwed them onto a couple of bookcases.Good work & hope to talk to you soon!xo,Kristi<a href="http://www.creativekristi.com>@ Creative Kristi</a>
Anita @ GoingALittleCoastal says
It sounded like a lot of work but really turned out fantastic. Love the dark color too. Looks great with the cabinets.
Chantelle - ThousandSquareFeet says
I am definitely doing this in our next office – and now I know how with your very clear, totally understandable instructions!
The Miller Five says
You knock my socks off!
Kate says
Fabulous tutorial. I didn't think it was hard to understand at all. You did a great job! I can't wait to try this for my craft room!
Katie says
You are then bomb! Are then such things as strips of butcher block to do something like that to my island?
The Pennington Point says
First of all, you are amazing at doing tutorials. I am so, so bad at them…so you inspire me.Second, both counters look wonderful! I have several "creative, outside-the-box" counters and I love them. Hooray for you! Lisa~
pinktoesandpowertools says
I think that your tutorial is very clear! Sometimes I have trouble with instructions until I actually have the materials in front of me and I can manipulate them to actually see it. I understand exactly what you are talking about in this one.Thanks!
pinktoesandpowertools says
Maybe I should be clearer:) Not YOUR instructions, instructions in general!
Lily says
Hi Sandra! Did you build the bottom components too? Is that tutorial somewhere in the archives? I showed this to my husband and he is into it– we may do this in our office! Do you think it would work with leftover bamboo flooring? And we are wondering if we can buy modular units for the base if we are not handy enough to build them…
paperkite says
WOW! You totally inspire me!
Sharlee says
Thanks so much, Sandra. You are awesome.
yeoldesandwichshoppeva says
Thanks for the tutorial! I didn't think you were confusing. The diagrams are great! I am probably going to have to try this. I don't know where, but I like it a lot!
Anna says
I am doing this same thing in my office. But I bought prefinished flooring. My husband said that we would have to have the wood planed after it was put together. did you just sand it with a hand sander to make it smooth? I should have just gone with what I knew! but instead I bought cork flooring for $100. When the cork looks like crap in a few years I'll have to upgrade to "real" flooring. Thanks so much for posting this, just to show me that is IS actually possible to use unfinished flooring. I love it. Thanks.
Jess says
the diagrams and pictures are not showing up for this tutorial…
Daniel says
What a great idea. I just moved in with my family to a bigger house and there is an extra room, which we have discussed to make it an office for my wife and I and other side for the kids study area. This is a great divider for all of us. The right side of the room is going to be my wife and I’s office and the other side is for the kids.
Bill Keiser says
***If you do use flooring, you’ll have to use a table saw to rip 45* angles onto some of your wood because the bottom of the flooring is not flat (it usually has ridges) and you will not be able to do a butt joint!
I don’t understand this point. I’m making a purple heart kitchen Ctop and my planks do have bottom ridges, but I don’t see why they matter.
Sawdust and Paper Scraps says
It all depends on which direction your grooves/ridges lay and if they start on the outside edges of the plank bottom.
The best thing to do is just hold a plank up and see if it works. If your ridges are going to cause a problem, you’ll see it. If not, Great! That’s one less step for you. I had to but I’d be happy to hear that you didn’t.
Note to self: Look at the bottom of flooring next time before purchasing. 🙂
Good luck. I’d love to see the finished pics if you want to post on my Facebook Page!
Samantha says
Hey,
I came across this when looking for advice on building a base for a countertop made from wood flooring. Glad to see how well it turned out and that I wasn’t the only one to attempt this 🙂
I just wanted to add that we purchased “stair nose” with the rest of the wood and are using it for the edges of the counter that are exposed. It’s designed to give a nice finished edge and is much easier than having to create joints for that finished look.
Evelyn says
What is “stair nose”?
Mona says
I was thinking about using red oak flooring for a coutertop just last night. Quick dash to Home depot at 9pm to ponder, wander and desire. Would this hold up to kitchen use? What size plywood, I looked at 1/2 and 3/4″ What would you oil/stain with that would be appropriate.
Sandra says
Mona, I love the look of Tung oil which is food safe after it’s cured but here is an article from Fine Woodworking that lists some other options. http://www.finewoodworking.com/SkillsAndTechniques/SkillsAndTechniquesArticle.aspx?id=26893
I used 3/4″ plywood for the craft room that had a very thick veneer. That is important so if you ever have to sand your countertop down, you won’t sand through your veneer into the “not so pretty” layer of wood underneath. For a kitchen, I would use solid wood so it can be sanded over and over if need be and still last for decades.
Evelyn says
Can the tung oil be used for a countertop in a kitchen or island? We bought an old house and are having cabinets built and want it to look old.
RayJan Ritchey says
We have installed 3/4″, tongue and groove, nail it to the foor utility oak, which has knot holes, saw marks, worm holes, fissures, cracks,etc in the wood to floor pretty much the whole house ( except the entry areas, bath and utility rooms, and in front of the fire place).
My wife thought that the 27 y.o. kitchen counter tops would look awesome covered in the left over flooring. We are planning to paint the existing front trim of the counter top black, like the cabinets, and use oak bullnose, or stair nosing, to trim out the front edge of the counter surface. We will place temporary pieces of the bullnose as spacers and work from the front of the counter towards the wall.
We noticed an earlier post where you responded about the tung oil being food safe after it cures. That was great information that we would have needed to investigate. Thanks. We will let you know how it turns out.
RAY and JAN
RayJan Ritchey says
On the subject of using Tung Oil to finish our kitchen counter tops because of its food safe properties once cured; I have subsequently found out that, since the Tung Oil comes from the nut of the Tung Nut tree; the fumes, vapor, and even mild contact with the oil in liquid, and cured states, can cause severe reactions to those with even slight NUT ALLERGIES and Sensitivities. Therefore, we will not be able to use the Tung Oil. Our daughter has Tree Nut sensitivities. Any suggestions for another food safe finish for our kitchen counter project??? Your email reply asked about pictures. Do you have a link I can send some to or up load to? Thank you.
Ray
Sandra says
That is good to know! Here is a great article by Fine Woodworking on food safe finish options.
http://www.finewoodworking.com/SkillsAndTechniques/SkillsAndTechniquesArticle.aspx?id=26893
There are a lot. Hope you find one that works out great for you. You can email me some pics at [email protected]. I can’t wait to see your masterpiece!
Adam Glenn says
I am interested if RayJan Ritchey ended up doing this project as discussed in this comment. This is exactly how I was thinking about doing ours, but wasn’t sure how it would turn out. If possible, I’d love to see some pictures and find out how it looks.
Dimitri says
Hey there. I don’t mean to be the only one with a negative comment but, I have to point out that expansion and contraction are big problems when using flooring for countertops. On your countertops, the problem will show up right at the bottom of the T. Specifically where the miter is. You can’t glue or nail a long grain board perpendicular to the grain of the countertop- it will slowly break itself apart. No amount of sealer or finish or paint can stop this movement and if it hasn’t happened yet, it eventually will. I’m only posting this to help out. As a carpenter, I see a lot of DIYers with broken hearts. Let me know if I posted this in error.
PS Ripping long miters on a table saw is not an an operation that can be safely performed without proper training. At the very least, tell your readers to research which side of the blade the fence should be on when mitering.
Sandra says
Thanks for your input Dimitri. My goal in this tutorial is not to teach people how to use a table saw. If they have one and know how to use it, they can rip at 45. If not, I mentioned some alternatives to the mitered edge. It is just showing hoe I made my countertop because I got asked so many times.
Jen W says
After a while, how are your countertops holding up? I’m considering doing a very small (66×18) top to cover an ugly buffet and serve as our TV stand. I think your project looks excellent, and I’m hoping it holds up well also.
Sandra says
We don’t live in that house any more Jen but I had them for 3 years (I think) and they held up great. I wouldn’t use them in a kitchen or anywhere they would get wet because the seams are not sealed well but for an office, they were great.
Leroy Balliet says
When using this method for a kitchen countertop,would it be ok to use a water based stain and top it with several coats of poly such as Helms spar or a self leveling type like I see on tables or bar tops? Get back asap as I’m going to buy the lumber to start my new countertops today…. Thanks Sandra, your a doll.
Sandra says
Finishing wood is like creating art. You could do it 500 different ways and no matter what way you choose, you’ll probably always wish you would have done it differently.
Linda says
I love , love , love this look. My handyman refuses to even try this. I’m trying to find someone else to do my countertop. Thanks.
Penny Wheeler says
We used a prefinished wood flooring and I LOVE the look – however in our case we have to deal with a small groove at each seam. NEVER doing that again. If I can figure out how to pour a clear top on it I am doing it – it is VERY difficult to keep grooves clean in a busy kitchen.
Are your unfinished tops without the grooves?
Amber says
Penny, I have the same problem as you. I used a pre-finished wood flooring as well with little grooves. I decided to fill in the seams with wood filler and sand the entire surface down and resurface. One problem, I have no idea what I am doing and boy, that finish is tough stuff!
Robyn @ Sawdust and Hoops says
I love this idea! It’s helping me brainstorm for a tv cabinet idea I have in the works! Thanks, Sandra!
Annet M says
So this is actually true – i was ripping out old hardwood floor tongue & groove real wood (not sure maybe oak?) from our old linen cupboard and keeping the nice pieces and then had an idea to make a countertop for the linen cupboard that I plan to build in the redone bathroom – with a thought that maybe I could re-use these boards to create a link between the old bathroom and the new. My first thought was to google that but I wonder if I should email Sawdust Girl about it… so I googled and yours was the first link. You are officially my new guru 🙂
I’ll keep you posted if I get it to work!