• Home
  • About
    • Personal Posts
  • Privacy
  • Shop
    • My Account
    • Checkout
    • Email
    • Facebook
    • Instagram
    • Pinterest
    • Twitter
    • YouTube
Sawdust Girl®

Sawdust Girl®

Renovation, cabinet building and woodworking plans and tutorials. Build like a Girl®

  • My Home
    • Clinton TN House
      • Clinton TN House in Progress
    • Maryville TN House
      • Maryville TN House Tour – Completed Rooms
      • Maryville TN House in Progress
        • Basement
        • Basement Storage Closet
        • Bedroom Office
        • Craft Room
        • Dining Room
        • Entry
        • Garage
        • Guest Bedroom
        • Hallway
        • Jack and Jill Bathroom
        • Kitchen
        • Kitchen Entry
        • Laundry Room
        • Library
        • Living Room
        • Loft
        • Madison’s Room
        • Master Bedroom
        • Master Closet
        • Pantry
        • Porch
        • Powder Room
        • Wes’ Office
    • Illinois House
    • Calderwood Cottage
  • My Workshop
    • Clinton Workshop
  • Build & Breakfast
  • Cabinet Making 101
    • Cabinets
    • Doors
    • Drawers
  • Projects and Plans
    • Countertops
    • Beds
    • Benches
    • Bookshelves
    • Desks
    • Gift Ideas
    • Holiday
      • Christmas
      • Halloween
    • Home Accessories
    • Kids
    • Kitchen Cabinets
    • Lockers
    • Nightstands
    • Organization accessories
    • Recipes
    • Sewing
    • Tables
    • Vanities
    • Wardrobes
    • Woodworking
      • Wood Finishing
    • Workshop
    • Workshop Storage and Organization
  • Remodeling 101
    • Baseboard and Trim
    • crown molding
    • Demolition
    • Door and Window Casings
    • Door Installation
    • Drywall
    • Electrical work
    • Flooring
    • Home Maintenance
    • Painting
    • Plumbing
    • Resources
    • Safety
    • Tile
    • Wall and Ceiling Treatments
  • Sawdust Squad
  • The Sawdust Diaries
    • Andrea
    • Ava D.
    • Beckie F.
    • Cara C.
    • Courtney B
    • Fawn T.
    • Jenn D.
    • Kelly C.
    • Kristy K.
    • Lara T.
    • Malisa B.
    • Marnie D.
    • Robin C.
    • Val F.
  • Tools
    • Products
    • Tool Reviews & Overviews
    • Inspiration & Ideas

How to build a Painted MDF Countertop

All Posts, Countertops, Projects and Plans

Painted MDF countertop

1.  Figure out what size you want your countertop to be and subtract 1 1/2″ from the length and width to account for your 3/4″ edging all around.

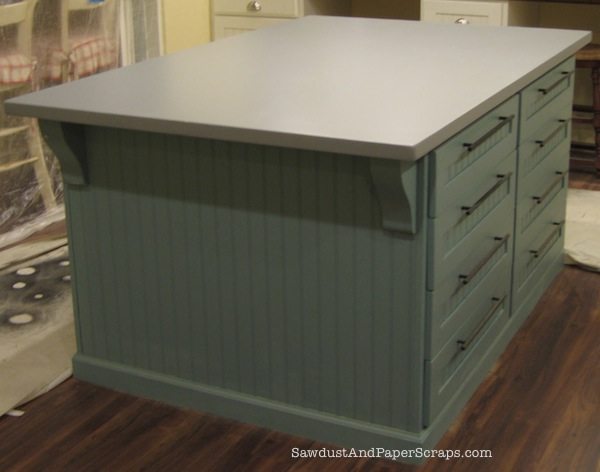
*  I wanted my countertop to extend 1″ over the sides of my cabinet.

On the ends, I wanted to create more of an overhang because

I wanted to use corbels and create another work station…

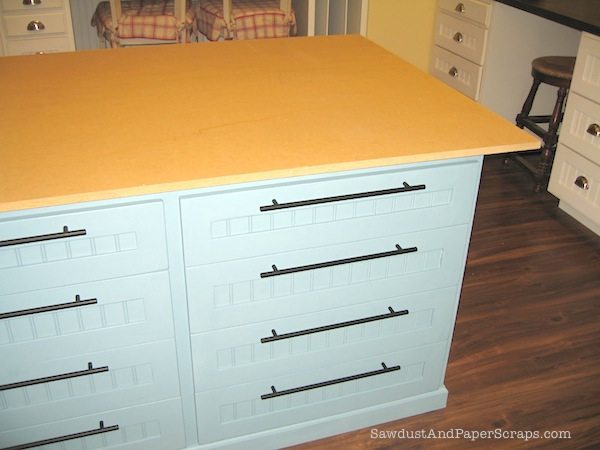
2.  Cut 2 pieced of 3/4″ MDF to that size.

*  I built my countertop in place because it is 4’x6′ and would be too heavy {for me}

to take down to the basement after it was completely built.

*  Just lay the pieces on top of your cabinet, don’t worry about securing it at this point.


MDF countertop

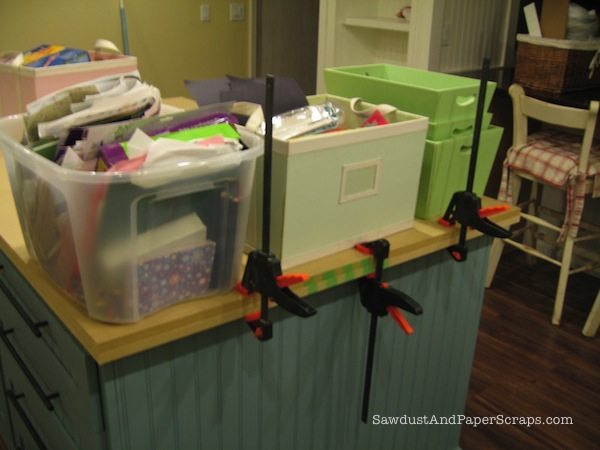
3.  Glue your pieces together.  Use clamps and heavy objects to insure contact while the glue dries/sets.

Weights for glue up

4.  Cut your edging {I used 3/4″ x 1 1/2″ pine}, mitering your corners.
5.  Install using glue and nails.

6.  Fill your nail holes and cracks with wood putty.

7.  Sand!    You might want to tape up some plastic to protect the rest of your house from this…

Painted MDF countertop 2

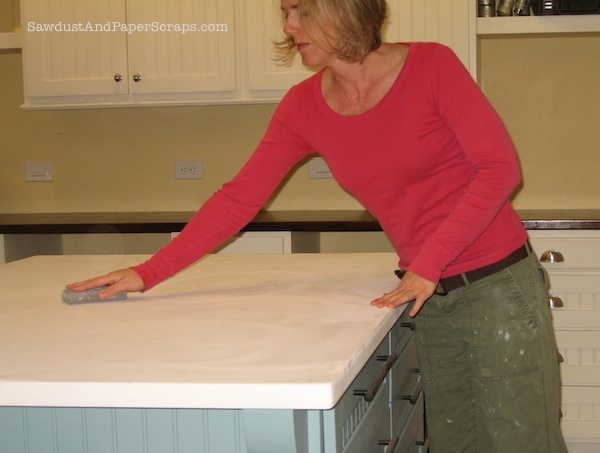
8.  After the dust settles, wipe down your countertop and prime.

9.  Lightly sand again.

10.  Paint.

*  Then try really hard not to use this surface as a work table when drilling holes so you don’t have to do any repairs…and you’ll be good to go.

Painted MDF countertop

*  It might be a good idea to do a top coat depending on the paint you used.  I  was planning a couple coats of Polycyclic.  It’s up to you.

Learn How to make your own Corbels too.

December 6, 2010 · 7 Comments

« Hanging Bed {Guest Post}
Easy DIY wall stencil »

Comments

  1. Kate says

    December 6, 2010 at 6:27 pm

    Love the look of it! Thanks for the great tutorial! Do you think I could do this as a temporary countertop in my kitchen if I sealed it after painting? It just needs to last a year or two.

    Reply
  2. jenmyall says

    December 6, 2010 at 6:43 pm

    I love your island color! If you don't mind could you let me know what paint you used? Thanks!!

    Reply
  3. gracefulvintage says

    December 6, 2010 at 8:19 pm

    Now I wanna know what the "Super Top Secret" thing was!!!!

    Reply
  4. Katie says

    December 6, 2010 at 8:33 pm

    I can't believe you are leaving me…I want to learn so much from you. I am back from my trip so just let me know when it is good for you to come and pick up the loot.

    Reply
  5. orange sugar says

    January 11, 2011 at 6:31 pm

    Is this counter for a kitchen island? Does priming and painting protect the MDF from getting wet? Because I know MDF and water don't mix.

    Reply
  6. orange sugar says

    January 11, 2011 at 6:48 pm

    BTW I am loving this island. Do you have a tutorial? I have one from Ikea in my kitchen but it's open shelving and everything gets too dusty. I need one like yours. If I had a 12" overhang for a breakfast bar type thing, would that be able to be supported by the corbels?

    Reply
  7. Sawdust and Paperscraps says

    January 11, 2011 at 9:27 pm

    It is in my craft room. I suppose if you used the right top-coat you could do a painted countertop in your kitchen. {I'm not sure what the appropriate top coat for a food prep surface over paint would be! You probably wouldn't need any support for a 12" overhang. Your cabinets underneath would be adequate support for that small of an overhang. Once you get to 18-24" overhang…that's when one would want additional legs.

    Reply

Leave a Reply Cancel reply

Your email address will not be published. Required fields are marked *

Categories

New Post email notification signup

You Subscribed!

Legal Stuff

Terms of Use

Privacy Policy

Disclosure

Recent Posts

  • Lodge Update – Floors, Cabinets, Countertops, and Appliances
  • Lodge Kitchen Cabinet Progress
  • Halloween Mad Gab – Halloween Party Ideas
  • Concrete Backsplash or Vertical Wall Treatment
  • Building and Installing a Giant Faux Beam on the Ceiling

Disclaimer:

Although it is my intention to provide accurate plans and clear instructions, not all plans have been tried and tested. Using plans or information found on SawdustGirl.com indicates that you agree with the Terms of Use policy and will accept full responsibility for the process and outcome of any project you attempt. All plans are for private use only. Plans and information published on SawdustGirl.com may not be reproduced, republished or distributed in any manner without written permission from Sandra Powell, Sawdust Girl. Actual projects built using Sawdust Girl plans may be published on your own site without instructions or "tutorial" as long as you provide a link to my original post with full post title or "SawdustGirl.com" as link title.

Copyright © 2022 · anchored theme by <a target="_blank"