Moving on with Courtney’s Built-ins … if you missed some of her story, you can catch up here: Part 1, Part 2, Part 3.
It’s great to have my husband home. He can lift heavy objects much easier than I can. We lifted up the bookshelves on top of the cabinet to check how they fit in regards to the electrical outlets. And my genius idea I had to accurately measure where the outlets will stick through the hardboard backing? FAIL! Huge fail. I don’t even know where I went wrong. My husband voted to remove the section of hardboard and redo. I ended up moving the outlets over a few inches! It’s something I would have never done before getting involved in this project. But it just seemed to be the easier option.

The cabinet top I had so carefully primed and painted is textured! I sanded down the cabinet tops to try to remove some of that texture, then I repainted them, but it looks like my cabinet tops will just be textured. I was able to knock down some of it by sanding, but it’s still there. It’s not horrible, just not what I was looking for. But I’m at the point in this project where it’s simply not possible to aim for perfection. Too many little things are going wrong (by this, I mean a mis-nailed brad that’s sticking through into my bookcase or a drip of paint that I didn’t sand down). I got the first coat of paint on my bookshelves, but because I used Floetrol, I’ll need to wait a while before it’s dry. I’m itching to get the bookshelves up on top of my cabinets and see some real progress!
The next day, we placed the bookshelves on top of the cabinets. One of the outlets wasn’t sitting right in the wall. I was coming up with wacky ways to try to make it level. My husband thought I should start over, rewiring the outlet again inside a different work box. It was a total pain, but now it sits just right. I like to do things quick, while my husband likes to do things correctly — I’m glad he’s back!

Another day – I worked all day long. And you wouldn’t be able to tell! To the untrained eye, everything still looks the same. I did the non-glamorous jobs, like double-priming all four sides of all the faceframe wood; building the other wide shelf and priming both wide shelves; and caulking. The bookshelves had already been put in place on top of the cabinets, but today I attached them to the wall and each other. And I started painting both the wide shelves.
Working with Sandra is interesting because, even though we’ve never met, I have to confess to her every time I make some crazy mistake, so I can get her genius ideas on how to fix it! Only after I double-primed all the faceframe wood and painted the back side of the faceframes did I realize that they should actually be bare wood so that the glue will adhere to help fasten them onto the bookshelf carcass. Argh! Tonight my husband helped me secure one wide shelf, which involved lifting up and taking down the shelf three separate times. And I got started on attaching the faceframes. It sounds simple, right? Just measure, cut, nail and glue! But there are so many other little things that need to be done before that can happen. THAT is why I think a task will take 20 minutes but it ends up taking 2 hours.
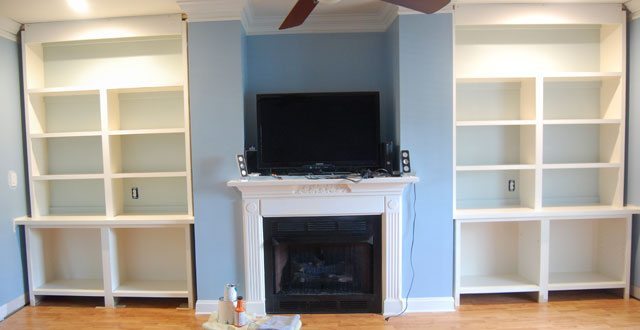
Fast forward a couple of days, and the basic bookshelves are finished!!! Well, except for filling in nail holes, sanding, caulking, and painting the three other sides of the faceframes. It’s never-ending. And now there’s a bunch of areas that need to be touched up with paint. Never-ending, I tell you! As I see it, I’ve completed Phase I of this project. I have no idea what Sandra has in store for me next!
Chantelle - ThousandSquareFeet says
You sound so frustrated. I feel for you. There were times when we were building our house that I JUST COULDN’T GET IT DONE!! I had to walk away for a while. Hubby stepped in and helped out. I took a deep breath and tried again. You can do this! You are doing so great!