I’ve been working on a HUGE “DIY coaching” studio craft room project for over a month now. It’s a doosey –Fo SHO! My “client” is Beckie who blogs at Infarrantly Creative. Beckie wanted to create a killer studio in her loft area so this is a rough sketch of what I designed for her. There will be doors and shelves and a big island in the middle of the room. Baby steps. I didn’t want to overwhelm her before she began!

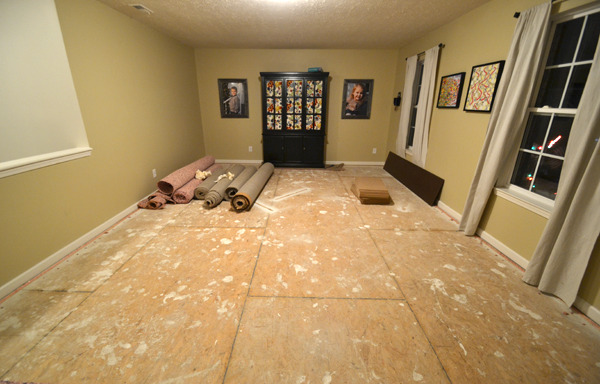
This is the room before she began building.
For Beckie’s project, I drew up the room plan and detailed build plans/instructions for building the cabinets. I gave her a list of tools and supplies to buy and a cut list to take to the lumber store. I’ve Skyped with her many times over the weeks and her project is coming together beautifully. She might want to kill me by the end of it but she will have a craft room/studio fit for the craft gods when we are done! As part of my coaching services, I ask my clients to take pics and keep a diary of the process.
Here is part 1 of Beckie’s Craft Room Story!
-------------------------------------------------------------------
Beckie’s Craft Room
Day 1: So I went to Lowes today to pick up the cut wood for my project. I see my huge pile of wood and I am like “Holy cow that is A LOT of WOOD.” Upon further inspection three of the long boards were slightly off. They were super helpful and they cut the boards again and didn’t charge me for those so I was able to use those as my scraps.

Things I learned:
1. Be very specific that you need accurate cuts. I had some boards that were slightly off.
2. Tell them very specifically to save the scraps. Doh!
They also packed and loaded me up. Thank God! Then Tim and I started the backbreaking work of bringing all of the cut boards up the stairs. Since we have a landing on our stairs we had to heavy-ho them up over the top rail. Our backs were dead. For some reason we decided to keep going though.


So I went and measured each board for accuracy. I spent about an hour doing that and marking all the boards. Since the boards were not cut perfect I had a little fudging to do. I would say all in all the most they were off was an 1/8”. So we were able to pair the boards with the same measurement together. Crown molding will cover a multitude of sins, or so Sandra tells me.
I got on Skype with Sandra and she walked me through making a stop block to drill all the holes in the sides for my adjustable shelves. I tried to be meticulous about marking the tops of the boards and drilled away.

I called Sandra back and she walked us through how to assemble the cabinets. The corner clamps were a bit confusing at first. I am betting by the second cabinet it will be much smoother.

Tim’s back is toast (did I mention he also tore up all the carpet today and moved all the furniture out of the room by himself?). I am dying. I am hopping in a hot bubble bath and popping some ibuprofen for sure.
Things I learned today:
1. I need to not work on the floor. I will get some saw horses or something for the next cabinet.
2. I should have worn knee pads if I was working on the floor. I will definitely put those on for tomorrow.
3. There is no freaking way I can assemble these cabinets without a second pair of hands. No Way.
4. I think I need to set realistic expectations about how long this will take and make sure I just do a little a day or Tim might never do a project with me again.
At this point I am asking myself, “Why the crap did I think I could do this?” And “How the crap long is this going to take me?” and “Holy Crap Sandra is super woman!”
Meanwhile I am staring at one cabinet built, no carpet in the room and I am thinking “Crap I totally need to finish this.”

----------------------------------------------------------
I’ll be sharing weekly progress reports of Beckie’s Story. It’s SO MUCH FUN watching this awesome space come together without having to do any of the physical labor myself. Beckie is doing awesome!
Continue reading the rest of Beckie’s story…Part 2, Part 3, Part 4 and the Reveal
Victoria Petersen says
I love seeing you work through this! It’s also great to compare posts between the two of you.
Ellora Drinnen (@CreatvlySouthrn) says
Can’t wait to see how it all comes together! And she’s right, you are super woman! 🙂
Anne @ Unique Gifter says
It is going to be so rockin’ when it’s done!
I am with you 110% on the feelings of being overwhelmed by a project. I am sooo close to finishing a ridiculously large project that I started in the middle of Sept. *make it be done!*
Brittany aka Pretty Handy Girl says
Whoa! Beckie is rockin’ and rolling. I need to bribe you to give me that stop block tip 😉
Malisa Bowen says
Hahaha! That was awesome to read. I’ve thought a lot of the exact same things before. Some this very moment! I don’t write quite as funnily though.
That is a crazy huge project. Crazy. Crazy. I know Sandra does things like that, but to hear someone else having to go through it makes me have a little panic attack. :/
Guerrina says
Go, Beckie! This is a huge undertaking! Sandra, I think you’re a wonderful mentor via your blog posts so I can only imagine the added benefits (and hilarity) via Skype.
Pamela says
I can’t wait to see the finished results. I know it will be awesome!
Pam says
WOW!!! Just looking at the wood coming outside the store made me tired LOL!!
I can’t wait to see the finished results. Just watch that you don’t over do it. It’ll be
beautiful once it’s done.
Pam
xox
Leslie Stewart @ House on the Way says
Awesome! I can’t wait to see the progress! You amaze me!
Leslie
Karen says
Love it. Can’t wait to see your progress! I have a quick question…what is the name of that clamp that you are using with the drill & where did you purchase it?
Adrienne Sajecki says
I love being able to read Beckie’s post after yours. Looking forward to learning along with her!
Carol @ Elephant Buffet says
You go, girls! I’m following along and can’t wait to see the finished product!
The Busy Bee's says
Hi,
This is a great project. Love home improvement projects!
We are having our first link party and would like to invite you to link up.
Thanks!
The Busy Bee’s,
Myrna and Joye.
http://thebusybhive.blogspot.com
Gwen says
Love this project!!!!! Found it through a link from The Lettered Cottage!! I was wondering what grade and size (1/2″ or 3/4″) of plywood that you used? Did you use cabinet grade one sided or finish grade on both sides….sorry I don’t know the correct term for the plywood. Did you use any MDF in any of the construction??? This is an awesome space! Need this much storage for my smocking designs.