I spent the entire last week building one corner cabinet in my pantry. You know I like to use every inch of space so when it came to designing the cabinets for my pantry corner, I had to come up with a really smart plan to give me access to the complete corner. What I came up with is a sort of puzzle of cabinets inside the main cabinet that gives me access to the entire blind corner with NO wasted space! Woohoo!
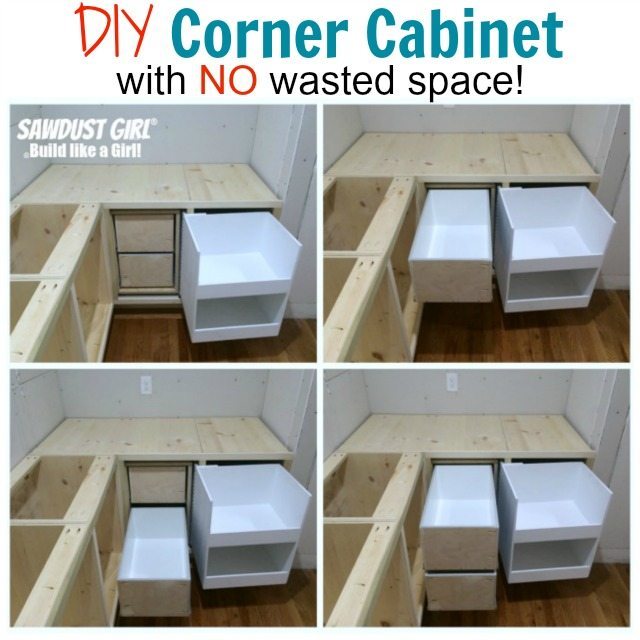
Build a Corner Cabinet with no wasted space.

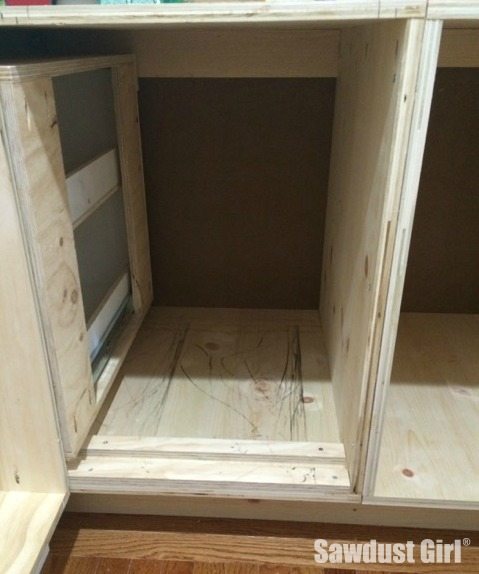
I built non traditionally sized cabinets for my pantry. The cabinets on the left are only 20″ deep while the right cabinets are a whopping 28″ deep. I’ll also show you the mechanics and inner workings of the rolling, sliding and hinging cabinet puzzle and you can make this system work for your blind corner situation.
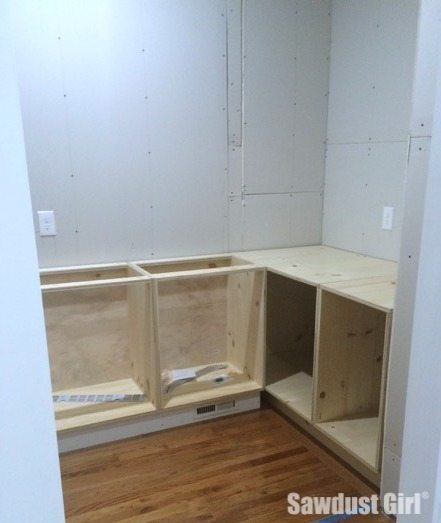
I started out by building the cabinet bases that will sit on the left of the corner. Then I took the width of the right side bank of cabinets and came up with a configuration that would allow me to build one cabinet, large enough to have approximately equal portions on both sides of the cabinet that buts up against it (covering half of the opening).
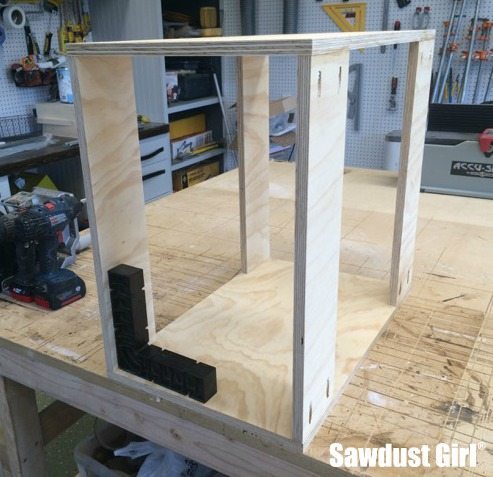
Cabinet carcase
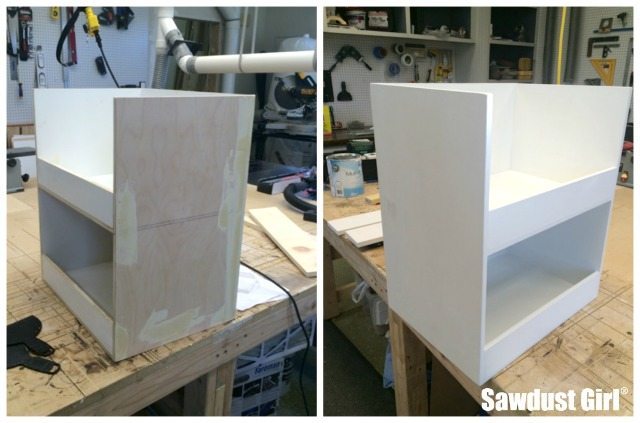
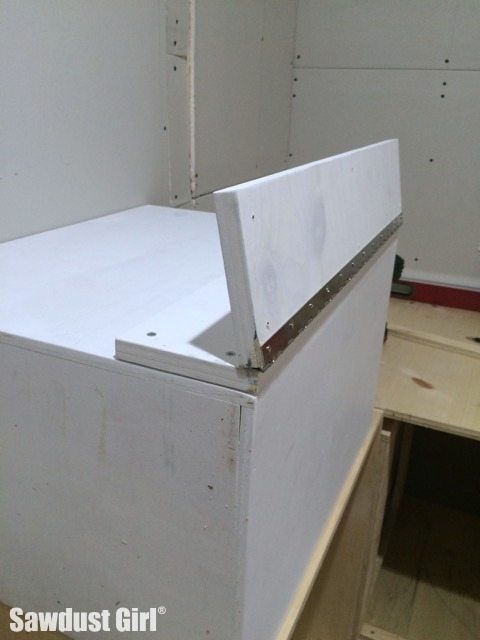
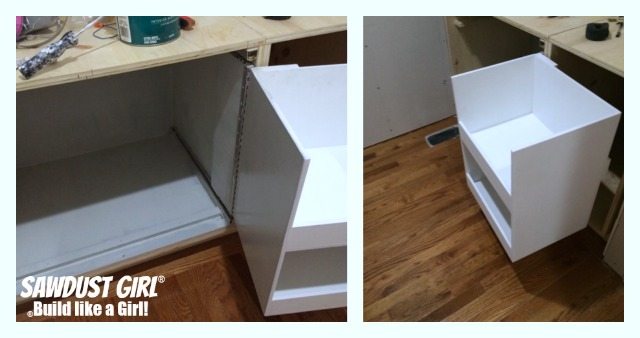
Then I built a cabinet carcase, slightly smaller than half the remaining opening in the main cabinet. This cabinet will roll back and forth from the opening and into the “blind space”. This cabinet is 2″ more shallow and 4″ shorter than the main cabinet to allow for rolling devices.
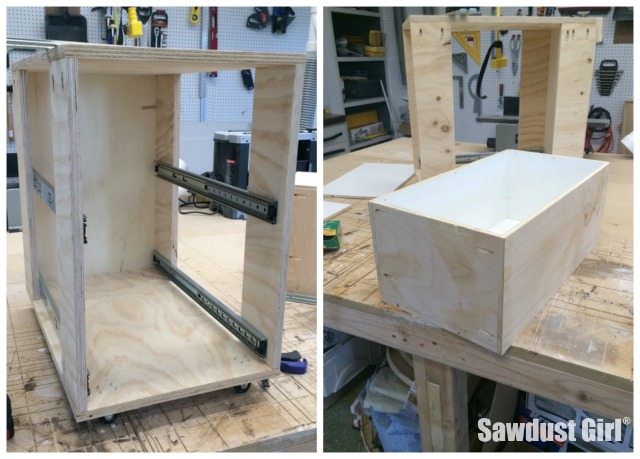
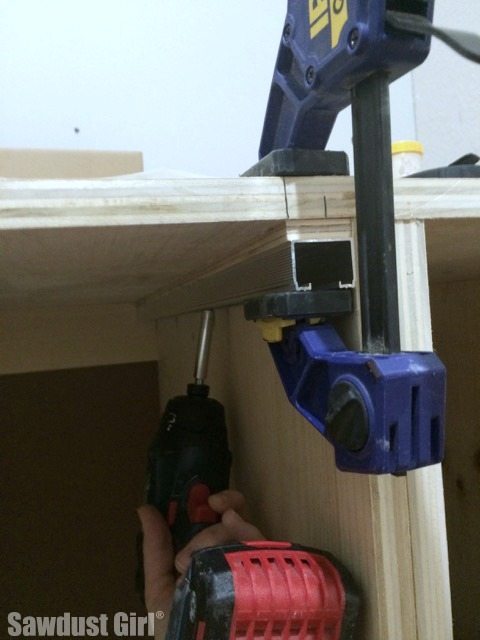
Install drawer slides
I initially used one set of drawer slides and built a single pull-out with two shelves but that didn’t work out after the whole configuration was put together so I took that apart and build 2 individually opening drawers instead.
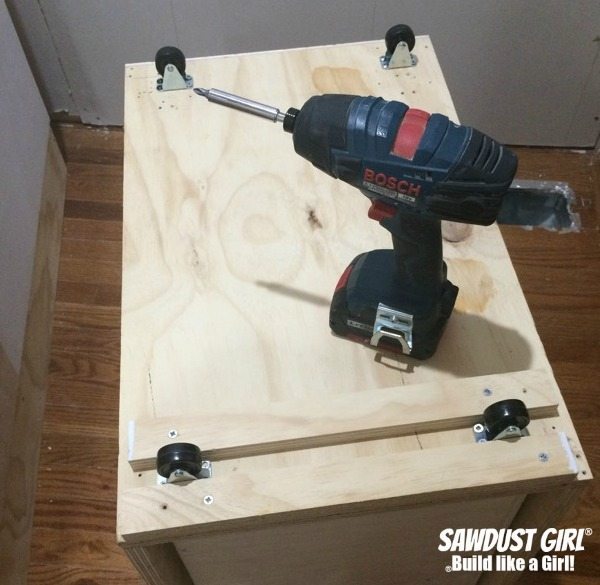
Install casters
Next I mounted 2″ casters onto the bottom of the “slide-over” cabinet. It’s imperative that these wheels are installed exactly straight! You can see from the number of extra holes that I tried a few times. What ended up working for me was screwing a cleat parallel with the side of the cabinet, placed the wheel next to that cleat and then screwed another cleat next to that. The caster sandwiched in between the two cleats was the only way I could secure the casters and keep them exactly straight.
*Do not use swivel casters! I tried. Swivel casters work in such a way that when you pull in one direction, stop and the pull in the opposite direction they swivel around so the lead is in front. That swivel action will not work in the track and they are stubborn about wanting to swivel. They’ll fight you all the way. Just use non swiveling casters and make sure they are on straight. 🙂
Create track for casters
I created a track for the front casters to ride in so the rolling cabinet wouldn’t “drift”. I used a strip of wood the same width as the cleat I used to sandwich the caster while I secured to. This is to ensure that the “roller cabinet” rides at the front of the main cabinet but doesn’t stick out too far.
I don’t want this cabinet to tip when the drawers are pulled out so I used another caster secured to a cleat which I secured to the back of the “rolling cabinet”. Getting this new “Roller” into the main cabinet now is tricky!
I secured the caster to the top of the cleat, then screwed the cleat onto the cabinet on ONE end only. This allowed me to tilt the caster mounted cleat down and out of the way giving me the clearance I needed to get the cabinet up over the guide and into place. Once my rolling cabinet was in place, I tilted the caster mounted cleat up until the caster came into contact with the main cabinet top. Then I drove a screw at an angle through the side of the rolling cabinet and into the cleat, securing it on the second side.
You don’t want that top caster putting pressure onto the cabinet roof, or it will make the rolling less smooth. Just touching will create enough resistance so it won’t tip over (as long as your main cabinet is secured to the stud as it should be).
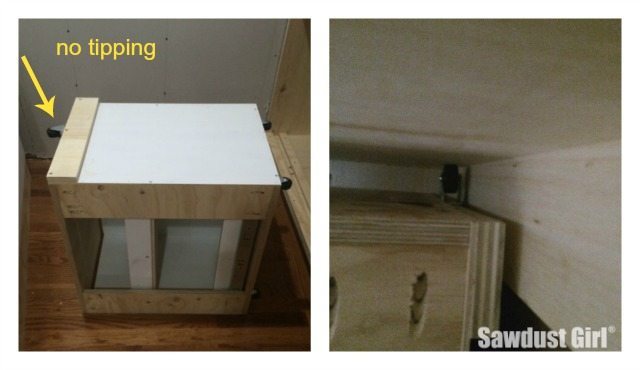
Now the “rolling cabinet” glides easily from side to side!
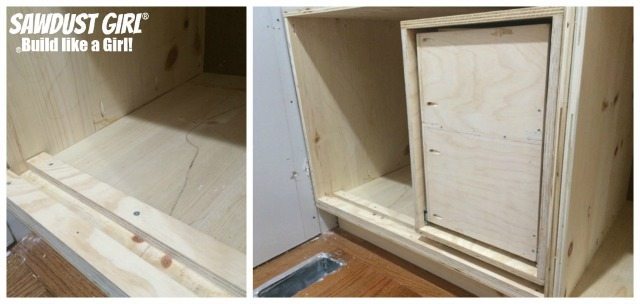
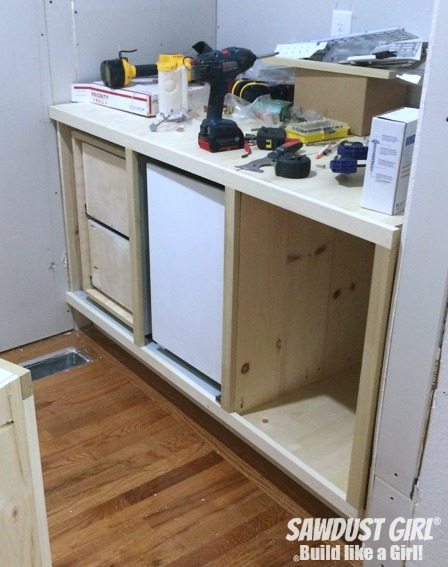
Next it was time to build a pull-out that would utilize the remaining space in the main cabinet.
Build inside slide-over cabinet
I built a double shelf pull-out out of 1/2″ plywood so it would be as light as possible. The depth of this cabinet needs to be 5-7″ shallower than the main cabinet to allow for the glide and hanging “hardware”.
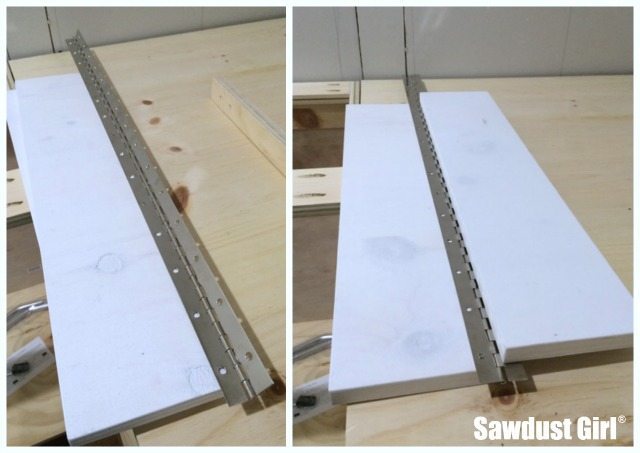
Install piano hinge
- I cut two cleats the height of the pull-out and 7″ wide and secured them to the most heavy duty piano hinge I could find.
- NO clue what the weight capacity was on any of the piano hinges I saw. Apparently that was not information the manufacturer deemed important.
- I bought the thickest one which was too long.
- But piano hinges are continuous hinges so you can cut them as needed and they’ll still work (generally).
Secured the hinge to the two cleats – as shown.
I used a metal cutting blade on my mini reciprocal saw to cut the hinge flush with the cleats.
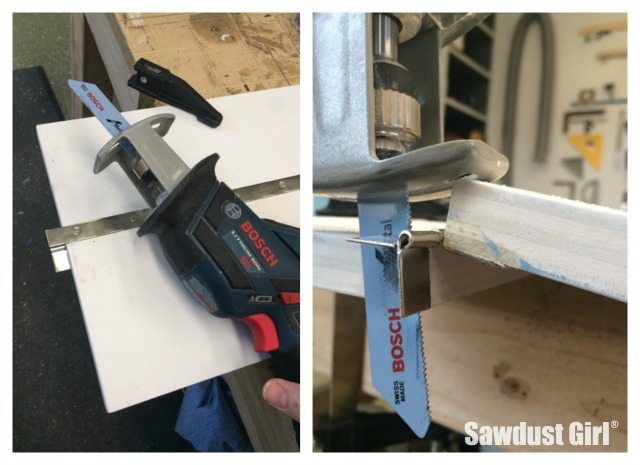
And made sure to file the ends smooth after cutting the metal.

Next, I secured one of my hinged cleats onto the cabinet.
Install slide out track
I’m using pocket door hardware in my corner cabinet! I hemmed and hawed about how to get this contraption to work. I looked at flipper door hardware, pull-up appliance shelf hardware, cutting down part of a traditional drawer slide…This is the best I could come up with!
One track kit comes with two wheels so I got one 48″ track kit for $27.00 and two extra wheels for $10. One track was enough because I cut it in half.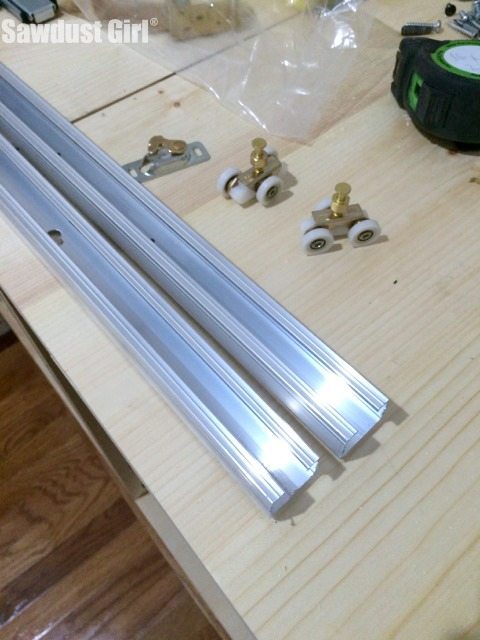
I mounted the wheels on the top and bottom of my free swinging cleat.
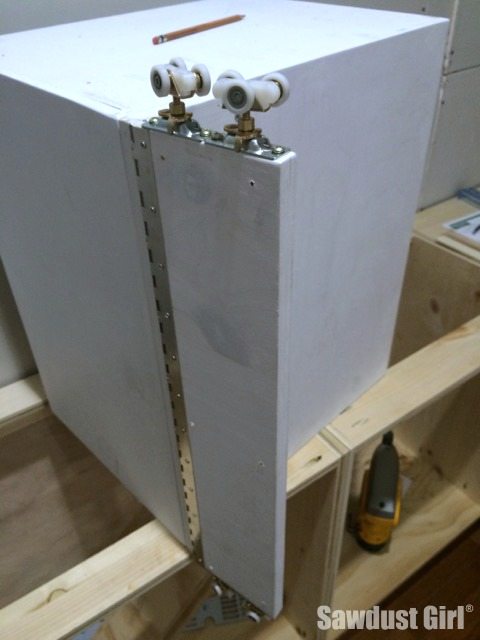
Then I added a block on the bottom of the cabinet floor to raise the track above the piece of wood I installed for the wheel guide.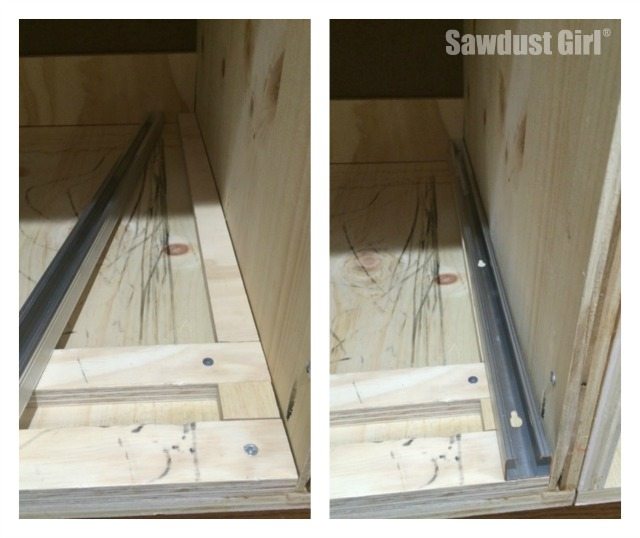
I also had to block out the top of my corner cabinet so I could install the top track at the right height for the cabinet and both sets of rollers. There was a lot of fiddle factor here: making sure the wheels fit securely but not too snug. There is some adjustability with the track door hardware so it wasn’t imperative that this cleat be accurate down to the fraction of the inch. Thank goodness!
The rollers go into the track — holding the cabinet and getting all 4 rollers in the track is FUN! Extra hands are a plus. The hardware kit comes with a stopper to keep the rollers from rolling right out of the track. I used one on the top only and that was enough.
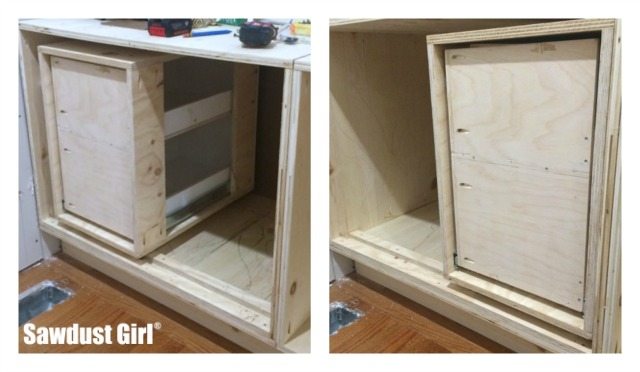
Now this Pull-Out cabinet can slide back into the main cabinet or pull forward and hinge over out of the way of the hidden Roll-Over cabinet.
Since all the weight of this cabinet is on the hinge, it can be a little wibbly wobbly and I have no idea how much that hinge can take so I definitely won’t put anything heavy in this cabinet. We’ll see how long it holds up. Maybe I’ll come up with a better solution.
 I did a couple dry fits and changing things up before I came up with what I’ve got. This configuration is the best I could come up with. Before placing the Roll-Over cabinet in place for the final time, I covered the sides with scrap wood to keep anything from falling out of the drawers and into the path of the “roller”.
 I also needed to screw a little block in the far side of the cabinet to prevent the “Roller” from getting too far into the main cabinet making it difficult to grab and pull over.
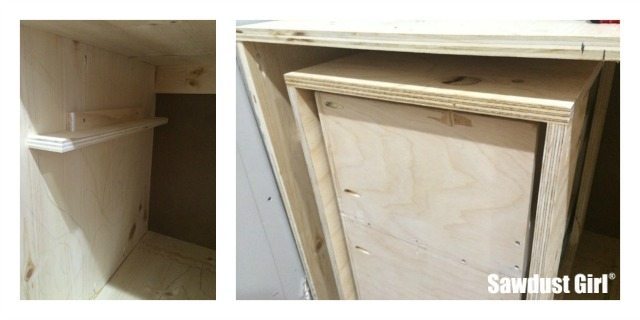 Once I’d made sure everything was working beautifully and sized correctly, I put on my faceframe and secured the adjoining cabinet in place.
And now almost every single inch of space is usable in my blind corner cabinet!
Well worth a week of brain teasing, muscle making work for this Sawdust Girl!
Want to build awesome Cabinets? Get my E-Book!
$9.99Add to cart
Pam says
That is genius!
nellie says
That’s what I was going to say. Pure genius.
Heather says
I was going to say that you are a genius, but two other people beat me to it!
Sandra says
LOL Thanks!
Erin says
I am very impressed!!! Quite the jigsaw puzzle to figure that out.
Johnny says
Love it thank you
Jared says
This looks great! I like the ingenuity and problem solving. If you are concerned with hinge support, have you considered knuckle hinges? I can’t see the clearance between the pullout and the cabinet side from the pictures, but it seems you only need 180 degrees, and I would think 2 hinges would solve the “wibbly wobbly” issue and give plenty of support. Those piano hinges always seem a bit flimsy to me.
Sandra says
Thanks for the input Jared. The hinge is pretty heavy duty and seems strong enough. The problem is that the entire weight of the cabinet hangs on the 7″ cleat which the rollers are installed on so there is some racking in the guide rails. I’d have to make the rollers sit really tight in the tracks to keep them from racking and then they won’t roll smoothly. I did go out and purchase a couple glides that I plan to jury rig to work for me. Crossing fingers that it works…but if it doesn’t what I have now is fine. I just hate settling when I think I should be able to make it closer to perfect. 🙂
Lisa E says
Seriously impressive. I’ve come to realize I am not great at problem solving. There’s no way I would have come up with that. You rock!
Jordan says
Amazing! I wish I was skilled enough to pull this off- it’d be perfect for our (unfortunately small) kitchen. Thanks so much for sharing!
carm says
You are BRILLIANT! Contractors, please take note.
Jake's a Girl says
All of the above! and WOW!
Dee says
Any way to add a track or ideally two On the side of the Fixed cabinet wall and a side-mounted wheel on the 7″ section? That way you can stabilize the weight between the upper and lower Tracks?
Sandra says
I’m going to see if a flipper door track will work. I initially was thinking I’d have to cut off part of the drawer part on a traditional drawer glide but hopefully a pair of flipper door tracks will work. We’ll see.
Sharmila says
Hi Sandra! Sent you a message through your appt form 🙂 how to I get in touch with you for a consultation/design? I can’t wait to start my project! Regards Sharmila
JWard says
What’s the story with the drywall in this video?? I feel bad for whoever has to tape that room. It’s the #1 reason why I’m not going to buy the cabinet building ebook…
Sandra says
Well JWard, there IS a story to it. https://sawdustgirl.com/2015/03/30/pantry-progress/ But certainly, don’t buy my cabinet building ebook based on your assumption of my drywall patching abilities! 😉
Mark Butler says
You are brilliant. I have a similar situation in my shop and I have been trying to think of a way of doing what you accomplished. I never thought about pocket hardware.
This may not work for you but what I plan to do is exactly what you did but add another drop down caster on the rear left corner of the cabinet. By drop down I mean a board about half the height of the pull out cabinet with a caster on the bottom that has a slot about 10 inches down its length that a couple of bolts would go through from the back of the cabinet with threaded knobs on the bolts. The board could then slide up and down and be locked into any position by tightening the knobs.
So when you pull the cabinet out with the rear of the cabinet past the floor of the cabinet base, you would loosen the knobs and let the caster drop down and rest on the kitchen floor then tighten the knobs. This would take most of the weight off the hinge side of the cabinet.
This may not be convenient for you if you are accessing the roller cabinet often. It will work for me because I the roller cabinet I currently have in the corner holds some shop supplies I don’t use very often.
I hope my explanation make sense to you. Thanks very much for sharing your ingenious invention.
Donna says
YOU ROCK!!!!!!! Finally a solution for that stupid cupboard
Mo Asisss says
Very clever
Sara says
Waiting desperately for the plans:) is going to work perfect in our kitchen!
Leigha says
You know if you just have the blind cupboard part slide over why the need to take it out ? Just let it slide over then back. Also I would just put the tracks for the drawers on the side of the part that slides over, but maybe your blind cupboard sits different then mine ? Just a thought! No need to use the piano hinge or the extra stuff you put down just take the drawers out and slide the blind part over to the right (my opening door is on the right)….
karen a barber says
I was excited to see the title and pictures thinking it was what I was thinking.
Is it possible to just make a storage cabinet with wheels that you slide over to the right after you pull the right side Cabinet from under the counter roll out on wheels hidden by the kick plate? So what you have is 2 cabinets one you see and one box type with shelves hidden. I am making my back wall base cabinet 30inches deep and my corner cabinet is next to a dishwasher so it will be 24ft W by 30 ft deep and slides/rolls to the right after you roll out the 30ft deep cabinet. Nothing fancy to build just wheels hidden under the toe-kick? So it all rides across the floor.
IN other words, Instead of installing a cabinet, as usual, sliding back on the floor in place you roll it in place and do not attach permanently? Also, I will only be storing items that I hardly use. Like electric roaster, sausage grinder, etc. In my head and on paper it looks good 🙂
Sandra says
Sounds like a useful plan. Only way to see if it’ll work for you is to build it and see.
Patrick says
That’s a big cabinet! Why don’t you folks use metric like the rest of us?
John richter says
One of the best ideas yet for corner cabinets I’ve seen! Please don’t give up.
Simply lose two inches off the bottom of the pull out cabinet and attach small casters to the bottom. Light tensioned spring casters would be great, but you could chamfer the top of the bottom face plate rail at about 35 degrees to catch the casters and gently lift them up when and if the pull out cabinet should sag slightly when pulled out. Make sure the metal rails for your “dead space” cabinet are set flush into a dado so the casters won’t be too bumpy.
Sylvia S Darling says
I would love to see a final video of how it actually works.
Hannah Sanderson says
I wonder if wheels on the bottom would make any sort of difference?
Mary says
This comment is more to do with the video where you pulled everything out in the end. My thought was to use smaller units instead of one big one which would help with the weight issue helping it move smoothly. Also having front access so that you don’t need to pull the cabinet out when you only need items from that cabinet. Or using components for a garbage can pull out adding your piano hinge so it turns out. Even a basket type bin that fits in the space that you can build a frame around and use the structure you created. My thing that can still store items but drastically reduce the weight of a full wood construction. Girl after my own heart. Love figuring out time and space saving solutions. Wish I had your finishing skills! Someday…. 🙂
Jehnakai says
Thank you so much! I am so tired of trying to reach into our blind corner, but none of the premade ones are small enough to use with our narrow door opening.
Richard says
I have been a cabinet maker for over 60 years and it would seem to me that your trying to re-invent the wheel. First of all, the amount of material used to make this “space saver”,takes up a lot of room. I am a retired cabinetmaker and I have always had the passion for cooking. This is not what ˆ would want to go through to get something in the corner drawers and t˙en obliviously I would have to put everything back so I can continue cooking. I give you credit for making this project work, but it is still not functional. Corner cabinets and how functional they are, larely depend on the size of the corner (meaning the layout of the kitchen), If the corner is not big enough, even your “idea” would not work, but a simple shelf would be better. I see that everyone that has commented on your idea, has ever.ything nice to say. I hope i’m not a disappointment. It does take skill to cut pieces of wood (material) to precise measurement and it is oblivious that you do have that skill.
Sandra says
Richard, thank you for your 60 year, experienced insight. Experienced craftsman and women have so much to offer the next generations of people who want to learn trade skills. It is fine to point out how your opinion differs and what you believe is a defect in design. Questioning what IS and what HAS BEEN –is what drives improvements and innovations.
I don’t think shelves in blind corner cabinets are very convenient at all…which is why I wanted to try to create something that would be more useful. It worked fine but I wanted a more high-end feel to the pull-out mechanism for my kitchen. I would do this in a shop of craft room if I didn’t have much space.
lise says
AWESOME POST!! I’ve been looking for a solution that doesn’t cost an arm and a leg in prep for rebuilding our kitchen and I can’t stop thinking about how to fix the last problem!
I’m starting our cabinets in the next week and would love to make a further attempt at this system. Since I haven’t put in dozens of hours on this project yet I would be SO grateful for your input on a few ideas and would love to update you on the results when I finish up!
What would you think about swapping the pocket door hardware for another caster and track system like you built for the drawer carcass? And replacing the piano hinge & 3/4 ply piece with 2 or 3 door hinges attaching to a 2×4? I was thinking I’d move the track system for the drawer carcass to the backside of the cabinet so I could add an additional pair of casters to the non-hinging side of the pull out. My thoughts were that it would relieve the weight on the hinge system when everything is closed up and also help with pushing back into the cabinet.
What do you think? Viable options worth testing? Or is there something problematic you can see that I might be missing?
Thanks so much for the wonderful content! I’m so excited to give this a try!!
Sandra says
Honestly ,I can’t picture what you’re describing but I’m interested to know how it works for you.
Aditiastiti says
I was going to try this using bull’s eye wheel / ball bearing caster
Lars says
Have to admire your tenacity. Getting things to move within a tolerance is a challenge. Way to go !!
sully says
Hi, i loved your idea. I’ve been struggling with a corner cabinet for years.
Question… what are the rail and wheels called??
I live on a small island , so I buy the online and have them shipped.
Thanks for your help.
Sandra says
Those are parts of a pocket door kit. I included a link to the product I used in the post – so you can see what you’re looking for.
DAVID M SEVERANCE says
So watching your video made me wonder if puting the first part on a piece of plywood with full extenders, with a second set on the cubbie thing going at 90 degrees rather than the piano hinge. to make this work, the section in the blind area would have to be on a piece of plywood as well high enough to go over the drawer slides of the pull out cabinet. you might be able to go one step further with the rear section and do drawers that would open and close while the pull out section is sitting in front of the other cabinet door.
Sandra says
I changed the drawer system there and sold that house so now someone else will have to pick up the torch and figure out this mystery! LOL
DAVID M SEVERANCE says
that is one way to solve the problem. Ill let you know if my concept works.