Blum installation instructions leave a lot to be desired but the hardware is great. I pretty much always use Blum Tandem plus Blumotion for my drawer slides. Once you learn how to make sense of the drawer sizing instructions, Blum drawer slides are much easier to install than side mounted drawer slides. Once your drawers are build, Installation is a breeze.
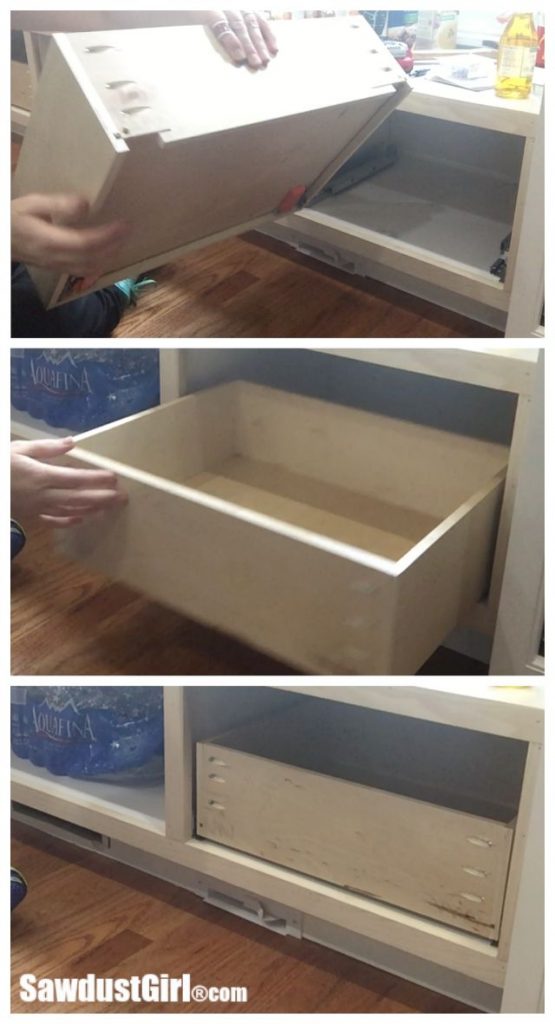
How to Build a Drawer for Blum Drawer Glides
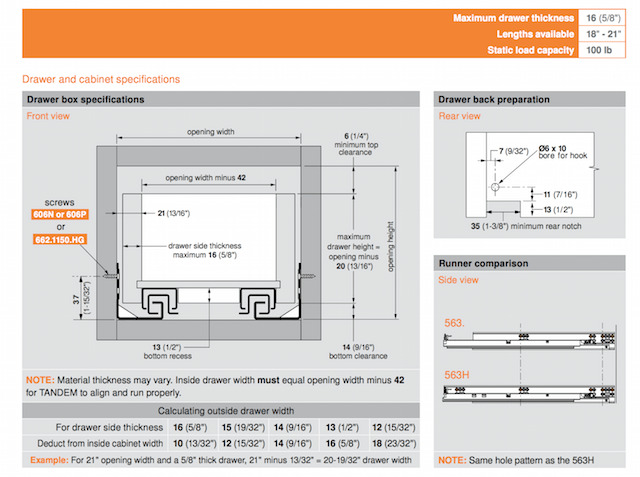
Every time I install these Blum drawer runners I have to look up the installation guide, FIND the section on notching and boring for the drawer runner and then translate the metric measurements into imperial so my brain will recognize what the instructions are telling me to do. They finally started including metric and imperial measurements so I don’t have to translate. Yeah! But when I look at this diagram, it makes my head spin a bit.

I think it could be done better. I need an instructions that make sense to my brain so I created the following instructions for anyone (including myself next time I need this info) to use when they are picking out drawer runners and then figuring out how to notch and bore for the locking mechanism.
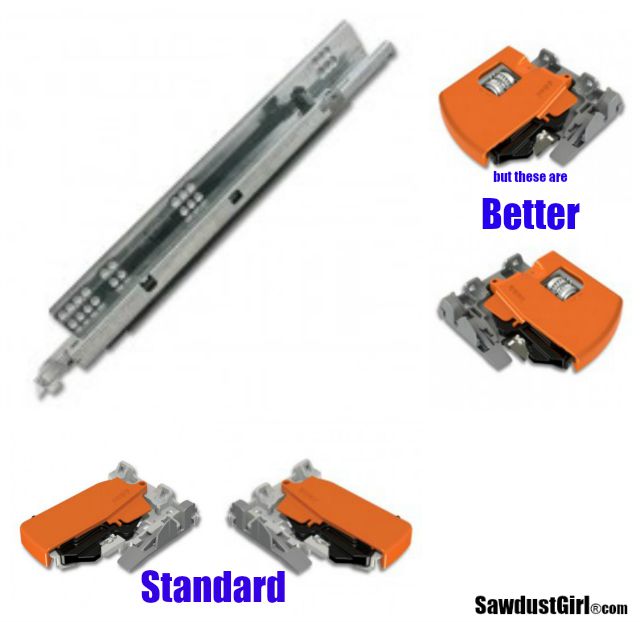
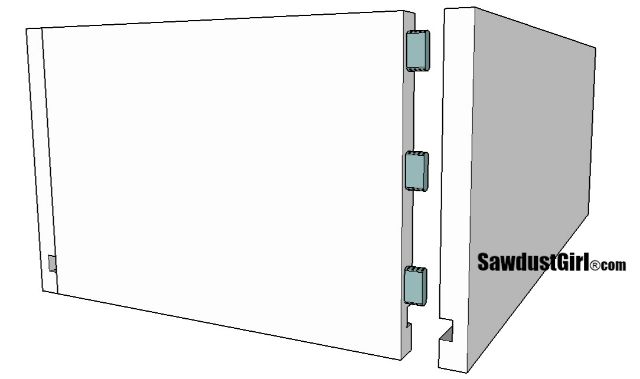
Locking mechanisms
You have to order a right and a left locking mechanism for each drawer slide pair you purchase. (The slides come in pairs. The locking mechanisms are sold individually.)
So, make sure that for EACH drawer you are building you order:
- 1 pair of drawer slides (sold as a pair)
- 1 Left locking mechanism
- 1 Right locking mechanism
- Screws (I use #6 1/2″ for locking mechanism and #8 5/8″ for drawer slide)
I shop around for the best price whenever I need a new batch.
Important: You have to order the correct glides for the thickness for the drawer material you are using. Most of us build drawers with 1/2″ to 5/8″ thick material. The instructions in this post are specifically for the 563H Drawer runner for 1/2″ -5/8″ material!
*Also, the Blum drawer runners come in 3″ increments. Decide which runners will work in your cabinet and then build your drawer the same length as your runners.
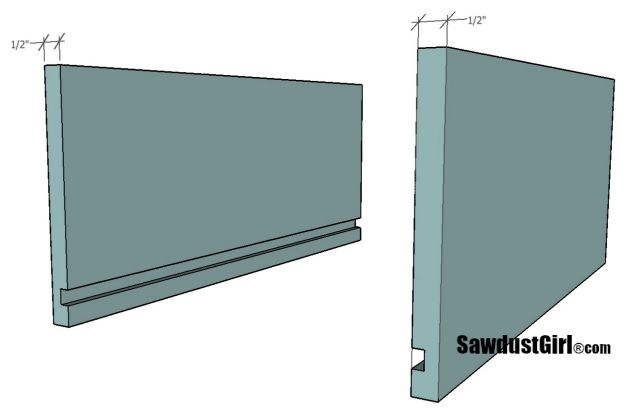
Size your drawer
- Measure your cabinet opening.
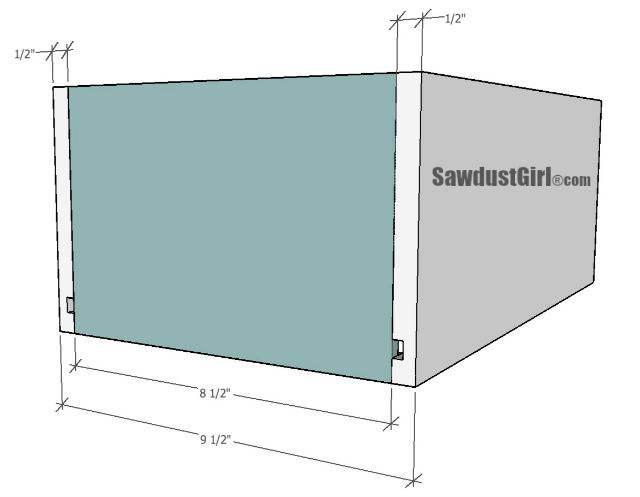
- Easy interpretation of the below Blum diagram: If you’re using 1/2″ plywood to build your drawers, subtract 5/8″ from your cabinet opening to determine the outside width of your drawer.
The sides should extend the full length of your drawer. The front and back should be installed INSIDE your sides. With 1/2″ plywood, the math for the width of your drawer front and back is easy — subtract 1″ from the outer width.
The front and back parts can be attached to the drawer sides in a number of ways: the easiest of which are loose tenons, dowels or pocket screws.
Most people have a pocket hole jig so that’s what I’m using for this tutorial.
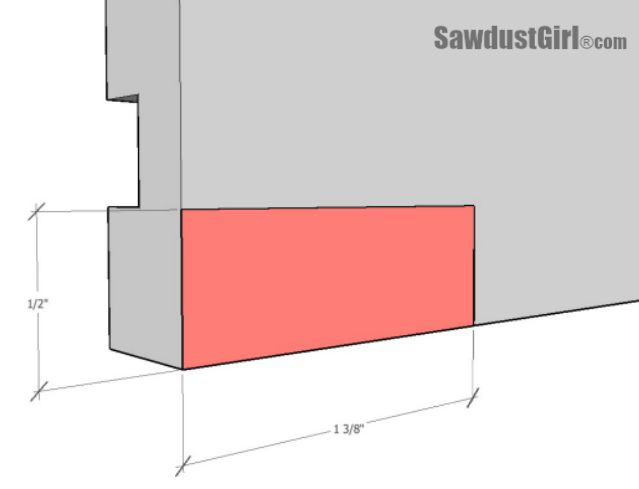
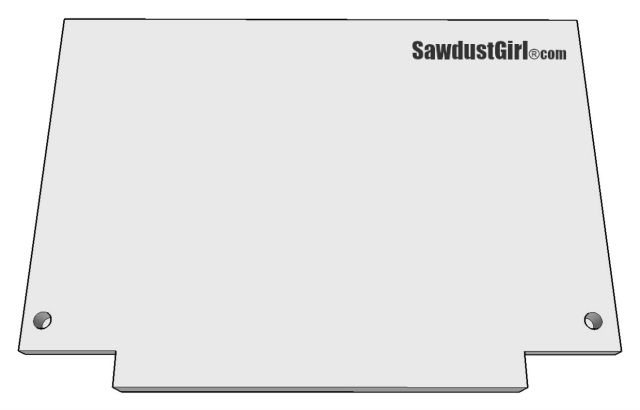
Prepare the drawer back for the drawer runners.
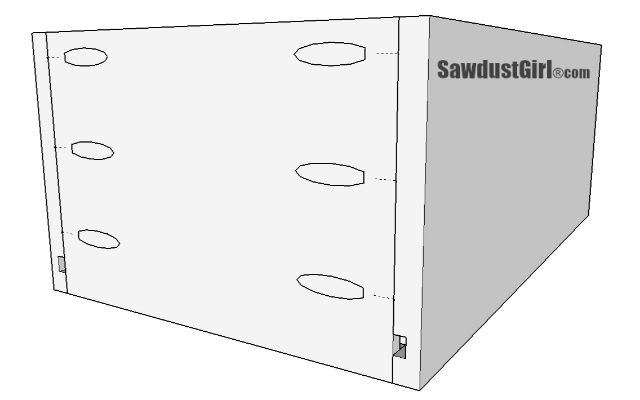
Before you build your drawer, you need to prepare the drawer back. It’s easier to do this before assembly than after. You need to drill a 1/4″ hole and cut a notch for your drawer glide. You need to do this on both the right and left side of your drawer back. I have a tutorial for the Blum hole drilling jig I created. It holds the drawer back and allows one to drill the hole in the exactly correct location without measuring for every single hole.
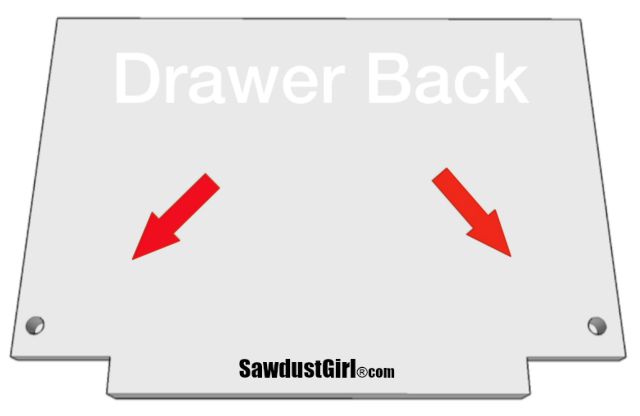
Make sure you are doing this on the BACK side of the drawer back. The groove for the drawer bottom is on the inside of the drawer. The opposite side of that groove is the drawer back (and the bottom of the drawer back — back.)
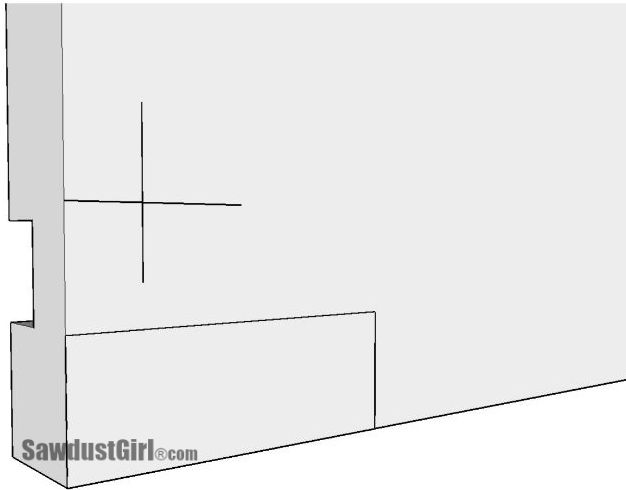
IMPORTANT: 563H Drawer runner is for 1/2″ -5/8″ thick drawer material and that is what these specific notching and boring measurements are for.
The notch you’ll need to cut out is 1/2″ tall by 1 3/8″ wide (minimum). You can cut that out with a jigsaw.
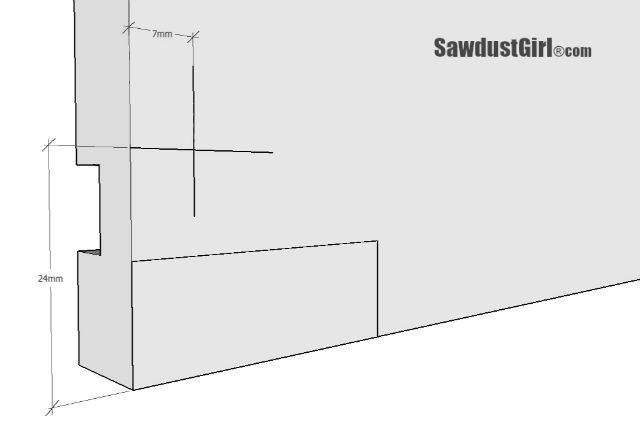
The 1/4″ hole you need to drill out is as shown below. 9/32″ is difficult to find on a tape measure so I find it easier to use a metric ruler for this part.
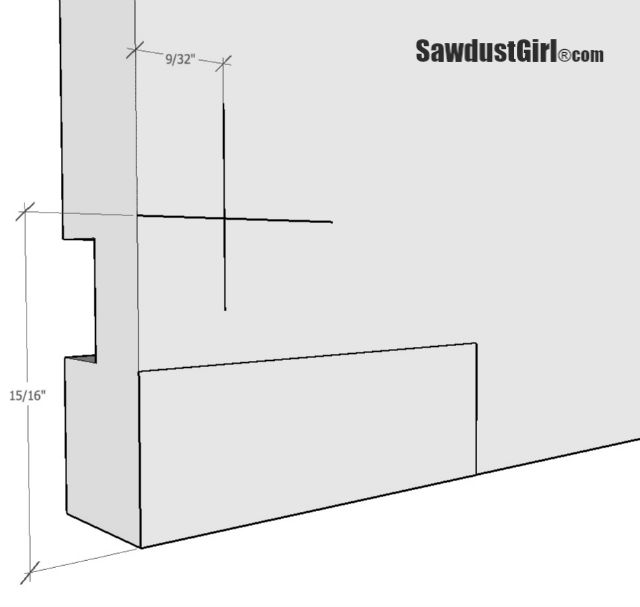
7mm over and 24mm up is easier to find on a metric ruler.
You can even print out the PDF versions of my drawings for convenience.
Build your drawer
Using floating tenons, dowels or pocket screws. Make sure you DO NOT drill a pocket hole on or too near the groove for the drawer bottom. If you drive a screw in the groove, the drawer bottom will not slide into place.
When you’re drawers are built and you’re ready to install, check out my tutorial and tips for installing drawers with Blum Tandem with Blumotion drawer slides.
Tom says
Great tutorial! Where are you getting the prefinished drawer material? I love that it is pre-routed for the bottoms.
Sandra says
Thanks Tom. I picked mine up at a lumber yard. It’s not generally available at home improvement stores but you can usually get it at a lumber store. Might be able to find it online too.
Nancy williams says
Hey there,
I jumped for joy when I saw your post. I modified the dormer window cabinet plan you drew for me for drawers inside of doors and am ready to build the drawers. I noticed that you buy the glides for frameless cabinets…are you using the on cabinets with face frames? What’s the difference?
Thanks in advance,
Nancy
Sandra says
Hi Nancy! I can’t see any difference in the runners that say for faceframe from the ones for frameless other than they are $2 more. I simply block out behind the faceframe to make the cabinet flush with the faceframe. I always do this, regardless of the type of glides I use. I don’t like “back mounting brackets” that you can use with faceframe glides. I prefer to have screws in the sides. I think it’s more stable.
Sarah Bonn says
I have pre-soft close blum drawer glides that came from the cabinet mfg. They are definitely high quality & 20 years after the original owner redid the kitchen they are still like silk. The cabinets are high quality too, so I’m keeping them, but I need more so I’ll be using your awesome tutorials to build some. This one is very helpful – thanks!!
Sandra says
Glad it will be of use. I love my Blum soft close drawers and they are so much easier to work with as a DIY’er. Trust me! I’ve worked with a LOT of drawer glides over the years. LOL
Becky says
If I have a 24 in deep base cabinet, will a 24 in glide work? I have a need for a drawer that is more than 21 in deep. Thanks for your help!
Ramon valdez says
Ive installed literally thousands of these and your tutorial is spot on! Great info for anyone using this type of drawer guide. (there is an alternate way to make the back piece of the drawer box, which eliminates the need for the notch and makes for a stronger drawer box. Let me know if you’re curious).Thanks!
Ramon – Instagram @ramonartful
Naushad says
Hi Ramon,
Could you please send me the instructions. Being a novice, would like to check it out.
Thank you!
Naushad
Frances Phillips says
I would like to know your alternative that eliminates notching the back of the drawer.
Robert says
Hey I am so excited I found your website, I really found you by
accident, while I was browsing on Bing for something else,
Anyhow I am here now and would just like to say cheers for a incredible
post and a all round thrilling blog (I also love the theme/design), I
don’t have time to go through it all at the moment but I have bookmarked
it and also added your RSS feeds, so when I have time I will be
back to read a lot more, Please do keep up the excellent jo.
Plant growth regulator
Corina says
Right here is the perfect site for anybody who wants to understand this topic.
You realize so much its almost tough to argue with you (not that I personally will
need to…HaHa). You certainly put a fresh spin on a subject that has been written about for many years.
Wonderful stuff, just great!
Metafolin
Jim says
Google “prefinished drawer sides” to find suppliers. I bought some from Woodcraft some years ago (quite satisfactory). Unfinished preslotted sides can be bought from Rockler (Baltic birch plywood).
I’ve just completed four drawers for these Blum slides, making them 21-1/2 inches long rather than the nominal 21 inches, to get as much space as possible. Although the instructions for installing the locking mechanisms show them being screwed to the bottom rear of the drawer front, in fact they have additional mounting holes that let you screw them into the drawer bottom if it’s thick enough (or you could glue them). As I was using half-inch prefinished plywood for the bottoms this worked fine. I just used a piece of half-inch scrap as a spacer to position the locking mechanisms that much back from the drawer front when attaching them. All that’s necessary is that they be positioned the correct distance (20-1/2 inches for a nominal 21-inch slide) from the back of the drawer. If the drawer bottom is too thin to screw into, you could insert a filler strip of appropriate width behind the drawer front and screw into that.
pom normandy says
I’m a woodworker- cabinet builder and Blum motion is the only draw slides I use. I buy them at EB Bradley. Just call in the order – tell them what you need and they will figure out all the components and screws needed. The other thing you forgot to mention is there is a jig you can buy to make your installation go a little smoother. You can’t overshot with the jig. Additionally, cutting the backs- I always use my dosuki and not the dado blade on my sawstop.
Doug Turner says
Thanks for this. I rarely use mechanical slides, and when I do, I’ve got to wrap my head around the unnecessarily complicated instructions. Simply put, great products, horrific instruction design.
Desmond OKelly says
Is there a Jig from blum for drilling the holes in the back and front the drawer to accept the slide.?
Sandra says
They do. The cost is around $50. I haven’t purchased it because I think that’s a ridiculous price for a jig for that purpose. If I knew someone with a 3D printer…
John Thompson says
I have used Blum undermount soft-close and love them too.
I agree that Blum builds great products and does a TERRIBLE job on instructions.
You have an amazing way of explaining things well–love your tutorials.
Have you worked with Tip-On Blumotion for wood drawers I am building?
If so, I would love a link to your tutorial.
Steve Hoff says
I have been building custom cabinets and other wood projects for the last 5 years. I recently switched from Hettich to Blum drawer slides and have been too lazy to create a roadmap for install so each time I do a project I have to sit down and think through all the measurements….(I know, pretty dumb for someone who gets paid to do this!). Thanks to your post here I have been able to do that and now have some useful instructions that even my most rookie helper can follow. Can’t thank you enough for your well-laid out instuctions for the Blum….:)
Rick Anderson says
Fantastic … thank you!