• Home
  • About
    • Personal Posts
  • Privacy
  • Shop
    • My Account
    • Checkout
    • Email
    • Facebook
    • Instagram
    • Pinterest
    • Twitter
    • YouTube
Sawdust Girl®

Sawdust Girl®

Renovation, cabinet building and woodworking plans and tutorials. Build like a Girl®

  • My Home
    • Clinton TN House
      • Clinton TN House in Progress
    • Maryville TN House
      • Maryville TN House Tour – Completed Rooms
      • Maryville TN House in Progress
        • Basement
        • Basement Storage Closet
        • Bedroom Office
        • Craft Room
        • Dining Room
        • Entry
        • Garage
        • Guest Bedroom
        • Hallway
        • Jack and Jill Bathroom
        • Kitchen
        • Kitchen Entry
        • Laundry Room
        • Library
        • Living Room
        • Loft
        • Madison’s Room
        • Master Bedroom
        • Master Closet
        • Pantry
        • Porch
        • Powder Room
        • Wes’ Office
    • Illinois House
    • Calderwood Cottage
  • My Workshop
    • Clinton Workshop
  • Build & Breakfast
  • Cabinet Making 101
    • Cabinets
    • Doors
    • Drawers
  • Projects and Plans
    • Countertops
    • Beds
    • Benches
    • Bookshelves
    • Desks
    • Gift Ideas
    • Holiday
      • Christmas
      • Halloween
    • Home Accessories
    • Kids
    • Kitchen Cabinets
    • Lockers
    • Nightstands
    • Organization accessories
    • Recipes
    • Sewing
    • Tables
    • Vanities
    • Wardrobes
    • Woodworking
      • Wood Finishing
    • Workshop
    • Workshop Storage and Organization
  • Remodeling 101
    • Baseboard and Trim
    • crown molding
    • Demolition
    • Door and Window Casings
    • Door Installation
    • Drywall
    • Electrical work
    • Flooring
    • Home Maintenance
    • Painting
    • Plumbing
    • Resources
    • Safety
    • Tile
    • Wall and Ceiling Treatments
  • Sawdust Squad
  • The Sawdust Diaries
    • Andrea
    • Ava D.
    • Beckie F.
    • Cara C.
    • Courtney B
    • Fawn T.
    • Jenn D.
    • Kelly C.
    • Kristy K.
    • Lara T.
    • Malisa B.
    • Marnie D.
    • Robin C.
    • Val F.
  • Tools
    • Products
    • Tool Reviews & Overviews
    • Inspiration & Ideas

Replacing Wood Floor Decorative Insert

All Posts, Flooring, Kitchen Entry

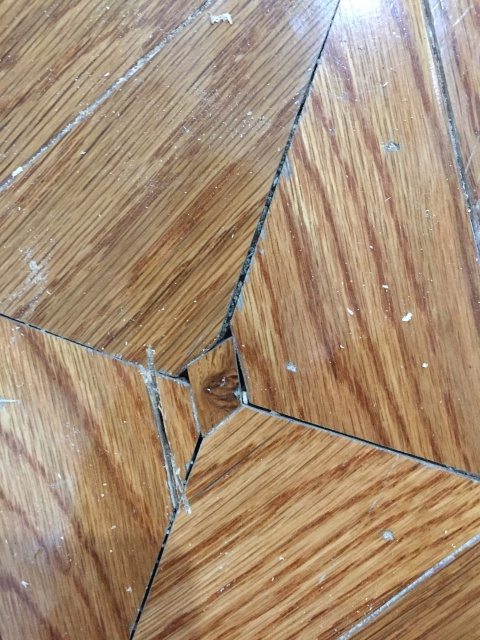
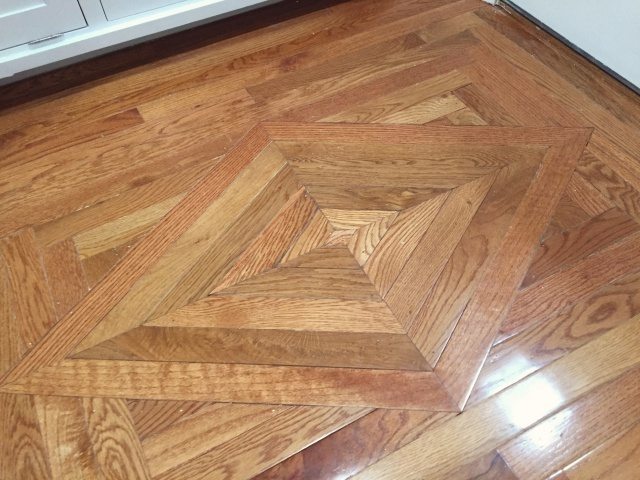
There are about a million little details that need to be addressed in order to completely finish this entry.  The decorative insert in the wood flooring is one.Replacing Wood Floor Decorative Insert

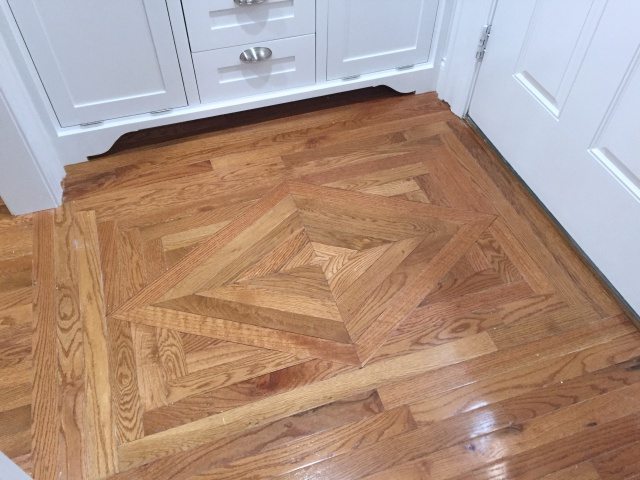
We had to install the wood flooring with the kitchen remodel, as the kitchen was originally tile. This kitchen entry area was a new addition too and it seemed the perfect place for a decorative design.  I had just had back surgery so one of the handy men installed it, loosely based on my powder room design.  He did a great job but was not happy with the very last piece. It wasn’t a big enough priority to come back to at that time, so it stayed — for 3 years until I took on the 289 day Kitchen Entry Remodel!

Replacing decorative flooring insert

I decided I’d have to cut out a more of the surrounding wood to create a larger, more uniform diamond.  I initially thought I’d eyeball it and started free-handing the cut with an oscillating too.  Then I decided a better plan would be to cut out a new decorative insert FIRST.

I jury rigged a jig that I could slide along the rip fence on my table saw.  It held the scrap piece in place, I cut the first angles with the wood on one side of the fence.  Then moved the fence and the jig to the other side of the blade to finish the cuts.  In each position, I made one pass with the wood facing up, and another pass with the wood flipped upside down.  

It was wonky but did the trick.  I really need to invest some time making some proper jigs but I don’t like spending time making things just to make things.  I just want to make the things.Replacing decorative flooring insert

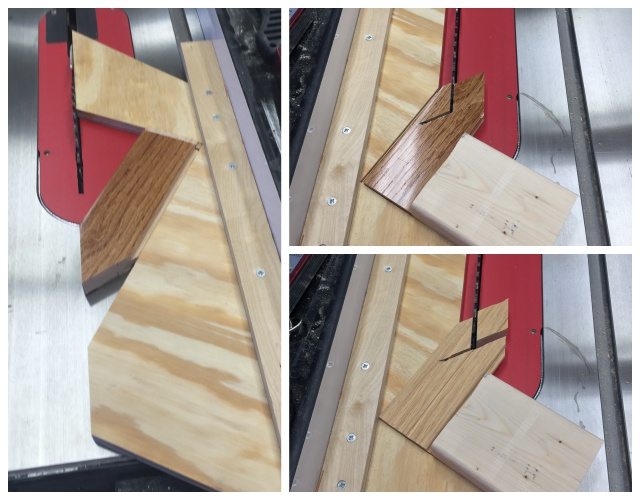
Armed with my new diamond insert, NOW I’m ready to cut out the old floor.  I traced the outline of the new insert with a sharpie.Replacing Wood Floor Decorative Insert

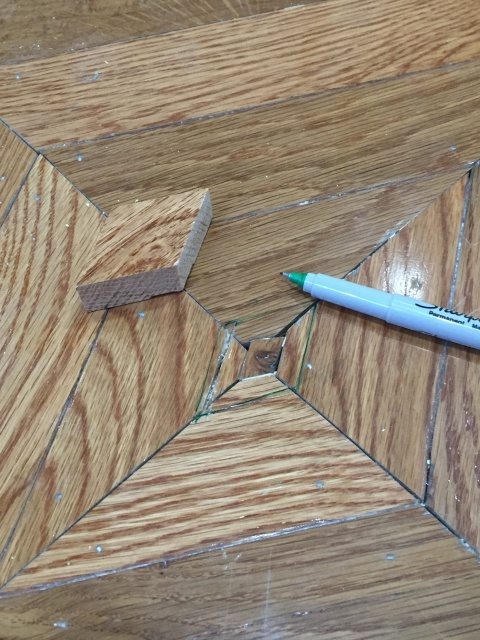
Next, I used my oscillating tool to cut out the floor on my mark.  Replacing Wood Floor Decorative Insert

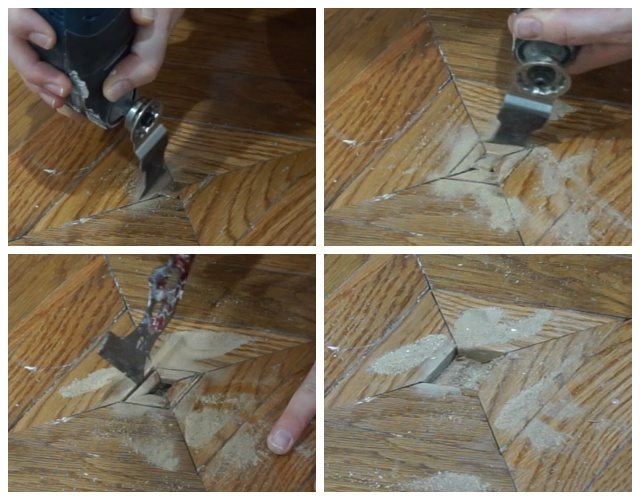
I vacuumed up all the sawdust and dropped in my decorative insert and nailed it into place.  Replacing decorative flooring insert

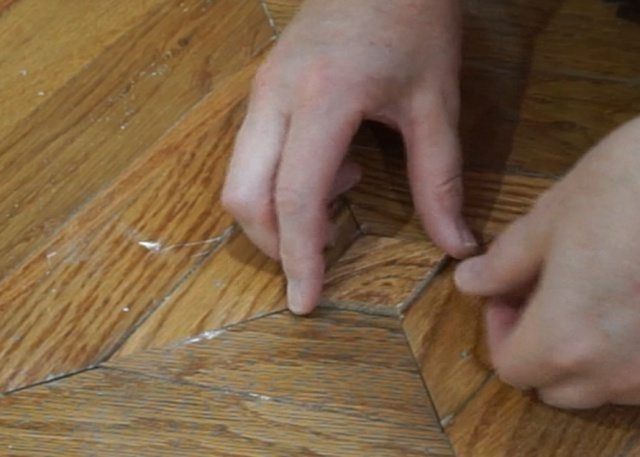
It’s not absolutely perfect but it’s good enough for me to move on — and not come back to ever.Replacing decorative flooring insert

Replacing Wood Floor Decorative Insert 
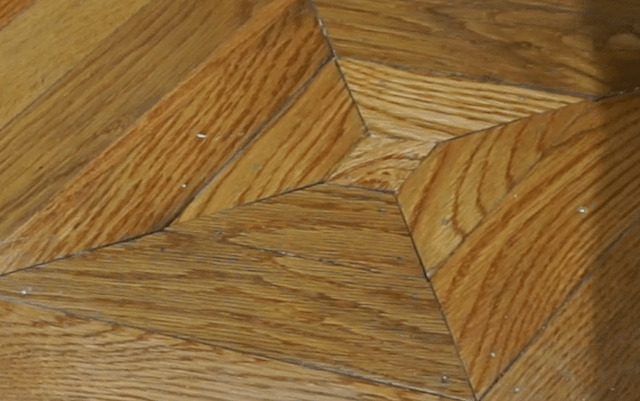
Now on to the other 57 small details to finish and this space will be complete!

November 14, 2016 · 13 Comments

« Doors, Drawers, and Drawer Fronts – Day 10
Patching holes and then patching some more holes — Day 13 »

Comments

  1. Kathleen says

    November 14, 2016 at 9:24 am

    Seriously, you are my hero. I’ve done some DIY, that I’m pretty impressed with, but you are amazing. I’m so jealous of your talent.

    Reply
    • Ange says

      November 14, 2016 at 9:45 am

      I totally agree!

      Reply
    • Katherine says

      November 17, 2016 at 12:06 pm

      Ditto! This woman is my idol!

      Reply
  2. Carla says

    November 14, 2016 at 12:05 pm

    This remakeis sort of like Ground Hog Day (the movie).

    Reply
    • Sandra says

      November 15, 2016 at 6:23 pm

      LOL It feels like it too.

      Reply
  3. Peggy says

    November 14, 2016 at 2:44 pm

    I was drooling over the diamond pattern on the floor, never noticed the center piece. Cutting a larger diamond first is genius. I am just so impressed with your designs and skills and yes your perfectionism. I am a perfectionist but not your wonderful skills. So many times I wanted to learn carpentry skills but life got in the way. You are just amazing!

    Reply
    • [email protected] says

      November 14, 2016 at 10:04 pm

      It’s never too late, Peggy.

      Reply
    • Sandra says

      November 15, 2016 at 6:24 pm

      Yes Peggy! It’s never too late. Jump in!

      Reply
  4. Vickie H. says

    November 14, 2016 at 8:23 pm

    Pretty damned close to perfect if you ask ME!!! Great job, girl!!!

    Reply
    • Sandra says

      November 15, 2016 at 6:22 pm

      Oh you’re too kind. Thanks!

      Reply
  5. [email protected] says

    November 14, 2016 at 10:05 pm

    You did a great job on that patch! The original one would have driven me crazy every time I looked at it.

    Reply
    • Sandra says

      November 15, 2016 at 6:23 pm

      Oh I know it would have! 😀

      Reply
  6. Katherine says

    November 17, 2016 at 12:07 pm

    It looks perfect to me, too! Another beautiful job, Sandra!

    Reply

Leave a Reply Cancel reply

Your email address will not be published. Required fields are marked *

Categories

New Post email notification signup

You Subscribed!

Legal Stuff

Terms of Use

Privacy Policy

Disclosure

Recent Posts

  • Lodge Update – Floors, Cabinets, Countertops, and Appliances
  • Lodge Kitchen Cabinet Progress
  • Halloween Mad Gab – Halloween Party Ideas
  • Concrete Backsplash or Vertical Wall Treatment
  • Building and Installing a Giant Faux Beam on the Ceiling

Disclaimer:

Although it is my intention to provide accurate plans and clear instructions, not all plans have been tried and tested. Using plans or information found on SawdustGirl.com indicates that you agree with the Terms of Use policy and will accept full responsibility for the process and outcome of any project you attempt. All plans are for private use only. Plans and information published on SawdustGirl.com may not be reproduced, republished or distributed in any manner without written permission from Sandra Powell, Sawdust Girl. Actual projects built using Sawdust Girl plans may be published on your own site without instructions or "tutorial" as long as you provide a link to my original post with full post title or "SawdustGirl.com" as link title.

Copyright © 2022 · anchored theme by <a target="_blank"