• Home
  • About
    • Personal Posts
  • Privacy
  • Shop
    • My Account
    • Checkout
    • Email
    • Facebook
    • Instagram
    • Pinterest
    • Twitter
    • YouTube
Sawdust Girl®

Sawdust Girl®

Renovation, cabinet building and woodworking plans and tutorials. Build like a Girl®

  • My Home
    • Clinton TN House
      • Clinton TN House in Progress
    • Maryville TN House
      • Maryville TN House Tour – Completed Rooms
      • Maryville TN House in Progress
        • Basement
        • Basement Storage Closet
        • Bedroom Office
        • Craft Room
        • Dining Room
        • Entry
        • Garage
        • Guest Bedroom
        • Hallway
        • Jack and Jill Bathroom
        • Kitchen
        • Kitchen Entry
        • Laundry Room
        • Library
        • Living Room
        • Loft
        • Madison’s Room
        • Master Bedroom
        • Master Closet
        • Pantry
        • Porch
        • Powder Room
        • Wes’ Office
    • Illinois House
    • Calderwood Cottage
  • My Workshop
    • Clinton Workshop
  • Build & Breakfast
  • Cabinet Making 101
    • Cabinets
    • Doors
    • Drawers
  • Projects and Plans
    • Countertops
    • Beds
    • Benches
    • Bookshelves
    • Desks
    • Gift Ideas
    • Holiday
      • Christmas
      • Halloween
    • Home Accessories
    • Kids
    • Kitchen Cabinets
    • Lockers
    • Nightstands
    • Organization accessories
    • Recipes
    • Sewing
    • Tables
    • Vanities
    • Wardrobes
    • Woodworking
      • Wood Finishing
    • Workshop
    • Workshop Storage and Organization
  • Remodeling 101
    • Baseboard and Trim
    • crown molding
    • Demolition
    • Door and Window Casings
    • Door Installation
    • Drywall
    • Electrical work
    • Flooring
    • Home Maintenance
    • Painting
    • Plumbing
    • Resources
    • Safety
    • Tile
    • Wall and Ceiling Treatments
  • Sawdust Squad
  • The Sawdust Diaries
    • Andrea
    • Ava D.
    • Beckie F.
    • Cara C.
    • Courtney B
    • Fawn T.
    • Jenn D.
    • Kelly C.
    • Kristy K.
    • Lara T.
    • Malisa B.
    • Marnie D.
    • Robin C.
    • Val F.
  • Tools
    • Products
    • Tool Reviews & Overviews
    • Inspiration & Ideas

Wood floor design in powder room

All Posts, Hall Bath

patterned wood floors - SawdustGirl.com


Tuesday is was pouring all day so I couldn’t work on building my office furniture so I looked for something to work on inside the house.  I decided to install the floors in my tiny powder room.  This used to be a full bathroom but I discovered the bathtub was in the living room when I tore out the coat closet…long story.  So now it’s just a powder room– going to be a powder room.


Installing patterened wood floors - SawdustGirl.com

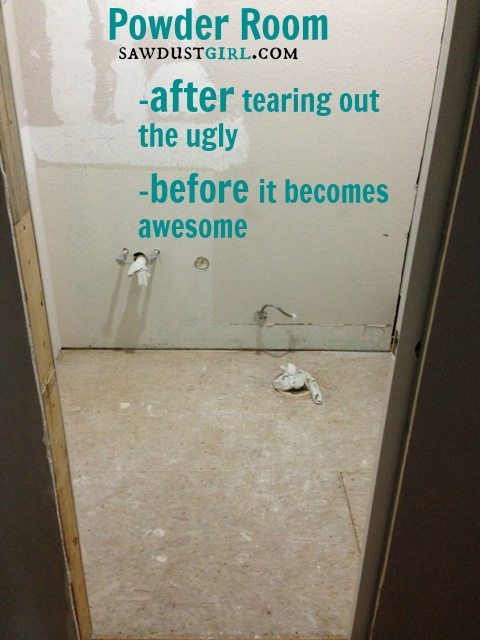
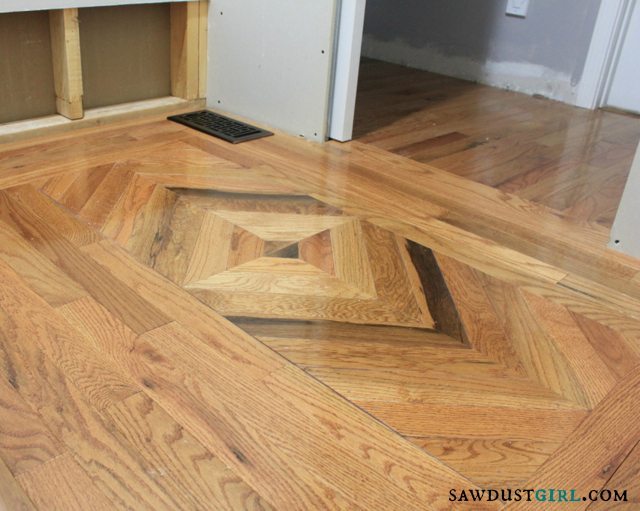
I thought I could knock it out in a day.   As always, I underestimated how long it would take!  I had always planned on doing some kind of patterned floor for the powder room but hadn’t decided what so I just made it up as I went.  I installed around the room to create a border.

Installing patterened wood floors - SawdustGirl.com

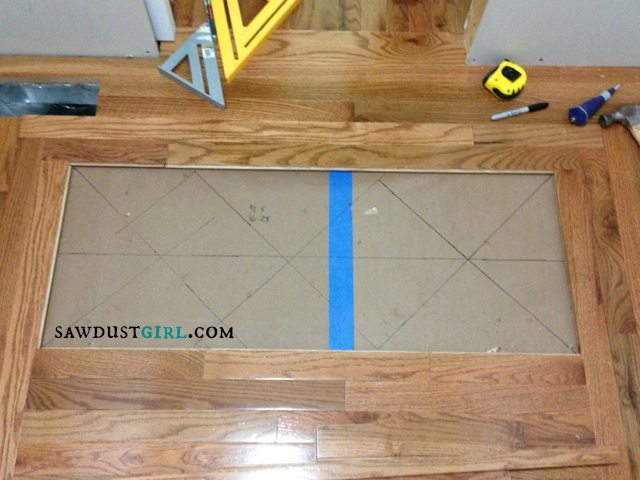
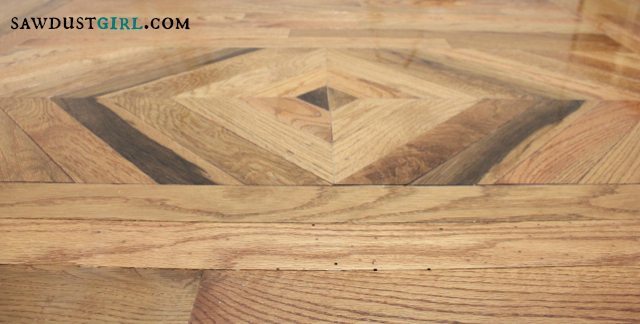
Then I got to the point where I needed to come up with a design that would fit within my rectangle — and that was difficult.   I tried some different designs and tried to work the math but my brain is more creative than systematic so the mathematical aspect of trying to create a design was difficult for me.  I finally came up with a fairly easy pattern.

Installing patterened wood floors - SawdustGirl.com

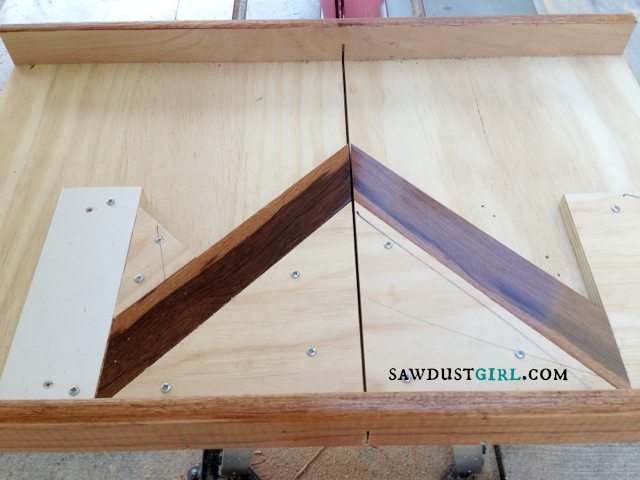
I built a jig for my table saw so I could cut all the pieces the same, quickly and accurately.  It’s crude but it worked.

Installing patterened wood floors - SawdustGirl.com

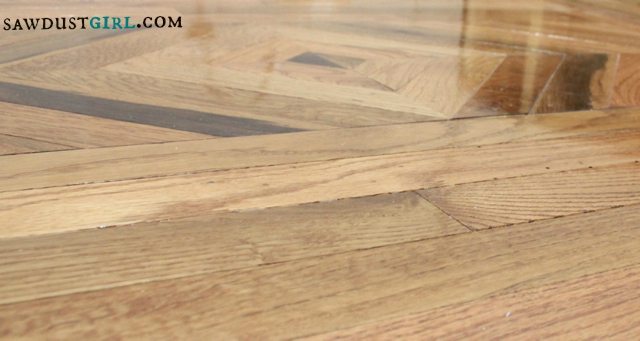
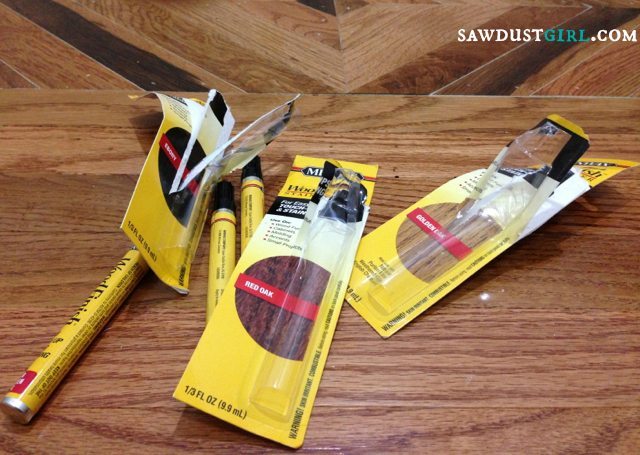
I filled all the nail holes with stainable wood filler and then used a combination of stain markers to try my best to hide them.

Installing patterened wood floors - SawdustGirl.com

It’s not perfect but it’s done.  2 1/2 days later!

patterned wood floors - SawdustGirl.com

patterned wood floors - SawdustGirl.com

June 21, 2013 · 18 Comments

« Kristy 4- Bedroom Built-ins
Kristy’s Bedroom – Part 2 »

Comments

  1. CaraLyn says

    June 21, 2013 at 4:40 pm

    It looks awesome!! I love it!!

    Reply
  2. Julie W says

    June 21, 2013 at 5:30 pm

    See, I could never get that to look right. Love it!

    Reply
  3. Malisa says

    June 22, 2013 at 1:06 am

    That’s cool.

    Reply
  4. kristin says

    June 22, 2013 at 9:44 am

    Pretty cool Sandra!

    Reply
  5. Christan says

    June 22, 2013 at 12:11 pm

    Awesome post! I appreciate your “I’ll just figure it out as I go” approach and don’t let a project hold you back. Following this blog has given me confidence to start projects in my own home (while unemployed) and document them along the way. Just wanted to share how you’re blog has influenced a random across the states to do more creative things he never thought he could do!

    Reply
    • Sandra says

      June 25, 2013 at 8:32 am

      Thanks Christan. It means the world to hear that.

      The “fly by the seat of your pants” program doesn’t work for everyone but it’s my preferred method.

      Reply
  6. kim massa says

    June 22, 2013 at 9:22 pm

    Beautiful, you did a great job!

    Reply
  7. Guerrina in CT says

    June 22, 2013 at 11:39 pm

    I love it!

    Reply
  8. jb @BuildingMoxie says

    June 24, 2013 at 8:41 am

    well done Sandra … I don’t know I would have taken the time to build a jig, but I see it gave you nice consistent cuts. Don’t know either I would have put the time into the floor before sheetrock but sometimes you just fight the flow to just keep going. looking good.

    Reply
    • Sandra says

      June 25, 2013 at 8:33 am

      …but you know that if you were ME you would have done it just the way I did because there is always a plan and a reason… 😉

      Reply
  9. Jake's a Girl says

    June 24, 2013 at 9:39 am

    Two and a half days and Well Worth It. 🙂 It looks fantastic!

    Reply
    • Sandra says

      June 25, 2013 at 8:33 am

      Thanks!

      Reply
  10. Lisa E says

    June 24, 2013 at 12:16 pm

    Looks amazing!

    Reply
  11. Erica says

    June 24, 2013 at 12:59 pm

    It looks fabulous! I always love seeing your projects come to life.

    Reply
    • Sandra says

      June 25, 2013 at 8:27 am

      Thank you Erica!

      Reply
  12. Kristi says

    June 25, 2013 at 12:33 pm

    It looks awesome!

    Reply
  13. Kayce Steadman says

    July 1, 2013 at 5:27 pm

    Hi Sandra, Did you use a regular finish nail gun to install your hardwood floors? I will be installing mine soon and thought there was a special kind of gun for that.

    Reply
  14. Tanya says

    November 18, 2013 at 3:00 pm

    So, I’m curious. Did you use prefinished hardwood flooring? And is there two different shades (part of the diamond looks a bit darker)?
    I ask because we are in discussions about the border I want in my living room, and I really like your idea!

    Reply

Leave a Reply Cancel reply

Your email address will not be published. Required fields are marked *

Categories

New Post email notification signup

You Subscribed!

Legal Stuff

Terms of Use

Privacy Policy

Disclosure

Recent Posts

  • Lodge Update – Floors, Cabinets, Countertops, and Appliances
  • Lodge Kitchen Cabinet Progress
  • Halloween Mad Gab – Halloween Party Ideas
  • Concrete Backsplash or Vertical Wall Treatment
  • Building and Installing a Giant Faux Beam on the Ceiling

Disclaimer:

Although it is my intention to provide accurate plans and clear instructions, not all plans have been tried and tested. Using plans or information found on SawdustGirl.com indicates that you agree with the Terms of Use policy and will accept full responsibility for the process and outcome of any project you attempt. All plans are for private use only. Plans and information published on SawdustGirl.com may not be reproduced, republished or distributed in any manner without written permission from Sandra Powell, Sawdust Girl. Actual projects built using Sawdust Girl plans may be published on your own site without instructions or "tutorial" as long as you provide a link to my original post with full post title or "SawdustGirl.com" as link title.

Copyright © 2022 · anchored theme by <a target="_blank"