• Home
  • About
    • Personal Posts
  • Privacy
  • Shop
    • My Account
    • Checkout
    • Email
    • Facebook
    • Instagram
    • Pinterest
    • Twitter
    • YouTube
Sawdust Girl®

Sawdust Girl®

Renovation, cabinet building and woodworking plans and tutorials. Build like a Girl®

  • My Home
    • Clinton TN House
      • Clinton TN House in Progress
    • Maryville TN House
      • Maryville TN House Tour – Completed Rooms
      • Maryville TN House in Progress
        • Basement
        • Basement Storage Closet
        • Bedroom Office
        • Craft Room
        • Dining Room
        • Entry
        • Garage
        • Guest Bedroom
        • Hallway
        • Jack and Jill Bathroom
        • Kitchen
        • Kitchen Entry
        • Laundry Room
        • Library
        • Living Room
        • Loft
        • Madison’s Room
        • Master Bedroom
        • Master Closet
        • Pantry
        • Porch
        • Powder Room
        • Wes’ Office
    • Illinois House
    • Calderwood Cottage
  • My Workshop
    • Clinton Workshop
  • Build & Breakfast
  • Cabinet Making 101
    • Cabinets
    • Doors
    • Drawers
  • Projects and Plans
    • Countertops
    • Beds
    • Benches
    • Bookshelves
    • Desks
    • Gift Ideas
    • Holiday
      • Christmas
      • Halloween
    • Home Accessories
    • Kids
    • Kitchen Cabinets
    • Lockers
    • Nightstands
    • Organization accessories
    • Recipes
    • Sewing
    • Tables
    • Vanities
    • Wardrobes
    • Woodworking
      • Wood Finishing
    • Workshop
    • Workshop Storage and Organization
  • Remodeling 101
    • Baseboard and Trim
    • crown molding
    • Demolition
    • Door and Window Casings
    • Door Installation
    • Drywall
    • Electrical work
    • Flooring
    • Home Maintenance
    • Painting
    • Plumbing
    • Resources
    • Safety
    • Tile
    • Wall and Ceiling Treatments
  • Sawdust Squad
  • The Sawdust Diaries
    • Andrea
    • Ava D.
    • Beckie F.
    • Cara C.
    • Courtney B
    • Fawn T.
    • Jenn D.
    • Kelly C.
    • Kristy K.
    • Lara T.
    • Malisa B.
    • Marnie D.
    • Robin C.
    • Val F.
  • Tools
    • Products
    • Tool Reviews & Overviews
    • Inspiration & Ideas

DIY Tables – Two Nightstands for the Guest Bedroom

All Posts, Free Plans, Nightstands, Tables

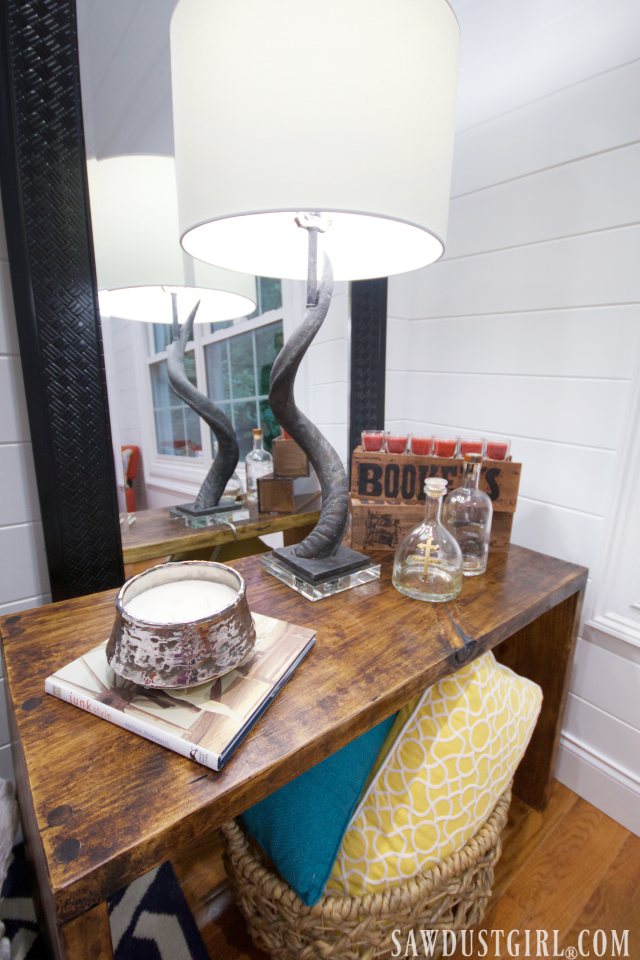
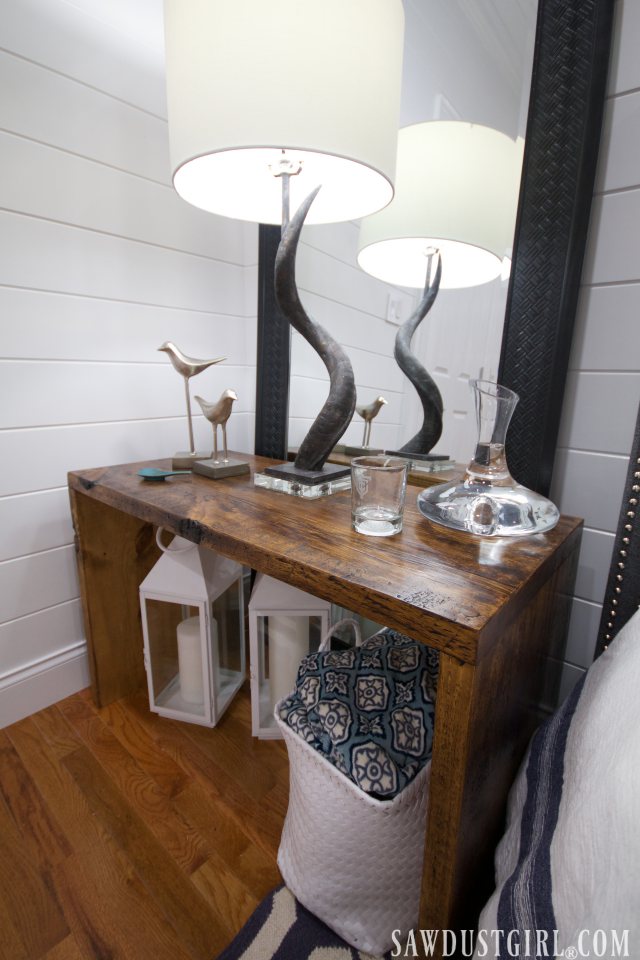
Julie and built these awesome diy tables to function as two nightstands in the guest bedroom.  We used easy joinery techniques and inexpensive wood.  The luxurious finish makes them look like a million bucks!  One benefit of building your own furniture is that you can make it any size you want.  To fill the space on each side of the bed, our nightstands are 18″ deep x 28″ wide x 24″ tall.

Refined finish on Pine Nightstands


DIY table

Selecting Wood for DIY Tables

Each diy table is formed from one 8′ long 18″ wide slab that is made by joining together 2x material.  Julie and I spent probably an hour looking through stacks of 2×6, 2×8 and 2×10 lumber.  Finding wood with lots of character is like hitting the jackpot.  We especially like saw marks, snipe and worm holes. Picking wood for DIY Tables

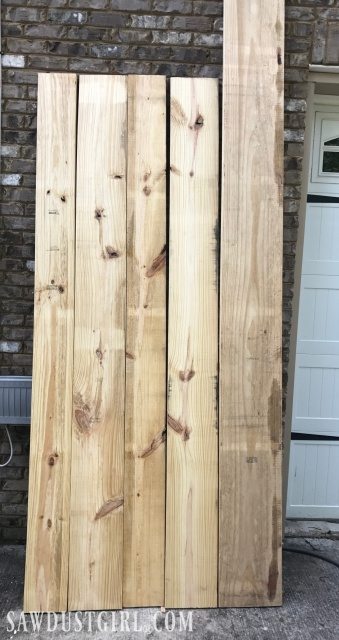
After selecting enough wood to build our two nightstands, we set out to pair the pieces together in the best visual arrangement that be at least 18″ wide.    We looked at each side of every piece and tried them together every which way until we found the best configuration for two wide slabs. Pairing wood that has similar grain patterns

Joining Wood into Wide Planks

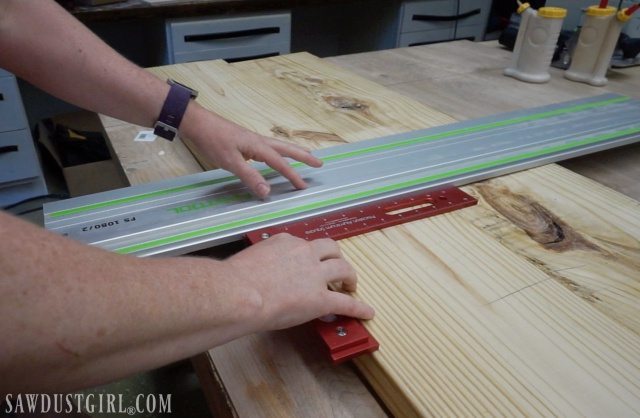
We want our diy tables to look like they are made out of one wide piece of wood.  To do that we have to edge join several pieces together.  It’s important to have straight edges when edge joining.  These planks are 8′ long which is too long to feel comfortable using my little jointer.  The easy alternative is to use a track saw. Using a track saw to joint wood before building diy tables

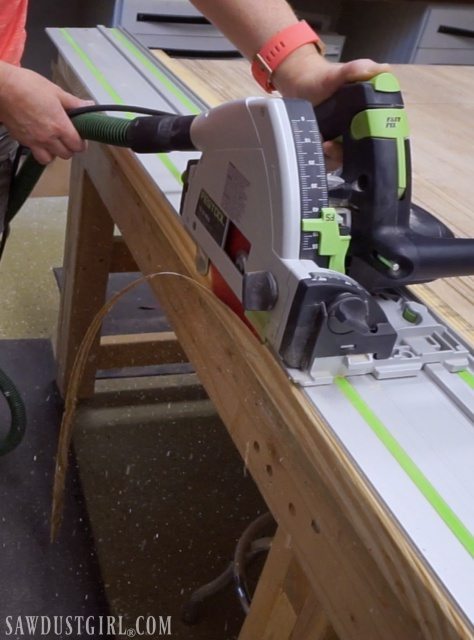
No fasteners are necessary.  Wood glue will bond the two surfaces together and it will be as strong as though it was just one wide cut from one big tree.  However, dowels, biscuits or tenons make it a lot easier to keep the top surface of both pieces flush with each other when clamping.  I’m using my Festool Domino to cut mortises for loose tenons for that purpose. Using Festool Domino to cut mortises for diy tables

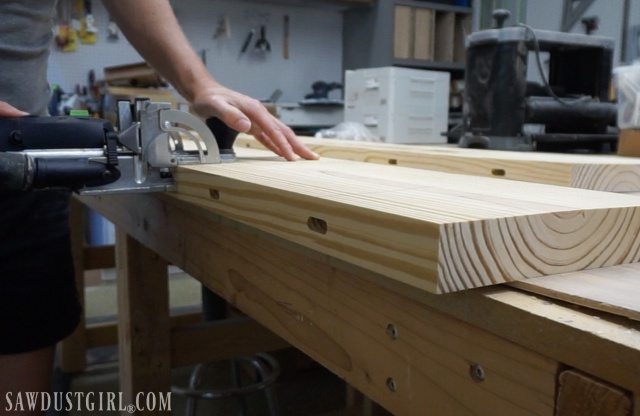
Working together, Julie and I apply glue, insert the tenons and join the two sides together.Joining wood with loose tenons to create a single plank for two nightstands.
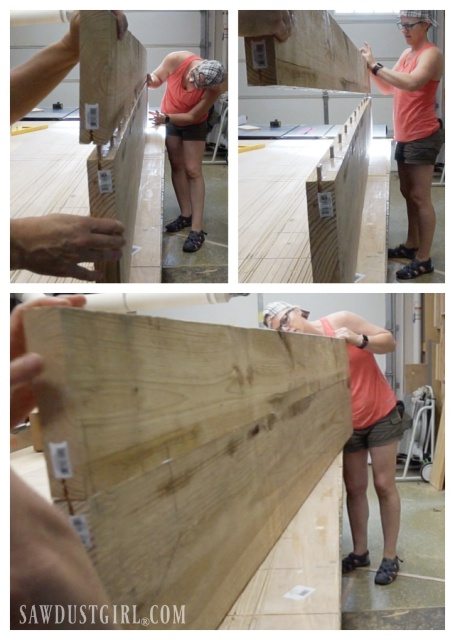
We used clamps to pull the pieces together without applying so much pressure it would cause the joint to buckle.Clamping wood to build two nightstands

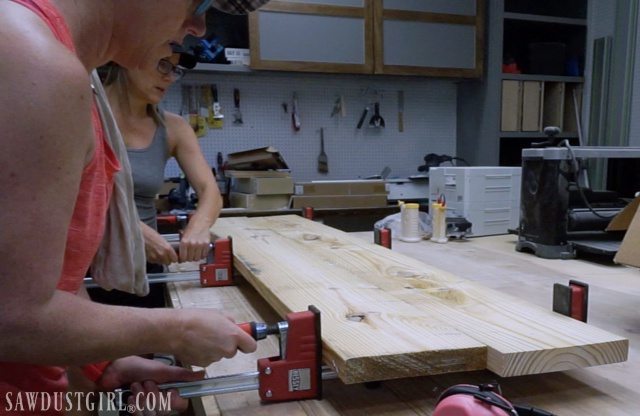
Alternating your clamps, under and over the wood, helps avoid buckling because it applies the pressure evenly.Bessey clamps hold wood firmly together while glue sets.

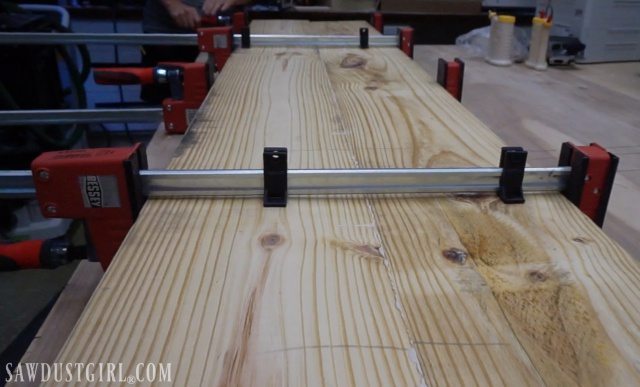
Building Two Nightstands

The glue to set up overnight before we started building our two nightstands.Wide plank of wood for diy tables

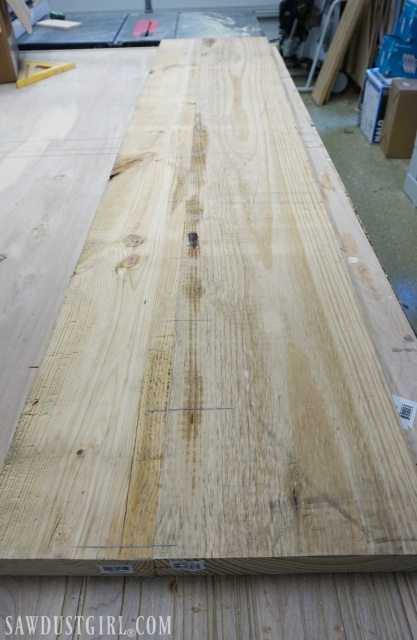
We used the track saw to cut each slab into three pieces for a diy table.

  • 1 Top at 28″
  • 2 Sides/Legs at 22 1/2″

Square up your straight edge before cross cutting

Doing our best to keep the sides square to the top, we glued the top to the sides and used clamps to keep it all pulled together until that set up.Building diy tables with simple butt joints

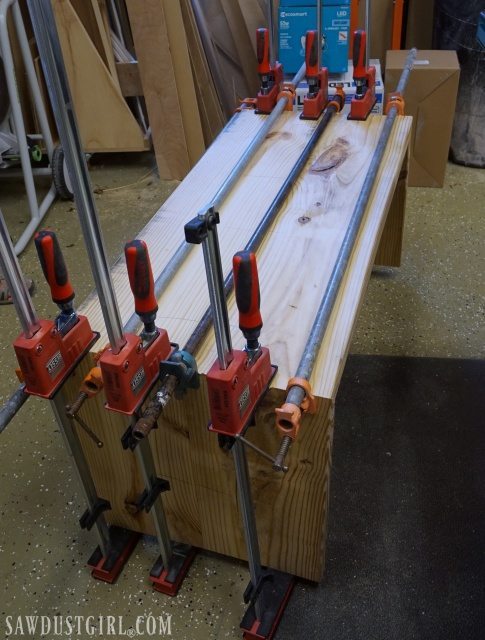
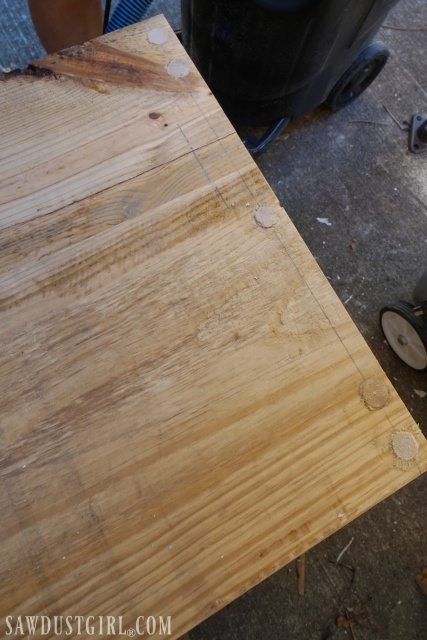
Glued butt joints aren’t very strong on their own.  Tenons could have been used as an invisible source to strengthen that joint.  However, we used through dowels because we wanted to add more visible character.

Adding Dowels to Strengthen a Butt Joint

  • Use a long drill bit and drill as deep as that bit will go
  • Pour glue into the hole and use a finger or glue paddle to spread the glue.  Make sure to cover the entire depth of the hole
  • Insert dowels and trim flush with a flush cut saw

We used long pieces of dowel so we wouldn’t have any waste. The trimmed sections were put back into the “dowel scrap pile”.Strengthening diy table joints with wood dowels.

Building diy tables with wood dowels

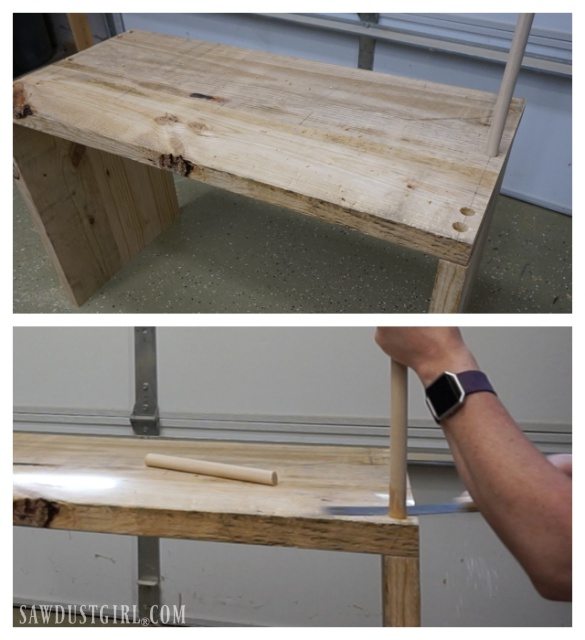
We hit the top of the diy tables with a random orbital sander to level off my rough trimming of the dowels.Sanding two nightstands before applying a rich wax finish!

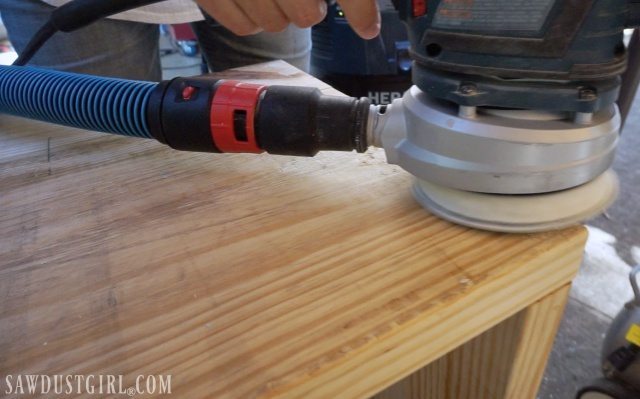
It took us a while to dig through piles of lumber to find wood with character and natural imperfections.  We wanted all that to show through on the finished table so we only sanded enough to create a smooth to the touch surface.  No slivers wanted.Rustic Pine diy tables

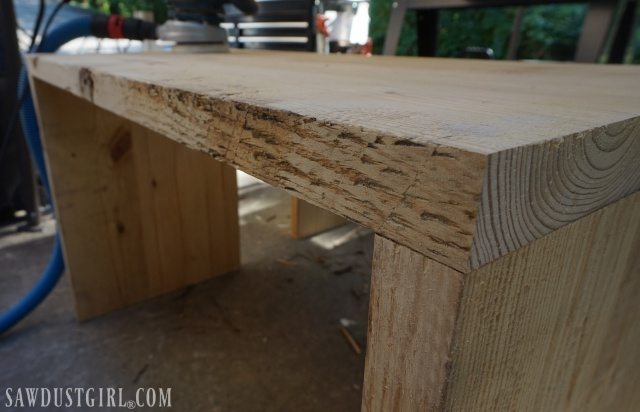
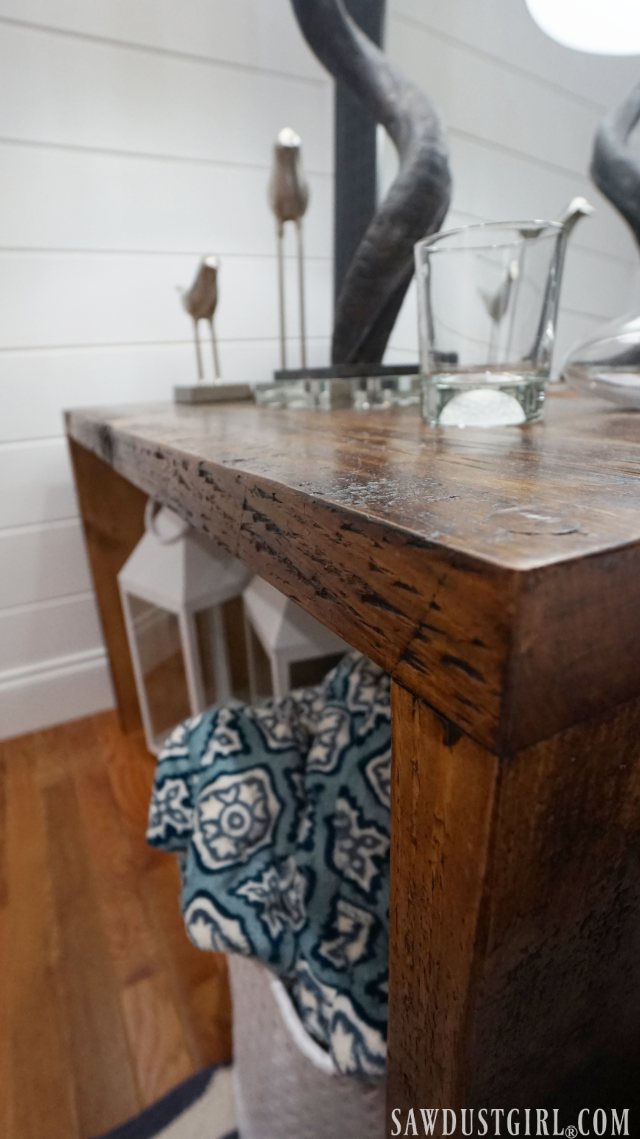
Then Julie used her magic Briwax finishing technique to go from that to this!  She’ll be sharing all her Briwax secrets as soon as I get her out from under the crawl space at Calderwood Cottage!  (Which is currently kicking our bootays but we’re about to start winning there.)

DIY Tables

October 20, 2017 · 2 Comments

« How to Braze – Brazing Metal Centerpiece Brackets
How to Stain Wood Using Briwax for a Fast Easy Finish »

Comments

  1. Jane says

    October 23, 2017 at 1:45 pm

    Not fond of plank chair and nightstands.
    In general I am fond of your web site.

    Reply
  2. Jacqueline Root says

    June 15, 2020 at 2:24 pm

    Gorgeous!

    Reply

Leave a Reply Cancel reply

Your email address will not be published. Required fields are marked *

Categories

New Post email notification signup

You Subscribed!

Legal Stuff

Terms of Use

Privacy Policy

Disclosure

Recent Posts

  • Lodge Update – Floors, Cabinets, Countertops, and Appliances
  • Lodge Kitchen Cabinet Progress
  • Halloween Mad Gab – Halloween Party Ideas
  • Concrete Backsplash or Vertical Wall Treatment
  • Building and Installing a Giant Faux Beam on the Ceiling

Disclaimer:

Although it is my intention to provide accurate plans and clear instructions, not all plans have been tried and tested. Using plans or information found on SawdustGirl.com indicates that you agree with the Terms of Use policy and will accept full responsibility for the process and outcome of any project you attempt. All plans are for private use only. Plans and information published on SawdustGirl.com may not be reproduced, republished or distributed in any manner without written permission from Sandra Powell, Sawdust Girl. Actual projects built using Sawdust Girl plans may be published on your own site without instructions or "tutorial" as long as you provide a link to my original post with full post title or "SawdustGirl.com" as link title.

Copyright © 2022 · anchored theme by <a target="_blank"