• Home
  • About
    • Personal Posts
  • Privacy
  • Shop
    • My Account
    • Checkout
    • Email
    • Facebook
    • Instagram
    • Pinterest
    • Twitter
    • YouTube
Sawdust Girl®

Sawdust Girl®

Renovation, cabinet building and woodworking plans and tutorials. Build like a Girl®

  • My Home
    • Clinton TN House
      • Clinton TN House in Progress
    • Maryville TN House
      • Maryville TN House Tour – Completed Rooms
      • Maryville TN House in Progress
        • Basement
        • Basement Storage Closet
        • Bedroom Office
        • Craft Room
        • Dining Room
        • Entry
        • Garage
        • Guest Bedroom
        • Hallway
        • Jack and Jill Bathroom
        • Kitchen
        • Kitchen Entry
        • Laundry Room
        • Library
        • Living Room
        • Loft
        • Madison’s Room
        • Master Bedroom
        • Master Closet
        • Pantry
        • Porch
        • Powder Room
        • Wes’ Office
    • Illinois House
    • Calderwood Cottage
  • My Workshop
    • Clinton Workshop
  • Build & Breakfast
  • Cabinet Making 101
    • Cabinets
    • Doors
    • Drawers
  • Projects and Plans
    • Countertops
    • Beds
    • Benches
    • Bookshelves
    • Desks
    • Gift Ideas
    • Holiday
      • Christmas
      • Halloween
    • Home Accessories
    • Kids
    • Kitchen Cabinets
    • Lockers
    • Nightstands
    • Organization accessories
    • Recipes
    • Sewing
    • Tables
    • Vanities
    • Wardrobes
    • Woodworking
      • Wood Finishing
    • Workshop
    • Workshop Storage and Organization
  • Remodeling 101
    • Baseboard and Trim
    • crown molding
    • Demolition
    • Door and Window Casings
    • Door Installation
    • Drywall
    • Electrical work
    • Flooring
    • Home Maintenance
    • Painting
    • Plumbing
    • Resources
    • Safety
    • Tile
    • Wall and Ceiling Treatments
  • Sawdust Squad
  • The Sawdust Diaries
    • Andrea
    • Ava D.
    • Beckie F.
    • Cara C.
    • Courtney B
    • Fawn T.
    • Jenn D.
    • Kelly C.
    • Kristy K.
    • Lara T.
    • Malisa B.
    • Marnie D.
    • Robin C.
    • Val F.
  • Tools
    • Products
    • Tool Reviews & Overviews
    • Inspiration & Ideas

How to Make a Whimsical Wooden Vase

All Posts, Gift Ideas

Hi, I’m Erin and I blog over at Erin’s Creative Energy.  I am so excited to be over here at Sawdust Girl!   Sandra was one of the very first bloggers I discovered and am honored to be able to share my Whimsical Wooden Vases with you.
wooden-vases-16-428x645


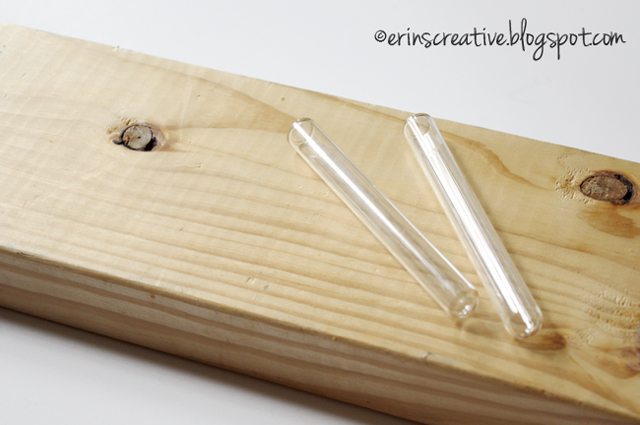
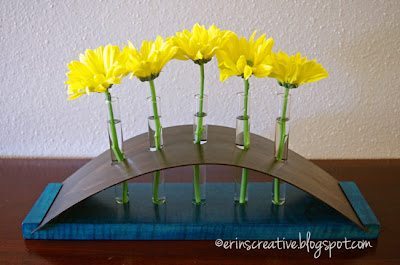
If there is one thing that I have more than I know what to do with, it’s scrap wood.  I am always trying to get rid of scrap wood.  My husband and I cannot just throw it out.  So, I grabbed one of the 2×6 boards and some leftover test tubes from a project last summer and decided to make some vases.

How to Make a Whimsical Wooden Vase

Step 1

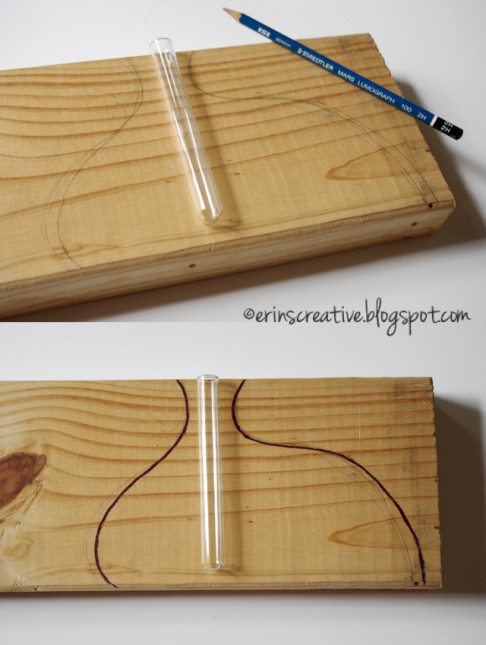
I started with sketching out a fun shape on the wood and then marking my final cut lines.

How to Make a Whimsical Wooden Vase

Step 2

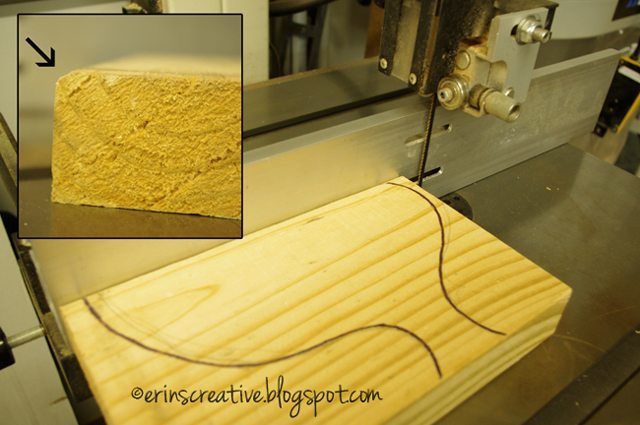
Since the bottom edge of the board was rounded, the first thing I did was cut it off.  I took less than 1/4 inch off with the band saw.  This could be done with a table saw, circular saw or jig saw.  I happen to love the band saw.

How to Make a Whimsical Wooden Vase

Step 3

I then cut out the shape of my vase.  This can also be done with a jig saw, but please follow the tips below if you use a jig saw.

How to Make a Whimsical Wooden Vase

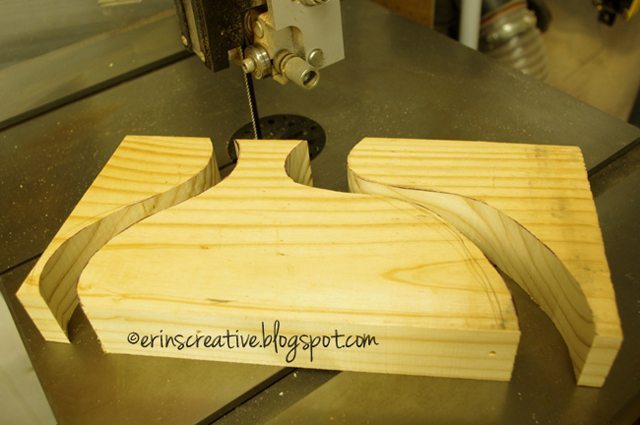
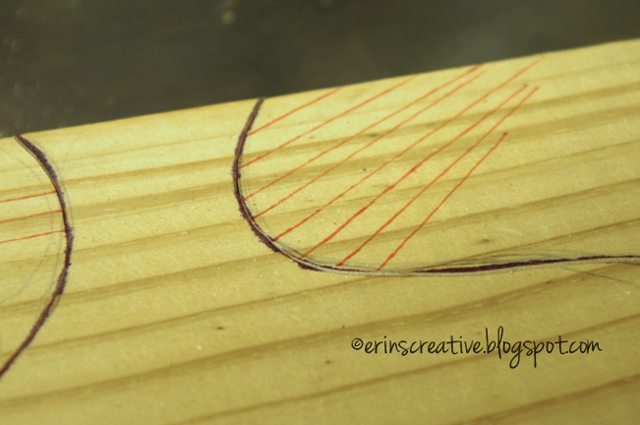
Since the blade on my band saw is rather thin, I can make curved cuts quite easily.  A jig saw has a wider blade making those same curved cuts more difficult.  If you use a jig saw, you will need to do relief cuts.  See the orange lines below?  You will cut straight lines up to the edge of your vase FIRST!  Then, once you cut the edge of your vase, your blade won’t bind up and you will be able to follow the curve of your cut more accurately.

How to Make a Whimsical Wooden Vase

Step 4

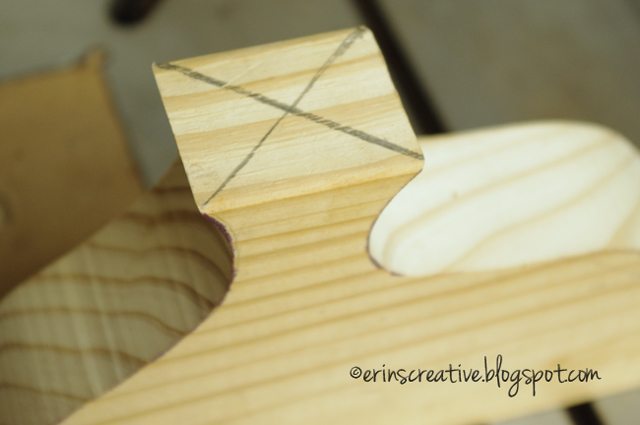
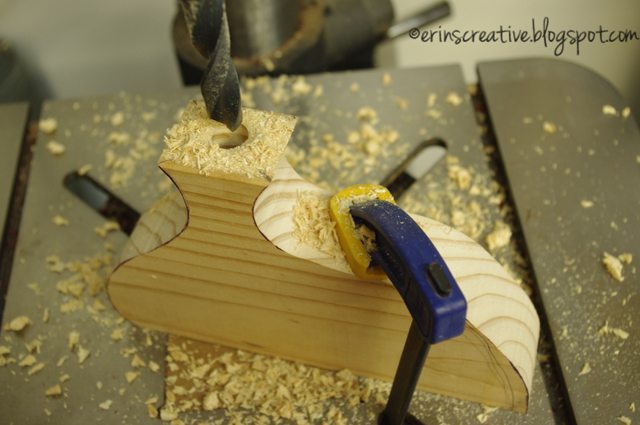
After my vase was cut out, I needed to find the center of the top so I knew where to drill.  The easiest way to do this is to draw a straight line from opposite corners.
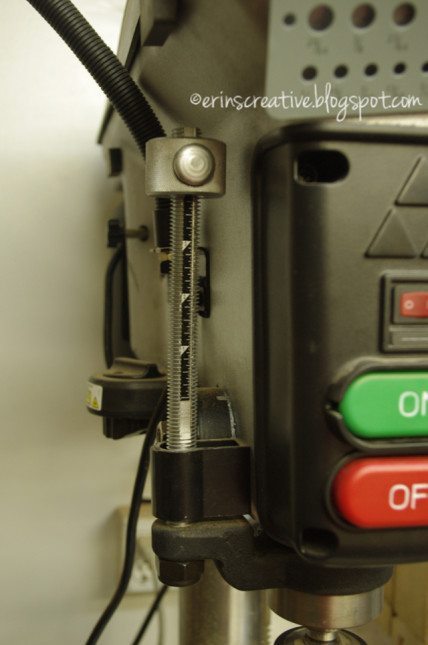
How to Make a Whimsical Wooden Vase

Step 5

I then figured how size of drill bit I needed.  It was a 5/8″ drill bit due to the size of my test tubes being just a hair larger than 1/2″.  I then figured out the depth.  I have a drill press, so I used my depth stop which prevents me from drilling further than what I want.

If you don’t have a drill press, you can still use a powered hand drill, but I would recommend a jig that allows you to keep your drill perpendicular so your test tubes sits in the vase straight up and down.  As for the depth, a trick that my husband told me about is to tape the drill bit at the depth you want to stop.  Pretty genius!

How to Make a Whimsical Wooden Vase

Step 6

When you drill, make sure you clamp down your vase for safety reasons.  When designing the shape of your vase, you will want to keep this in mind.
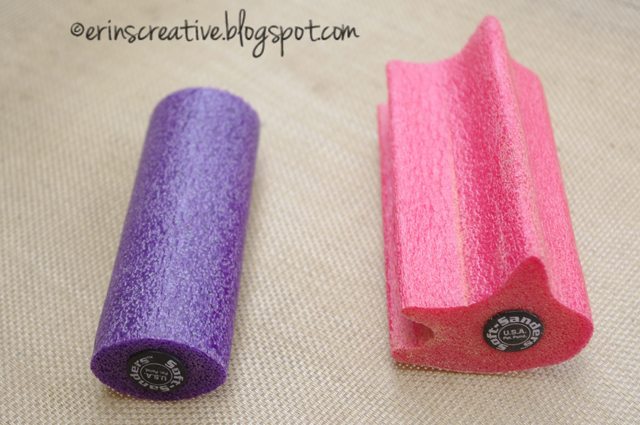
How to Make a Whimsical Wooden Vase

Step 7

After the vase was cut and drilled I started sanding.  I really like using sanding blocks.  They help a lot.  It makes sanding curves much easier and it keeps my hands from feeling the heat of the friction.  All you do is cut your sandpaper and hold it around the shape of the sanding block you are using.

How to Make a Whimsical Wooden Vase

Step 8

I sanded starting with 80 grit and worked my way through 150 and 220 grit papers.  After that was done, I used a lightly damp microfiber cloth to wipe the vase clean.  I then taped up the sides of the vase.
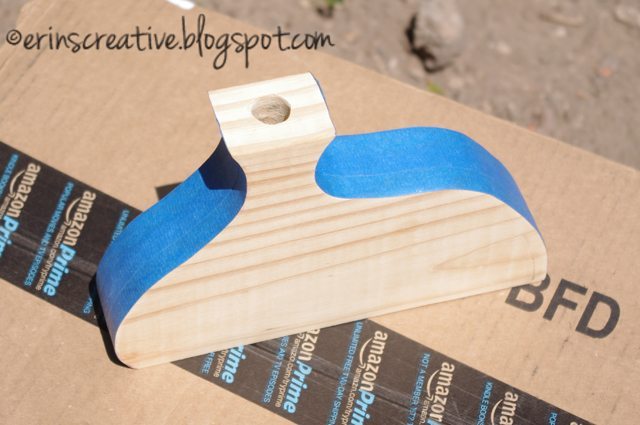
How to Make a Whimsical Wooden Vase

Step 9

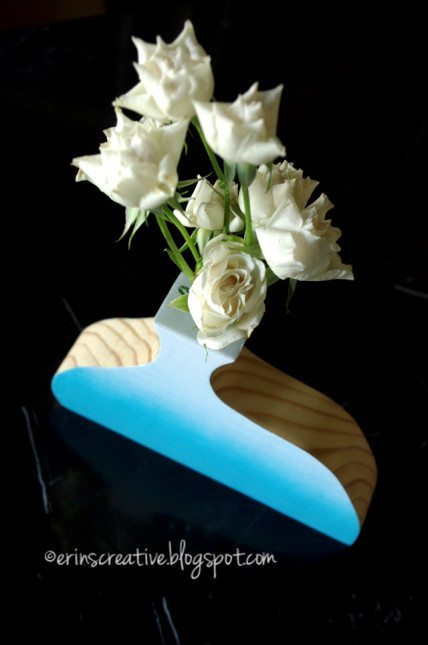
In order to get the ombre paint effect, I started with painting the entire vase white.
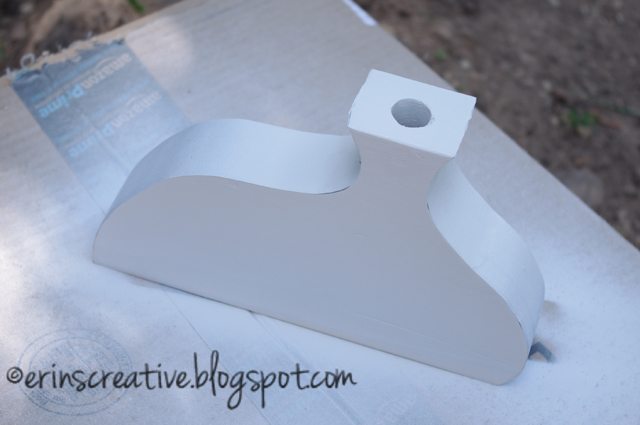
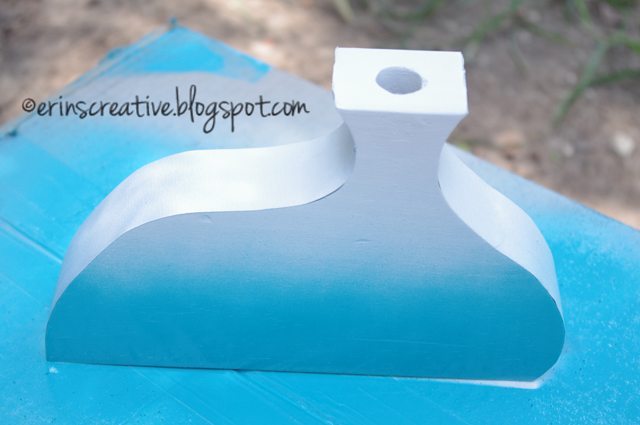
How to Make a Whimsical Wooden Vase
 
For the blue, start with light sweeping sprays from the bottom.  One pass at a time, back and forth, raising just slightly until you reach the ombre look that you want.
How to Make a Whimsical Wooden Vase

Step 10

After your paint dries, remove the tape and clear coat the entire piece to keep the wood from taking on any water once you put your test tube of flowers in.  Then, you can stand back and admire your handy work.

How to Make a Whimsical Wooden Vase

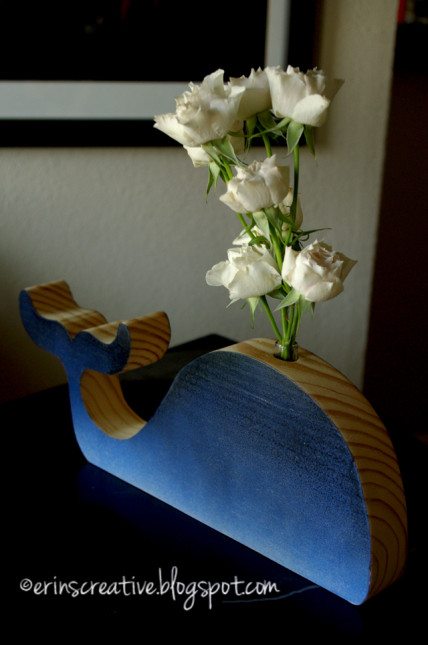
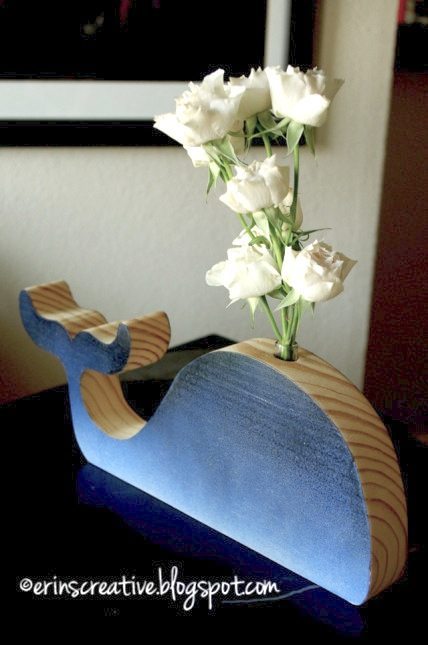
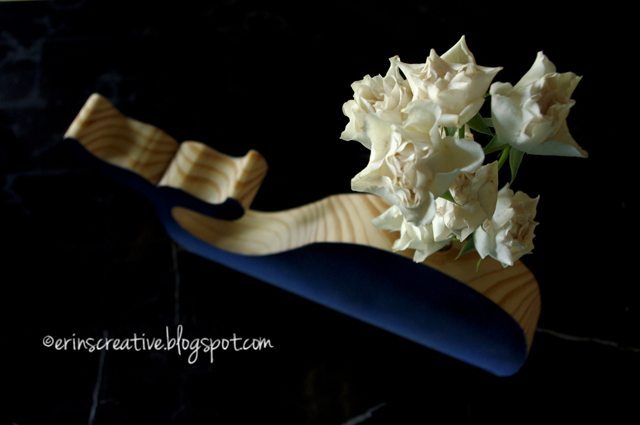
You can think you are done, until you have a husband like mine suggest an even better idea for a whimsical vase, like a whale.  I hate do admit it, but I loved the idea and had to immediately execute it!

How to Make a Whimsical Wooden Vase
 

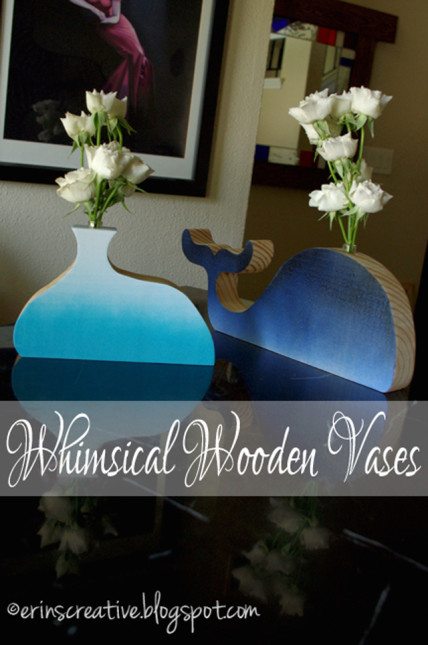
I love how the flowers look like the spray from the whale. I also love both of my vases and hope that you try making one of your own.

How to Make a Whimsical Wooden Vase

Thanks for having me Sandra!

Sandra speaking now:

I’m so excited to bring Erin on as a regular contributor here on Sawdust Girl, she is multi talented!  Make sure you click over to Erin’s Creative Energy for more creative tutorials and projects!

How to Make a Whimsical Wooden Vase - Test tube vase

test tube vase

diy cufflinks

diy cufflinks

August 22, 2021 · 2 Comments

« How to Make a Faux Reclaimed Beam Picture Ledge
How to Build a Bench with a Built-in Boot Rack »

Comments

  1. Julie says

    August 22, 2013 at 11:11 am

    Love this! I want to make the whale and use for a toothbrush holder in the kids bath.

    Reply
  2. Nancy Weaver says

    September 30, 2013 at 11:07 pm

    Those Whimsical wooden vases are gorgeous! I love that it has different designs which are very attractive and stylish. I believe that in making and cutting for those woods it is very essential that they will have sharp and the right tool for it. I will let my husband see this. Thank you for sharing, Erin.

    Reply

Leave a Reply Cancel reply

Your email address will not be published. Required fields are marked *

Categories

New Post email notification signup

You Subscribed!

Legal Stuff

Terms of Use

Privacy Policy

Disclosure

Recent Posts

  • Lodge Update – Floors, Cabinets, Countertops, and Appliances
  • Lodge Kitchen Cabinet Progress
  • Halloween Mad Gab – Halloween Party Ideas
  • Concrete Backsplash or Vertical Wall Treatment
  • Building and Installing a Giant Faux Beam on the Ceiling

Disclaimer:

Although it is my intention to provide accurate plans and clear instructions, not all plans have been tried and tested. Using plans or information found on SawdustGirl.com indicates that you agree with the Terms of Use policy and will accept full responsibility for the process and outcome of any project you attempt. All plans are for private use only. Plans and information published on SawdustGirl.com may not be reproduced, republished or distributed in any manner without written permission from Sandra Powell, Sawdust Girl. Actual projects built using Sawdust Girl plans may be published on your own site without instructions or "tutorial" as long as you provide a link to my original post with full post title or "SawdustGirl.com" as link title.

Copyright © 2022 · anchored theme by <a target="_blank"