• Home
  • About
    • Personal Posts
  • Privacy
  • Shop
    • My Account
    • Checkout
    • Email
    • Facebook
    • Instagram
    • Pinterest
    • Twitter
    • YouTube
Sawdust Girl®

Sawdust Girl®

Renovation, cabinet building and woodworking plans and tutorials. Build like a Girl®

  • My Home
    • Clinton TN House
      • Clinton TN House in Progress
    • Maryville TN House
      • Maryville TN House Tour – Completed Rooms
      • Maryville TN House in Progress
        • Basement
        • Basement Storage Closet
        • Bedroom Office
        • Craft Room
        • Dining Room
        • Entry
        • Garage
        • Guest Bedroom
        • Hallway
        • Jack and Jill Bathroom
        • Kitchen
        • Kitchen Entry
        • Laundry Room
        • Library
        • Living Room
        • Loft
        • Madison’s Room
        • Master Bedroom
        • Master Closet
        • Pantry
        • Porch
        • Powder Room
        • Wes’ Office
    • Illinois House
    • Calderwood Cottage
  • My Workshop
    • Clinton Workshop
  • Build & Breakfast
  • Cabinet Making 101
    • Cabinets
    • Doors
    • Drawers
  • Projects and Plans
    • Countertops
    • Beds
    • Benches
    • Bookshelves
    • Desks
    • Gift Ideas
    • Holiday
      • Christmas
      • Halloween
    • Home Accessories
    • Kids
    • Kitchen Cabinets
    • Lockers
    • Nightstands
    • Organization accessories
    • Recipes
    • Sewing
    • Tables
    • Vanities
    • Wardrobes
    • Woodworking
      • Wood Finishing
    • Workshop
    • Workshop Storage and Organization
  • Remodeling 101
    • Baseboard and Trim
    • crown molding
    • Demolition
    • Door and Window Casings
    • Door Installation
    • Drywall
    • Electrical work
    • Flooring
    • Home Maintenance
    • Painting
    • Plumbing
    • Resources
    • Safety
    • Tile
    • Wall and Ceiling Treatments
  • Sawdust Squad
  • The Sawdust Diaries
    • Andrea
    • Ava D.
    • Beckie F.
    • Cara C.
    • Courtney B
    • Fawn T.
    • Jenn D.
    • Kelly C.
    • Kristy K.
    • Lara T.
    • Malisa B.
    • Marnie D.
    • Robin C.
    • Val F.
  • Tools
    • Products
    • Tool Reviews & Overviews
    • Inspiration & Ideas

How to Make a Faux Reclaimed Beam Picture Ledge

All Posts, Craft Room, Loft, Projects and Plans

I’ve installed a picture ledge and some lights and now my studio “feature wall” is complete!  It’s a small success but I like to celebrate achievement – regardless of size.  I built and finished the picture ledge to look like an old, reclaimed beam and I love it against the brick and plaster wall  backdrop.  I actually built two but when it came time to install, I decided only one would fit.  Maybe I’ll find a spot somewhere for the extra one but each picture ledge only cost me $8 in materials so I won’t mind if all it does is sit in my scrap pile until I find another use for it. My picture ledge is 72″ long and made of one 2×4 and three 1×4 furring strips. The lights are the Academy task swing-arm sconce in antique brushed nickel from Restoration Hardware Baby & Child.  RH has almost exactly the same lights fin different finishes for an additional $159.  The RH Baby&Child site had the finish I wanted and cost less so it wasn’t hard to choose.

DIY Faux Beam Picture Ledge

Building the Picture Ledge

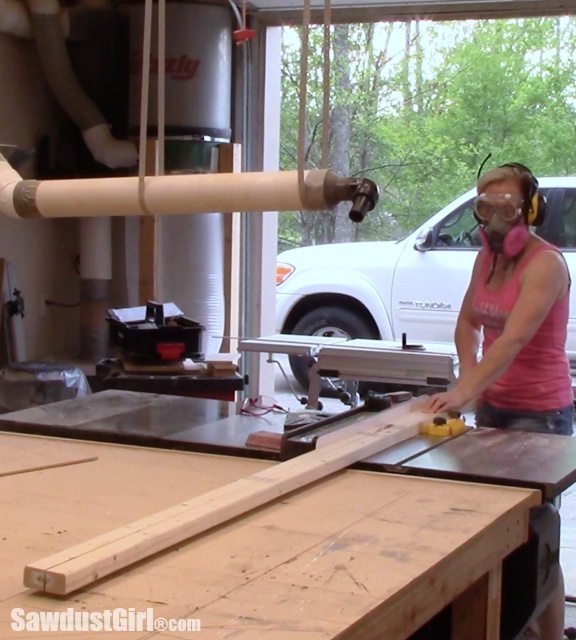
First, I ripped the 2×4 in half. One half will be secured to the wall onto which the picture ledge will be mounted.  The other half will be part of the picture ledge itself.  Without a table saw, one could purchase two 2×2’s and recreate this project with almost all the work already done for them.  I happened to already have a pile of 2×4’s on hand so I decided to use what I had instead of purchasing more.

  • Faux Beam Picture Rail
  • Picture Rail
  • Picture Rail

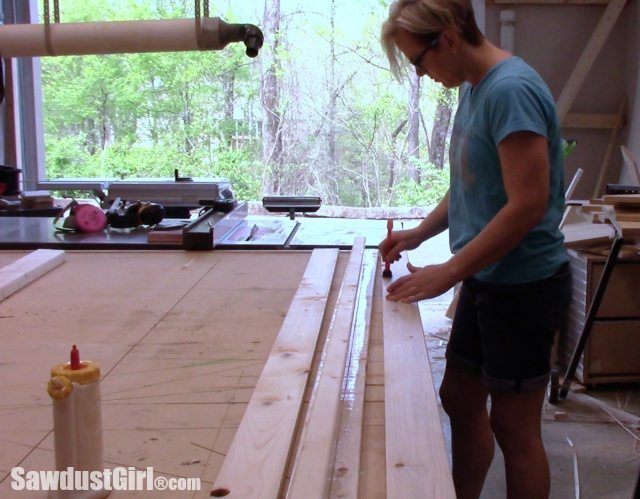
I sorted through the 1×4 furring strips to find three that looked similar in color and then arranged by appearance to create a front, top and bottom for my “beam”.  I generously applied glue to three sides of my 2×2 as well as to the pairing 1×4.

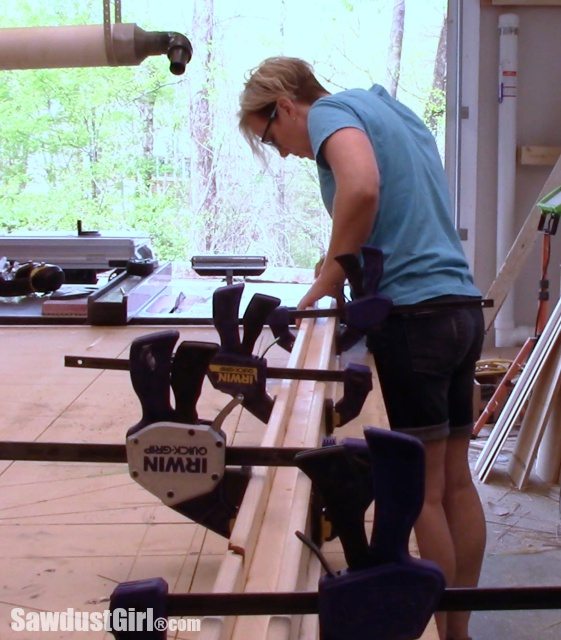
Then I sandwiched the 2×2 between the “top” and “bottom” furring strips and secured that tightly with a handful of clamps.

Making a Faux Beam Picture Rail

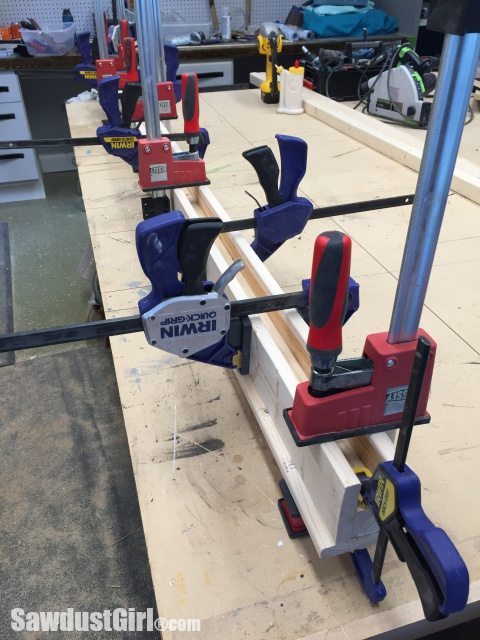
Then I used more clamps to secure the wood sandwich to the “front” furring strip and left that overnight to dry.

How to Get the Rustic Reclaimed Beam Look

  • Making a Faux Reclaimed Beam Ledge
  • Making a Faux Beam Picture Rail
  • Finishing a Faux Beam Picture Rail with Briwax

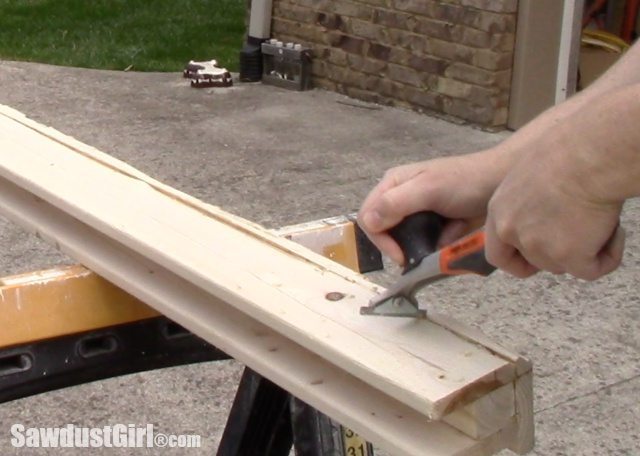
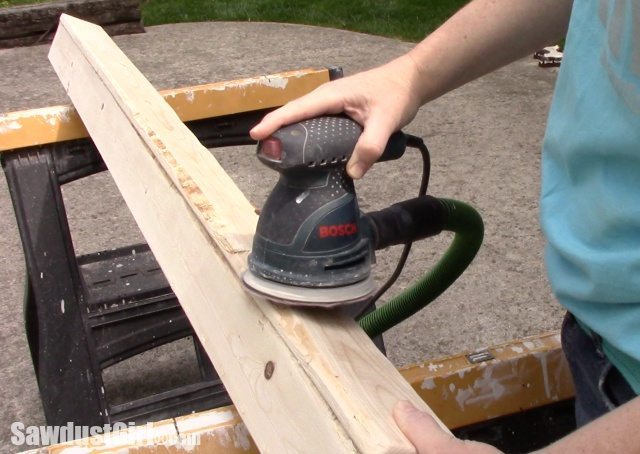
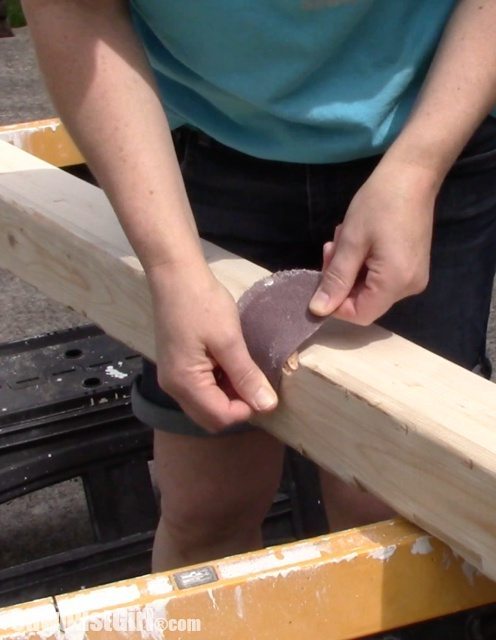
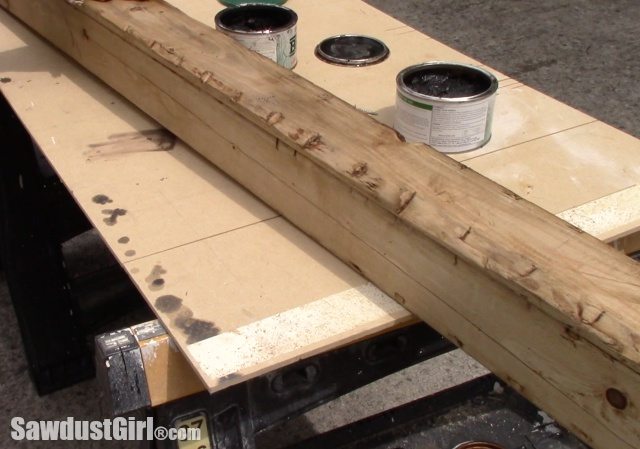
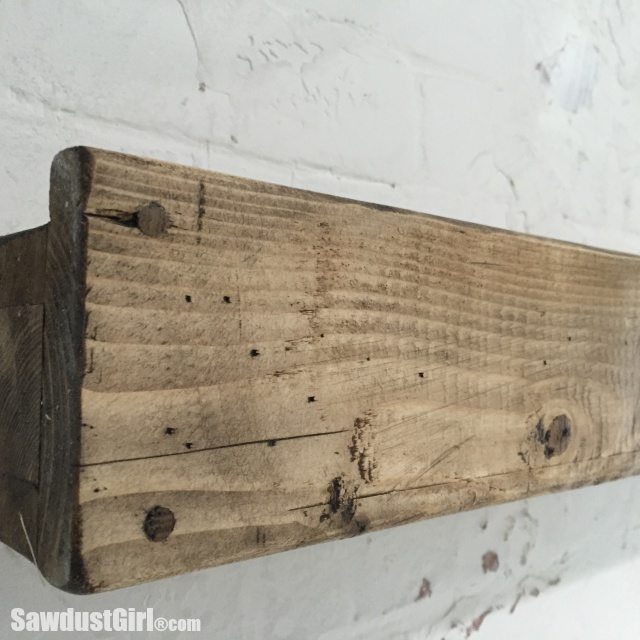
I scraped up any dried glue and made sure to bang and whack a lot of new “distress marks” into my lumber to try and get the look of a beam straight out of some old, rotting barn. I want my picture ledge to look old, but I want it to have the security and structure that an actual reclaimed beam couldn’t get me. I also don’t want splinters from it, so I sanded it smooth to the touch without removing the imperfections.

Finishing a Faux Reclaimed Beam with Briwax

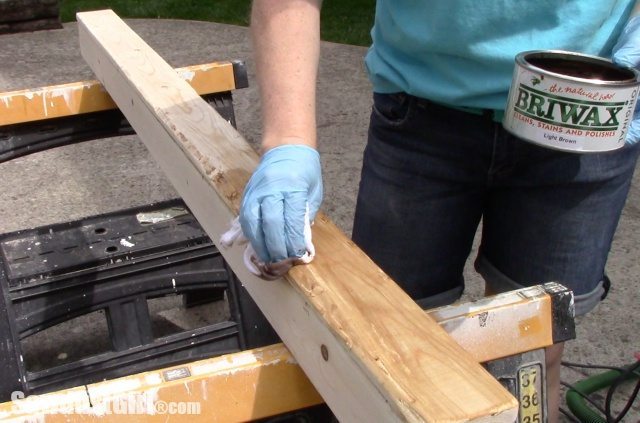
I finished my picture ledge with Briwax in Light Brown and Ebony.  I apply with with an old T-Shirt rag focusing on getting it into all the nooks and crannies.  It’s easiest to apply Briwax when it’s soft or melted, either from the sun or a heat gun so get it nice and toasty.

Finishing with Briwax

It’s a really fun process to work with Briwax.  It dries very quickly so you can re-coat in a matter of minutes.  I just keep playing around with it until I like the results.

Making a Faux Beam Picture Ledge

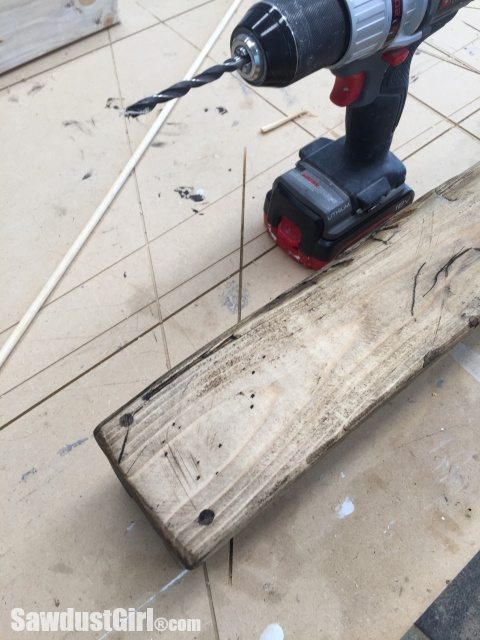
I drilled two 1/4″ holes in each end and glued in some wood dowels for an additional touch of realism to my reclaimed wood beam – dream.

Installing the Faux Reclaimed Beam Picture Ledge

Making a Faux Beam Picture Ledge

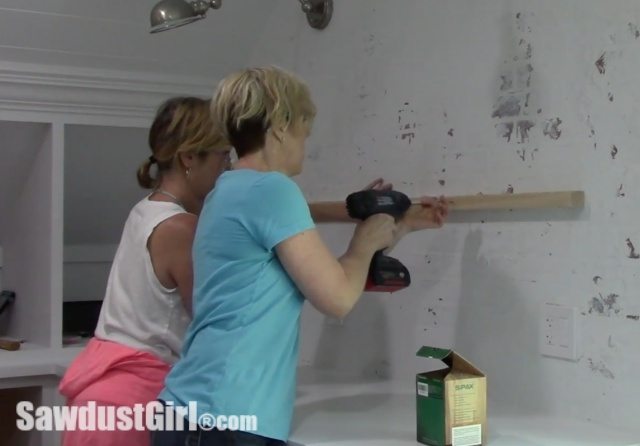
Penny helped me install my picture ledge.  She first held it in place while I stood back and put up with me while I instructed her to move it down 4″, now too far, left 1″, ahh – too much…and so on until we got it exactly where it made my eyes happy.  I had to locate the studs and my new Zircon stud finder worked through the brick paneling.  Thank heaven!  I used 3″ construction screws to secure the wall cleat (which was the leftover 2×2) on the right side.  Then we used a long level to level the cleat and I secured it on the left.  Then I drove screws into all the studs in between.

Making a Distressed Wood Picture Ledge

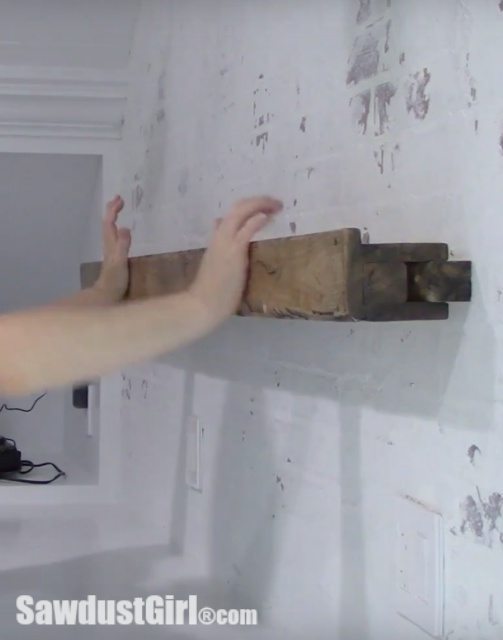
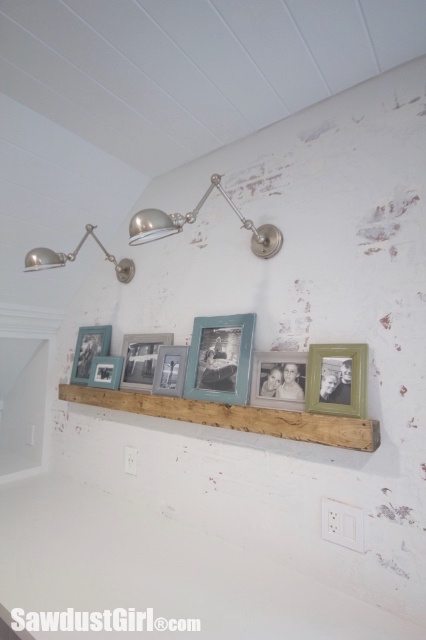
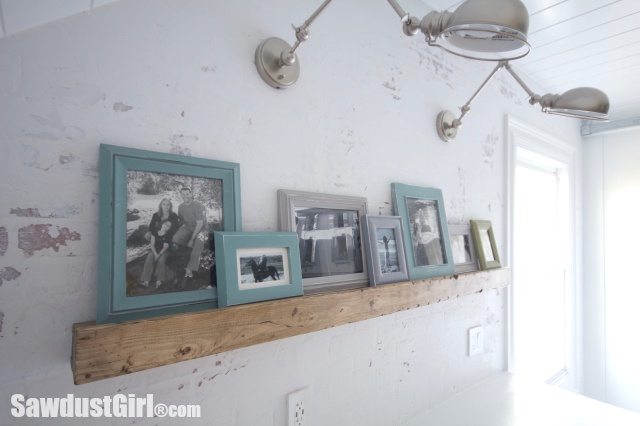
The picture ledge slid right onto the wall cleat and I shot a few nails through the top of the picture ledge into the cleat to secure it.  It is sturdy!  If you recreate this picture ledge, don’t forget to finish the ends of the wall cleat same as your shelf.  It remains visible.

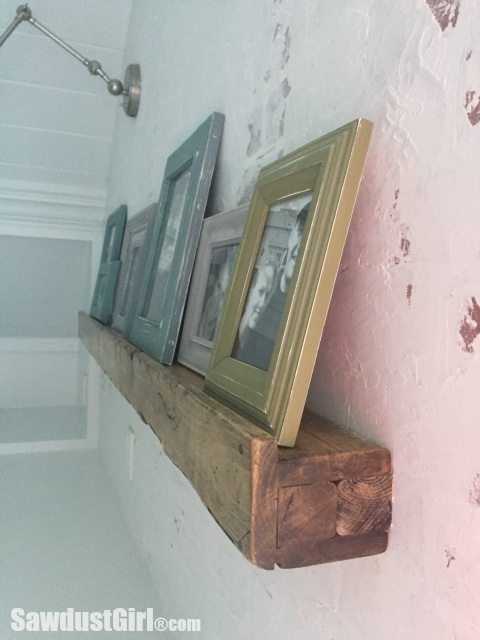
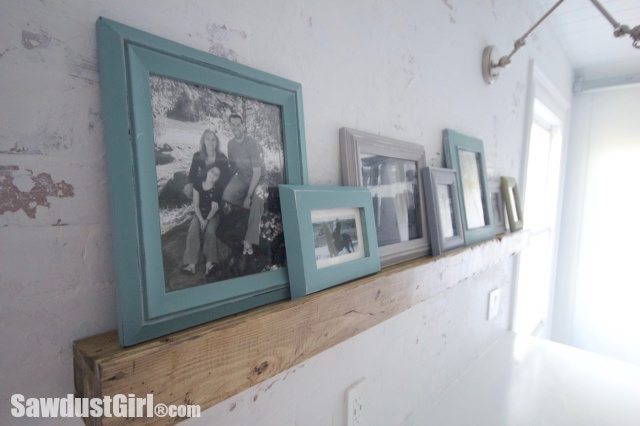
The front furring strip is taller than the wood sandwich portion which is what creates the lip on the ledge to hold your picture frames from falling off.  You could also use this for a plate rack or use wider material for a deeper shelf.

Making a Faux Beam Picture Rail

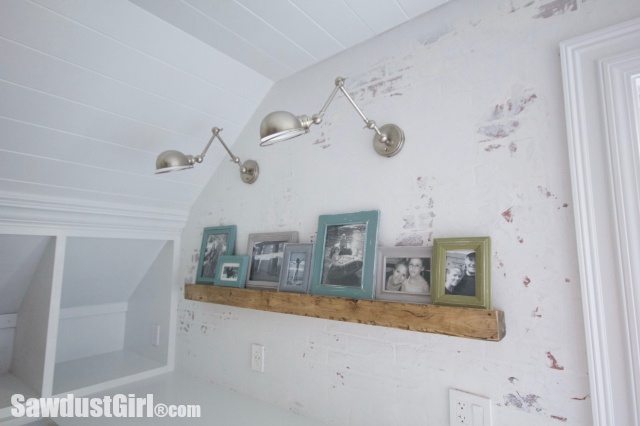
The picture ledge was a really quick, easy and inexpensive project — which was FUN when most of my projects take weeks to months to complete.  It’s also FUUUUN to see the studio start coming together!  I’ve created a build video for those that like videos and below is a smattering of “Reveal photos” because I apparently go wild for reveal photos when it’s a completed project!

Making a Faux Beam Picture Ledge
How to Make a Faux Distressed Wood Picture Ledge
Making a Faux Beam Picture Rail
How to Make a Faux Beam Picture Rail

August 19, 2021 · 7 Comments

« Pretty Bedroom Makeover Reveal & Ideas for Small Bedrooms
How to Make a Whimsical Wooden Vase »

Comments

  1. Kathy says

    April 19, 2016 at 9:56 am

    Very nice, and looks great on the distressed wall.

    Reply
  2. Cathy says

    April 19, 2016 at 10:11 am

    I also like the look of reclaimed wood without the splinters! Yours looks very realistic! Can you dust it without fluff from the duster getting caught?

    Reply
  3. Cathy says

    April 19, 2016 at 4:12 pm

    Is everyone who follows Sawdust girl named Cathy? 🙂 I just want to say I have clamp envy.

    Reply
  4. Maren says

    April 20, 2016 at 10:40 am

    That is beautiful, Sandra. Thank you for putting all your work out there, over the years, into the internet. You have been a source of great inspiration, education, and empowerment for me.

    Reply
  5. JUlie says

    November 14, 2017 at 12:41 pm

    Thanks so much for the tutorial. I made 3- 36 inch picture ledges this weekend from your tutorial, I used 2×2’s instead of ripping a 2×4 so they weren’t thick enough to entirely fill the end of the ledge so, I cut a 2 inch piece of 2×4 and glued and brad nailed in the both ends with the cut part facing out, so it looked like the end of barn beam and cut my 2×2 that I used to mount on the wall shorter to fit inside. I used pocket screws to attach the 1×4’s so I didn’t use the other 2×2 just the one to mount on the wall. I distressed the wood and used tea, steel wool and vinegar to stain the wood then waxed with bees wax and mineral oil.

    Reply
  6. Donnie says

    September 7, 2019 at 8:52 pm

    I like the idea… thinking about using this idea with a French cleat vs 2×2.

    Reply
    • Sandra says

      September 9, 2019 at 8:30 am

      That’s a great idea!

      Reply

Leave a Reply Cancel reply

Your email address will not be published. Required fields are marked *

Categories

New Post email notification signup

You Subscribed!

Legal Stuff

Terms of Use

Privacy Policy

Disclosure

Recent Posts

  • Lodge Update – Floors, Cabinets, Countertops, and Appliances
  • Lodge Kitchen Cabinet Progress
  • Halloween Mad Gab – Halloween Party Ideas
  • Concrete Backsplash or Vertical Wall Treatment
  • Building and Installing a Giant Faux Beam on the Ceiling

Disclaimer:

Although it is my intention to provide accurate plans and clear instructions, not all plans have been tried and tested. Using plans or information found on SawdustGirl.com indicates that you agree with the Terms of Use policy and will accept full responsibility for the process and outcome of any project you attempt. All plans are for private use only. Plans and information published on SawdustGirl.com may not be reproduced, republished or distributed in any manner without written permission from Sandra Powell, Sawdust Girl. Actual projects built using Sawdust Girl plans may be published on your own site without instructions or "tutorial" as long as you provide a link to my original post with full post title or "SawdustGirl.com" as link title.

Copyright © 2022 · anchored theme by <a target="_blank"