• Home
  • About
    • Personal Posts
  • Privacy
  • Shop
    • My Account
    • Checkout
    • Email
    • Facebook
    • Instagram
    • Pinterest
    • Twitter
    • YouTube
Sawdust Girl®

Sawdust Girl®

Renovation, cabinet building and woodworking plans and tutorials. Build like a Girl®

  • My Home
    • Clinton TN House
      • Clinton TN House in Progress
    • Maryville TN House
      • Maryville TN House Tour – Completed Rooms
      • Maryville TN House in Progress
        • Basement
        • Basement Storage Closet
        • Bedroom Office
        • Craft Room
        • Dining Room
        • Entry
        • Garage
        • Guest Bedroom
        • Hallway
        • Jack and Jill Bathroom
        • Kitchen
        • Kitchen Entry
        • Laundry Room
        • Library
        • Living Room
        • Loft
        • Madison’s Room
        • Master Bedroom
        • Master Closet
        • Pantry
        • Porch
        • Powder Room
        • Wes’ Office
    • Illinois House
    • Calderwood Cottage
  • My Workshop
    • Clinton Workshop
  • Build & Breakfast
  • Cabinet Making 101
    • Cabinets
    • Doors
    • Drawers
  • Projects and Plans
    • Countertops
    • Beds
    • Benches
    • Bookshelves
    • Desks
    • Gift Ideas
    • Holiday
      • Christmas
      • Halloween
    • Home Accessories
    • Kids
    • Kitchen Cabinets
    • Lockers
    • Nightstands
    • Organization accessories
    • Recipes
    • Sewing
    • Tables
    • Vanities
    • Wardrobes
    • Woodworking
      • Wood Finishing
    • Workshop
    • Workshop Storage and Organization
  • Remodeling 101
    • Baseboard and Trim
    • crown molding
    • Demolition
    • Door and Window Casings
    • Door Installation
    • Drywall
    • Electrical work
    • Flooring
    • Home Maintenance
    • Painting
    • Plumbing
    • Resources
    • Safety
    • Tile
    • Wall and Ceiling Treatments
  • Sawdust Squad
  • The Sawdust Diaries
    • Andrea
    • Ava D.
    • Beckie F.
    • Cara C.
    • Courtney B
    • Fawn T.
    • Jenn D.
    • Kelly C.
    • Kristy K.
    • Lara T.
    • Malisa B.
    • Marnie D.
    • Robin C.
    • Val F.
  • Tools
    • Products
    • Tool Reviews & Overviews
    • Inspiration & Ideas

How to Build Hanging Storage Boxes

All Posts, Bookshelves, Free Plans, Organization accessories

How to Build Hanging Storage Boxes -Super easy diy hanging storage boxes.

For someone who has never built anything before, taking on a big project can be daunting, so I’m sharing some simple plans today. These hanging box shelves are a good place to start because they give you a chance to experience a lot of the different aspects and techniques that make you a successful builder on a very small scale. You can use scrap 1/2″ plywood if you have it or spend very little on 1/4″ sheet and give it a try. After all, if you can build a box, you can build practically anything!

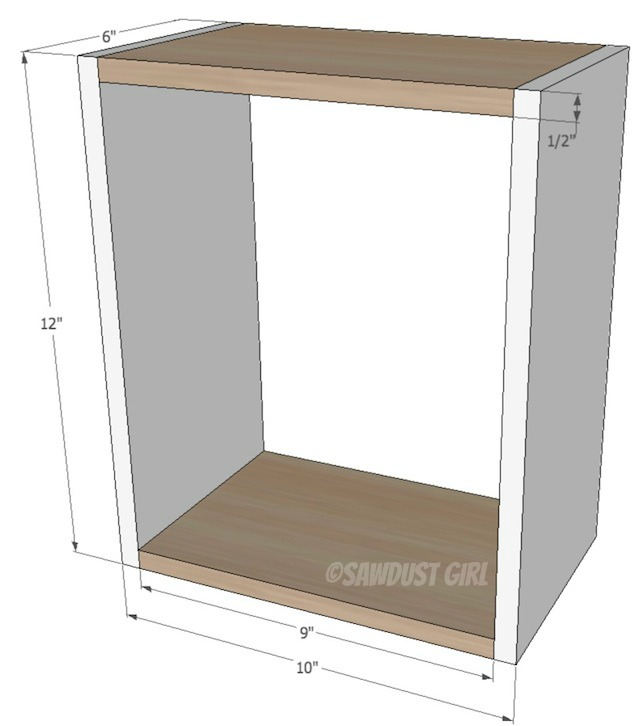
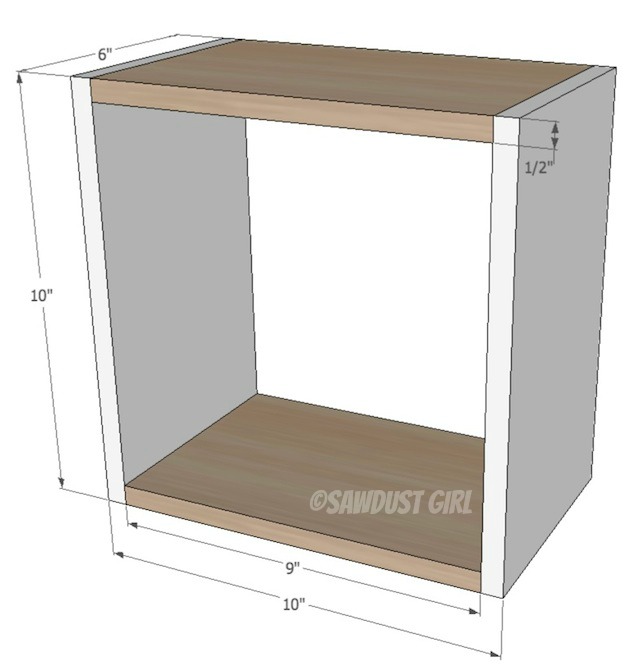
I’ve included dimensions for boxes in three sizes. The building instructions are the same for all three.

You can use 3/4″ thick material instead of 1/2″ if you choose, but you’ll have to reduce the width of the “wood colored” pieces by 1/2″.

How to Build the Boxes:  

  1. Use wood glue and fasteners to secure the “wood colored” pieces inside the “white colored” pieces.
  2. You can use pocket hole screws, wood screws, or brad nails to experiment with all different methods, but I would use simple brad nails for functional hanging boxes so the fasteners are invisible

12×12 box

How to Build Hanging Storage Boxes

10×10 box

How to Build Hanging Storage Boxes

8×8 box

How to Build Hanging Storage Boxes

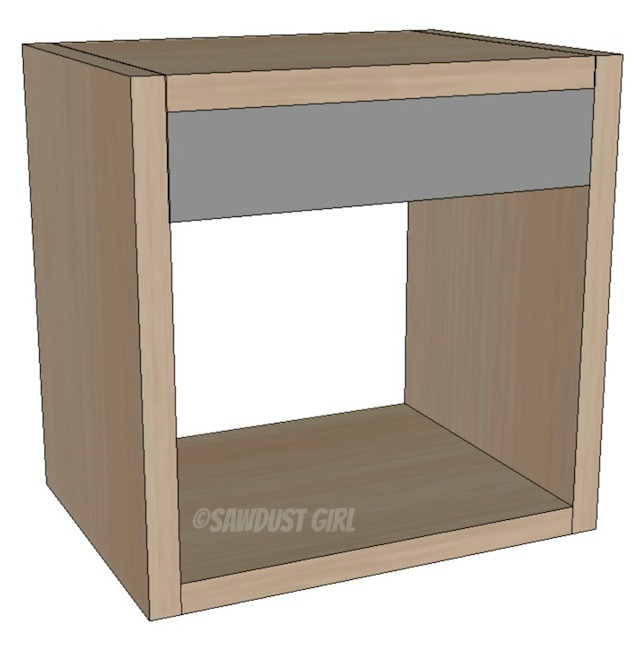
Add the Cleat for Hanging the Box

  1. The cleat is 1/2″ or 3/4″ plywood and fits inside the box at the top
  2. Secure with wood glue an brad nails
  3. This is how the box is secured to the wall. For future reference, in cabinetry, this is the same way base and upper cabinets are secured to the wall.
How to Build Hanging Storage Boxes

How to Hang the Boxes

  1. Screw right through the cleat into the wall-hopefully hit a stud. 
  2. If no stud is behind where you want to hang it, use drywall anchors. I never waste my time on plastic drywall anchors. I always use the metal, self-drilling ones.
How to Build Hanging Storage Boxes

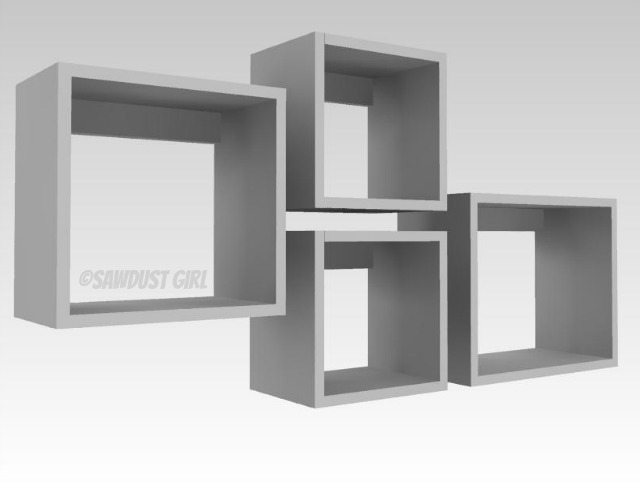
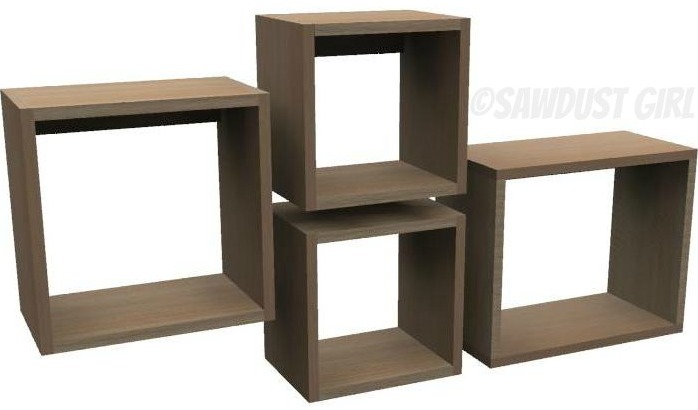
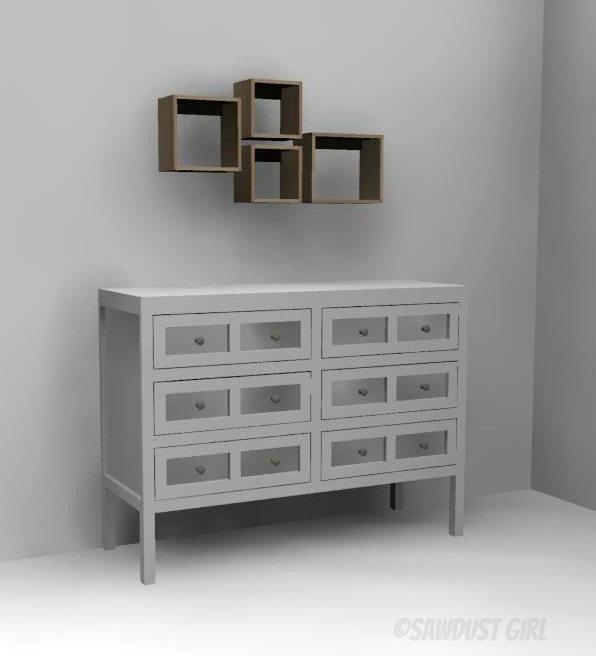
You can build a combination of sizes and cluster them together for a fun storage collection. They would be perfect over the Apothecary Console Table, don’t you think?

How to Build Hanging Storage Boxes

Hopefully, these free hanging storage box shelf plans have helped you on your way to becoming a confident DIY-er. If you are interested in my other free plans, take a look around my blog as I have quite a few! I also have tons of tips and tricks for new builders, as well as design tips. Good luck and good job on your journey of carpentry!

January 29, 2021 · 5 Comments

« The Lodge – part 3
How to Winterize Your Home with Window Shrink Film »

Comments

  1. Ayisha says

    January 30, 2014 at 9:20 am

    This is nice. I can see it in a bathroom for storage and visual interest.

    Reply
  2. Cory says

    March 1, 2014 at 10:10 am

    What is the width of the boards?

    Reply
  3. Gina says

    March 1, 2014 at 1:25 pm

    I don’t understand how we’re supposed to glue the boards together. Do I just use glue?! do I nail the boards together? If not, how will they hold anything without breaking, since they’re just held by glue? Please explain, as I would like to try, but don’t find the directions so clear (for me). Thank you.

    Reply
  4. Ms. Behroo says

    May 18, 2019 at 10:51 pm

    In the video where you made some small hanging wall shelves, you used a table saw to cut the boards to length using the miter gauge and the rip fence together. Perhaps it didn’t show, but I have always been taught not to do this without a spacer block clamped to the user end of the rip fence. (Allow for this blocks thickness when setting your cut length.) This block gives a small gap after you start your cut so that the wood doesn’t jamb between the fence and the blade, yet you have your spacing set for repeat crosscuts.

    Hope my explanation makes sense. I wish I was still strong enough to tackle big projects like you do.

    Reply
    • Sandra says

      May 19, 2019 at 2:10 pm

      If I’m using the miter gauge to push lumber into the cut, I’m holding it tightly against the miter gauge so it’s not going to move to one side or the other. The wood won’t get pinched between the rip fence and the blade (which is generally what causes kickback). I’m pushing the wood straight into the cut, holding it firmly against the miter gauge which holds it’s place (doesn’t let it push against the fence). I have the fence set up so I can make repeated cuts without measuring each time.

      Reply

Leave a Reply Cancel reply

Your email address will not be published. Required fields are marked *

Categories

New Post email notification signup

You Subscribed!

Legal Stuff

Terms of Use

Privacy Policy

Disclosure

Recent Posts

  • Lodge Update – Floors, Cabinets, Countertops, and Appliances
  • Lodge Kitchen Cabinet Progress
  • Halloween Mad Gab – Halloween Party Ideas
  • Concrete Backsplash or Vertical Wall Treatment
  • Building and Installing a Giant Faux Beam on the Ceiling

Disclaimer:

Although it is my intention to provide accurate plans and clear instructions, not all plans have been tried and tested. Using plans or information found on SawdustGirl.com indicates that you agree with the Terms of Use policy and will accept full responsibility for the process and outcome of any project you attempt. All plans are for private use only. Plans and information published on SawdustGirl.com may not be reproduced, republished or distributed in any manner without written permission from Sandra Powell, Sawdust Girl. Actual projects built using Sawdust Girl plans may be published on your own site without instructions or "tutorial" as long as you provide a link to my original post with full post title or "SawdustGirl.com" as link title.

Copyright © 2022 · anchored theme by <a target="_blank"