• Home
  • About
    • Personal Posts
  • Privacy
  • Shop
    • My Account
    • Checkout
    • Email
    • Facebook
    • Instagram
    • Pinterest
    • Twitter
    • YouTube
Sawdust Girl®

Sawdust Girl®

Renovation, cabinet building and woodworking plans and tutorials. Build like a Girl®

  • My Home
    • Clinton TN House
      • Clinton TN House in Progress
    • Maryville TN House
      • Maryville TN House Tour – Completed Rooms
      • Maryville TN House in Progress
        • Basement
        • Basement Storage Closet
        • Bedroom Office
        • Craft Room
        • Dining Room
        • Entry
        • Garage
        • Guest Bedroom
        • Hallway
        • Jack and Jill Bathroom
        • Kitchen
        • Kitchen Entry
        • Laundry Room
        • Library
        • Living Room
        • Loft
        • Madison’s Room
        • Master Bedroom
        • Master Closet
        • Pantry
        • Porch
        • Powder Room
        • Wes’ Office
    • Illinois House
    • Calderwood Cottage
  • My Workshop
    • Clinton Workshop
  • Build & Breakfast
  • Cabinet Making 101
    • Cabinets
    • Doors
    • Drawers
  • Projects and Plans
    • Countertops
    • Beds
    • Benches
    • Bookshelves
    • Desks
    • Gift Ideas
    • Holiday
      • Christmas
      • Halloween
    • Home Accessories
    • Kids
    • Kitchen Cabinets
    • Lockers
    • Nightstands
    • Organization accessories
    • Recipes
    • Sewing
    • Tables
    • Vanities
    • Wardrobes
    • Woodworking
      • Wood Finishing
    • Workshop
    • Workshop Storage and Organization
  • Remodeling 101
    • Baseboard and Trim
    • crown molding
    • Demolition
    • Door and Window Casings
    • Door Installation
    • Drywall
    • Electrical work
    • Flooring
    • Home Maintenance
    • Painting
    • Plumbing
    • Resources
    • Safety
    • Tile
    • Wall and Ceiling Treatments
  • Sawdust Squad
  • The Sawdust Diaries
    • Andrea
    • Ava D.
    • Beckie F.
    • Cara C.
    • Courtney B
    • Fawn T.
    • Jenn D.
    • Kelly C.
    • Kristy K.
    • Lara T.
    • Malisa B.
    • Marnie D.
    • Robin C.
    • Val F.
  • Tools
    • Products
    • Tool Reviews & Overviews
    • Inspiration & Ideas

Tip for gluing up mitered joints and library progress

Cabinet Making 101, Cabinets, Library

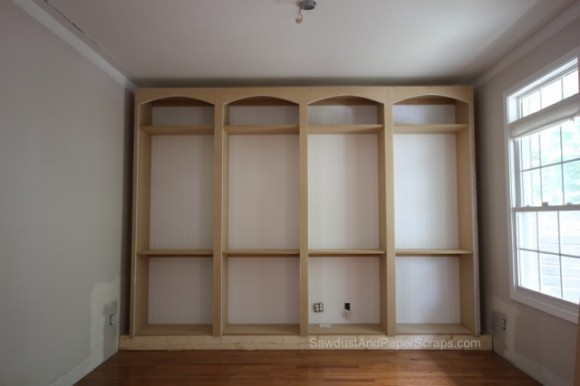
Last time I showed you my library bookshelf progress, I got a lot of questions about what I was planning for those big gaps on the side of the bookshelves.

I filled it in with a 2×4 wall (of sorts).

Built in bookshelves progress

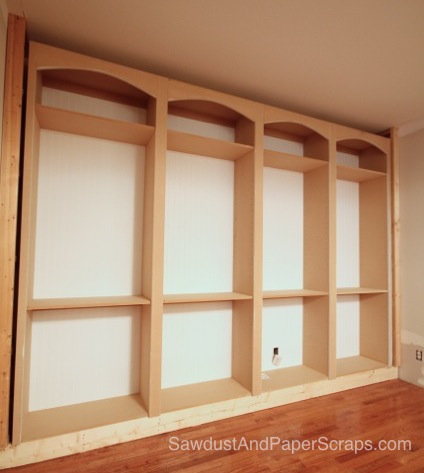
And then covered that with a two sided column.

Built in bookshelves


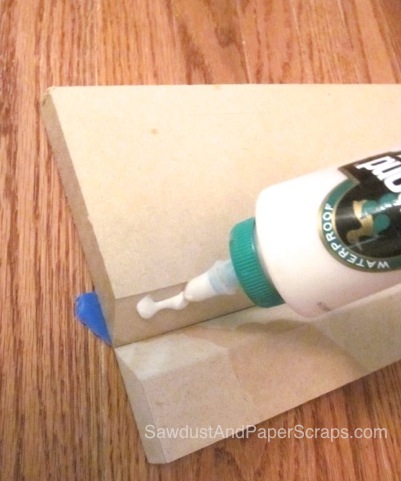
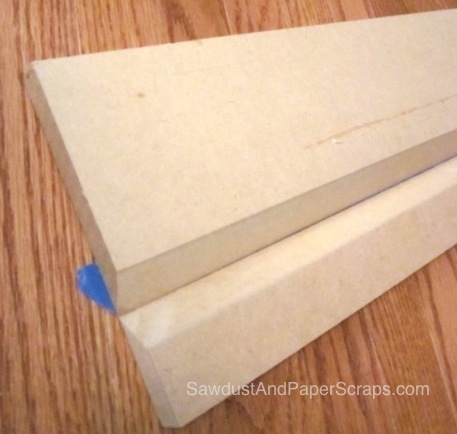
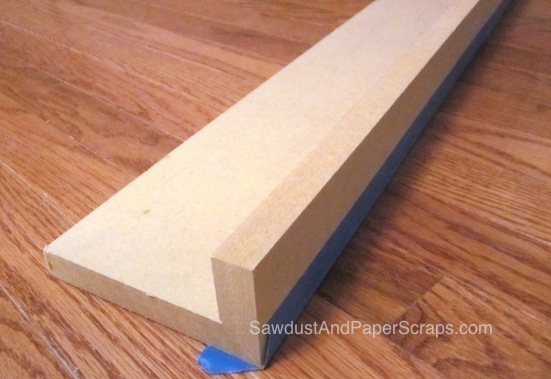
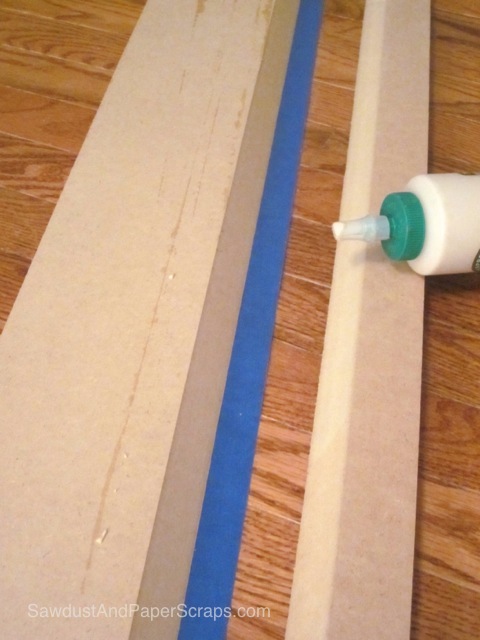
How did I  make a two sided column?  I mitered two long pieces of MDF and glued them together.  I also shot some nails in to help hold it in place while it dried.


The key to keeping long mitered joints in place during glue up is using tape to hold the pieces together like this:

1.
Mitered joint glue up.2.

Keeping pieces from sliding during glue up of a mitered joint.

3.

Keeping pieces from sliding during glue up of a mitered joint.4.

Keeping pieces from sliding during glue up of a mitered joint.


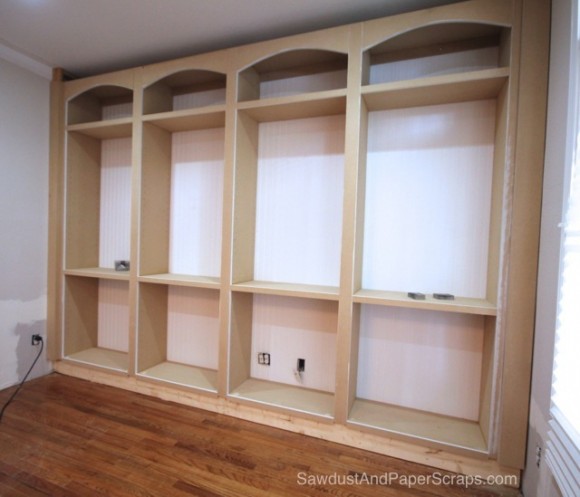
It’s that easy.  Then I glued and nailed it over my 2×4’s and it looks like this.  Of course, it won’t look REALLY good until it’s all caulked, trimmed, painted and finished…

Built in bookshelves

And my goal for that is the end of the week.

WISH ME LUCK!

October 2, 2016 · 21 Comments

« Utility Sink Design Options
Utility Sink Placement »

Comments

  1. Anne @ Unique Gifter says

    October 2, 2012 at 3:54 pm

    Good luck!
    Looks like I’ll have to stay late tonight and further delay my massive, massive project 🙁

    Reply
    • Sandra says

      October 2, 2012 at 10:02 pm

      What is your massive project Anne? Good luck!

      Reply
      • Anne @ Unique Gifter says

        October 4, 2012 at 10:54 am

        A multi section bookcase thing (different than yours, but same vein) and a wardrobe.
        Hit a snag last night with the light installation… not sure what the problem is and could take awhile to figure it out!

        Reply
  2. Wendy says

    October 2, 2012 at 5:39 pm

    Wow!!! Love that tip! I’m SO going to need it! ty ty ty ty

    Reply
    • Sandra says

      October 2, 2012 at 10:05 pm

      It’s like 5 extra sets of hands. LOL

      Reply
  3. Jacque @ theDIYvillage says

    October 2, 2012 at 7:11 pm

    Great idea! I cannot wait to see what these look like when you are done … don’t forget my house is next!!!

    Reply
    • Sandra says

      October 2, 2012 at 10:05 pm

      I’ll work on your built-ins while you work on my landscaping. Right? 😀

      Reply
  4. Karen says

    October 2, 2012 at 7:48 pm

    Looks good Sandra!

    Reply
    • Sandra says

      October 2, 2012 at 10:06 pm

      Thanks Karen!

      Reply
  5. Jake's a Girl says

    October 2, 2012 at 9:20 pm

    Good Luck!

    And looking good. 🙂 Those are going to be so great.

    Hey Sandra. Would you recommend MDF for baseboards and trim?

    Reply
    • Sandra says

      October 2, 2012 at 10:00 pm

      If you’re going to paint it and as long as you take extra care to get the edges smooth.

      Reply
  6. Chantelle - ThousandSquareFeet says

    October 2, 2012 at 11:14 pm

    Will be beautiful, I am sure. So, just to recap, you used MDF for the faceframes because you have no intention of installing doors. Does that then mean that you just glued and nailed the faceframes on from the front instead of using pocket holes from the backside to make them less visible?

    Reply
    • Sandra says

      October 2, 2012 at 11:23 pm

      Yep. If I could have installed the face frame before securing the cabinets to the wall, I would have used clamps to hold it in place but — as it is, nails had to do the job.

      Also, I intended to use pocket holes but didn’t plan ahead and drill my holes before installation and the 14″ depth wasn’t enough room to get the drill with the long bit behind the jig. (Wood glue is strong enough to hold but using pocket holes would have prevented the nails in the face…but then you have to plug the pocket holes. It’s really just a matter of preference and planning.)

      Reply
      • Chantelle - ThousandSquareFeet says

        October 4, 2012 at 11:49 pm

        Thanks! All things I need to keep in mind when I build my library cabinets, the boy’s window seat/bookshelves, and my mudroom lockers. I am slightly nervous about all that work but I know with your blog I will be able to do it just fine. I think. 🙂

        Reply
  7. lucy @lucysinspired says

    October 3, 2012 at 3:53 pm

    Sandra! You are so smart!! Come to Birmingham so we can play! I need your DIY hands and tools to finish my Hansel and Gretel house!!!

    Reply
    • Sandra says

      October 4, 2012 at 12:40 am

      I AM a sucker for candy!

      Reply
  8. Maureen says

    October 3, 2012 at 11:06 pm

    Sandra,

    Being totally brain-dead on things like this – Where exactly do you caulk? Is it every seam? Are there any places that you don’t have to caulk? Do you put a small amount on and then squish it into the seam scraping off most of the caulk in the process? Do you need to recaulk due to shrinkage?

    Maureen

    Reply
    • Sandra says

      October 4, 2012 at 12:46 am

      Mareen, I caulk anywhere where there is a gap. It might be every seam. I’ll prime first and then caulk because the primer will fill very small cracks and then I won’t have to waste my time caulking. I caulk along the line and then wipe it down with a wet finger. That’s what works for me. Or squish as you put it. I don’t recaulk unless there is a really wide gap and I have to build up…and I try to pretend I never have to do anything like that!

      Reply
      • Maureen says

        October 4, 2012 at 11:50 am

        Thanks, Sandra! I’m glad you answered my questions. I simply lack the confidence to learn through trial and error. I appreciate you letting me pick through your brain.

        Maureen

        Reply
  9. Colleen says

    October 4, 2012 at 4:12 am

    You are awesome one day i am going to try a big project like that!!!

    Reply
  10. Jody says

    October 12, 2012 at 2:39 pm

    Sandra, I was wondering how your got the curve on the top plate? Did you use a template. That would give my built in cabinets that finished touch!

    Reply

Leave a Reply Cancel reply

Your email address will not be published. Required fields are marked *

Categories

New Post email notification signup

You Subscribed!

Legal Stuff

Terms of Use

Privacy Policy

Disclosure

Recent Posts

  • Lodge Update – Floors, Cabinets, Countertops, and Appliances
  • Lodge Kitchen Cabinet Progress
  • Halloween Mad Gab – Halloween Party Ideas
  • Concrete Backsplash or Vertical Wall Treatment
  • Building and Installing a Giant Faux Beam on the Ceiling

Disclaimer:

Although it is my intention to provide accurate plans and clear instructions, not all plans have been tried and tested. Using plans or information found on SawdustGirl.com indicates that you agree with the Terms of Use policy and will accept full responsibility for the process and outcome of any project you attempt. All plans are for private use only. Plans and information published on SawdustGirl.com may not be reproduced, republished or distributed in any manner without written permission from Sandra Powell, Sawdust Girl. Actual projects built using Sawdust Girl plans may be published on your own site without instructions or "tutorial" as long as you provide a link to my original post with full post title or "SawdustGirl.com" as link title.

Copyright © 2022 · anchored theme by <a target="_blank"