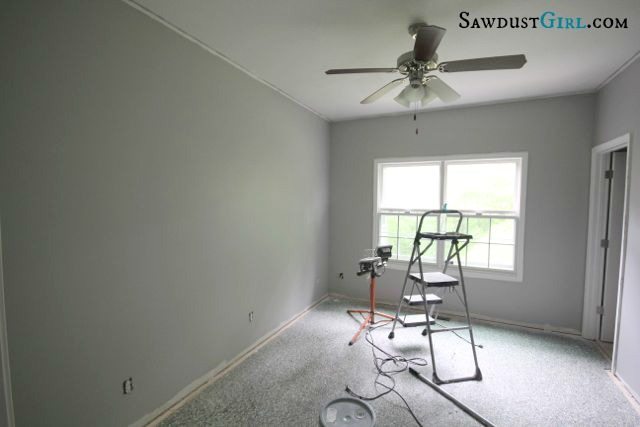
I’m so excited about my (Wes AND my) new office. It’s coming together quickly — now that the dang skim coating is done. Hate that job!
I got the walls painted on Friday and I LOVE the color. (Sherwin Williams — Light French Grey) I still need to bulk up the trim around the window and doors. I wasn’t careful with the paint on the ceiling because we’re doing a plank ceiling and adding crown moulding. AND yes, I absolutely CAN sleep at night knowing that I slopped the paint up there. LOL The walls look perfect and that’s all I care about. 🙂
And can you believe that Wes and I actually worked together THE WHOLE WEEKEND — and we still love each other! (We must be listening to our own advice on “how to DIY together and stay together“. heehee)
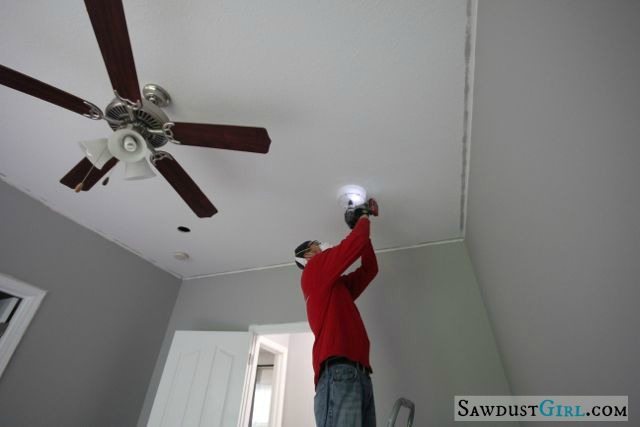
Because of my bum back, Wes has to do more of the manual labor DIY projects ’round here these days. I just supervise — which I’m getting pretty good at with of all my coaching jobs. 😉
He cut the holes for the new lights and then we both went up in the attic. He sat on the joists and wired up the lights. I only had to show him what to do on the first one and he took it from there. He’s a good apprentice!
I chose these new LED lights with integrated trim. They’re pricey but supposed to last for –like forever, so hopefully it’s worth $37 a pop in the long run.
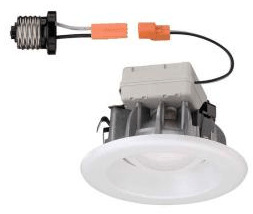
You screw one part into the recessed socket and then insert the trim into the can. They are instant on and dimmable. So that’s cool! Because we’re doing a plank ceiling, we’re waiting to push the trim into the can. Those suckers are hard to get back out once you insert. (Take it from me. I tried one!)
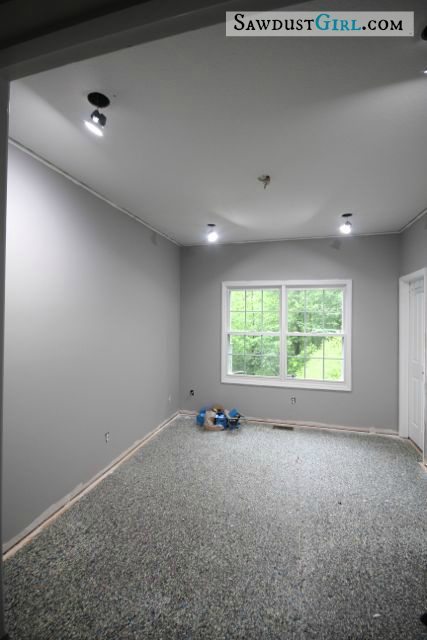
I was originally going to put a ceiling fan in here too but the office design I came up with dictated something else. It was too perfect to pass up…
I’m so flippin’ excited about having an office! (SOON)
Brenda says
Wow, it’s looking great! I love the lighting and that paint color is beautiful! Thanks for sharing the paint color name. I’m painting my living room and dining room very soon, and I’ve been trying to decide on what color of grey to choose. The Light French Grey is just beautiful, even more so when the light hits it. Looking forward to seeing your office when its completed! 🙂
Sandra says
Thanks Brenda. I am using this same color in the main house as well and love it!
Marcie says
I’ve been looking at the pictures you’ve been posting (FB, I believe) of this room and waiting for the paint color! I want to paint my bathroom gray, but have been having a hard time finding THE perfect color. I think I’ll go get a sample of that SW color today and try it out. Thanks!! Can’t wait to see how the room comes together!!
Sandra says
Grey is a hard color isn’t it? I really like this for a light grey. It’s not too dark, not too light, not too blue… I love it.
Laurel m. says
Oh, Sandra, help me! I have one light in my dining room, centered like your fan, and I would love to put up can lights around it. I think I could do it, but don’t know how. Did you wire them all to the fan? Is there some wonderful Internet tutorial you could direct me to? Thanks a bunch!
Sandra says
The fan had two separate hot wires feeding into it – both on their own switches. So, I was able to lead one of those to the cans and leave one in the fan junction box for the future fan or chandy (which is what I have planned).
Laurel m. says
Thanks! I guess what I need to do is climb up there and see what I’ve got.
Loretta Powers says
Hi Sandra. I absolutely love your site… I would like your professional opinion on using the beadboard on my master bedroom ceiling. The ceiling is popcorn that wasn’t done too well to begin with and I am afraid if we take the ceiling down then the blow-in insulation will come pouring down too. Do you think installing the beadboard over sheetrock would work as long as I find the studs and use the proper length of nails? The ceiling is 8 feet tall and the sheetrock is in good shape. Also would you use any type of wooden strip where the joints connect that would be seen? I was just talking about painting my office gray and I will definitely check out the color too. Thank you!
SayrahK says
Hi Loretta,
Last summer we put a beadboard ceiling in my husband’s office and it looks great! We wet down our popcorn ceiling and scraped that crap off! My hubby nailed up 4’x4′ peices of beadboard directly to the naked drywall ceiling, careful to hit the joists. Then he used 1″x2″ to cover the joints making a large grid pattern. The same 1×2 was used instead of crown moulding. Here’s a photo of our office on a Houzz article (it’s in the first comment at the bottom of the page) here:
http://www.houzz.com/ideabooks/576719/list/14-Ways-to-Add-Ceiling-Style
My hubby is a ship’s captain so this added the perfect nautical touch.
Loretta Powers says
SayrahK: Thank you for the link. The beadboard ceiling is beautiful and looks so expensive. We have beadboard on our porch and I would like to use the trim work like your ceiling and give it a little more definition. I can’t wait to start scraping the ceiling now – thank you for a great idea.
Sandra says
That is absolutely beautiful Sayrah! I might copy you too. 🙂
Sandra says
OOh, I just looked at Sayrah’s pic too and love that. I think I might copy that as well! 🙂
Darlene says
I’d also like to know where you pulled the power from for the cans from. I was thinking about adding some cans to a room and was concerned about adding more lights to a circuit, but these LEDs are only 12 watts. That’s totally doable. You’re giving me ideas and my project list is growing!
Sandra says
The fan was a light fan combo so I had two hot wires feeding it going to separate switches. I fed the recessed lights with one of those and left one there for the future fan or light.
Darlene says
Oh duh!! Of course, there’s power to the fan. Sometimes I over think things. Thanks for the reply.
AYISHA says
Im also curious about the install of the can lights. How do you wire them if you have a second story above? Do you do the whole “fishing” thing? I read up on it and it looks really complicated and too much room for DIY error.
Sandra says
If you don’t have attic access to hour lights you have to use remodel cans and cut a bunch of holes (strategically so you can notch or drill through your joists) in your ceiling to fish the wire to where you need it.
Feral Turtle says
How exciting Sandra. I just can’t seem to master drywall mud so I must say what a good job you have done. Those lights look amazing. Would love to here reviews down the road.