I built a pull-out storage cabinet in my laundry room to utilize the 36″ deep space above my washer and dryer. 36″ is a lot deep space and that’s a lot of potential storage. The problem is the items in the back would be difficult to reach and I don’t want to have to move all the front items out of the way to reach deep in the back. That would be a pain! So, pull-out storage cabinet it is!
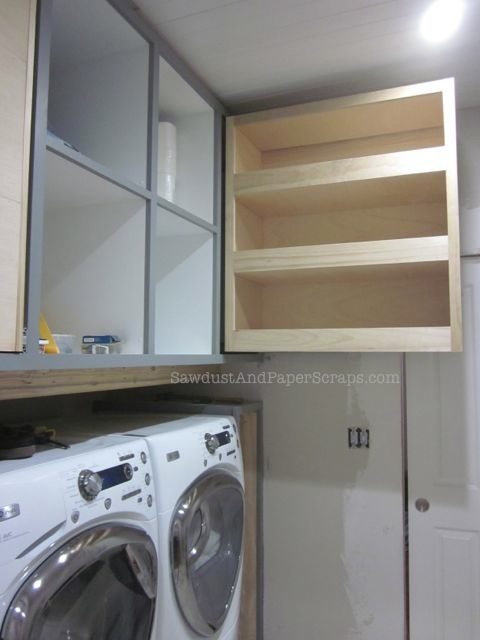
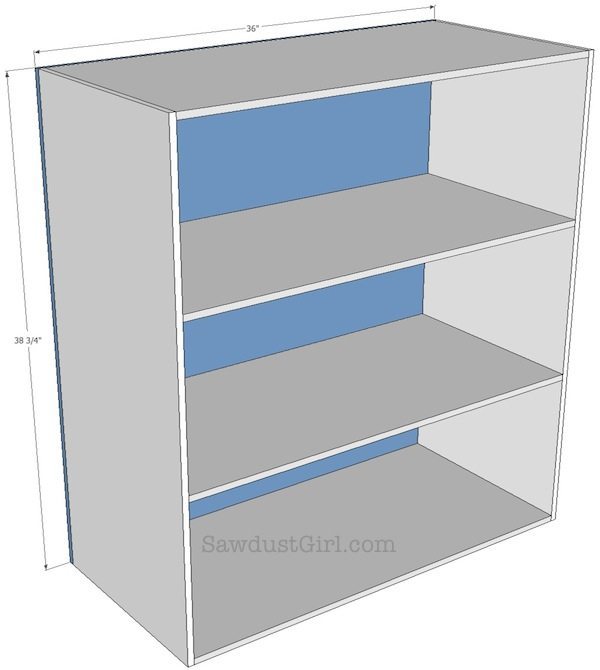
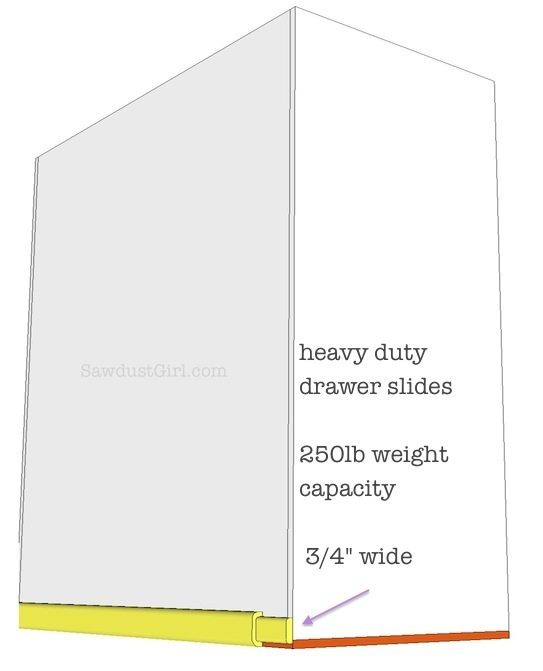
I built the outside “housing” cabinets first. Remembering that my cabinets are 36″ deep, I had to buy (pretty expensive) drawer slides to accommodate that depth. I purchased 250lb weight capacity, full extension slides that require 3/4″ space for installation. You should buy your drawer slides before you begin so you can build your cabinet parts to your own specifications. Most common slides only require 1/2″ clearance but you never want to assume anything. Order your hardware first and build to fit.
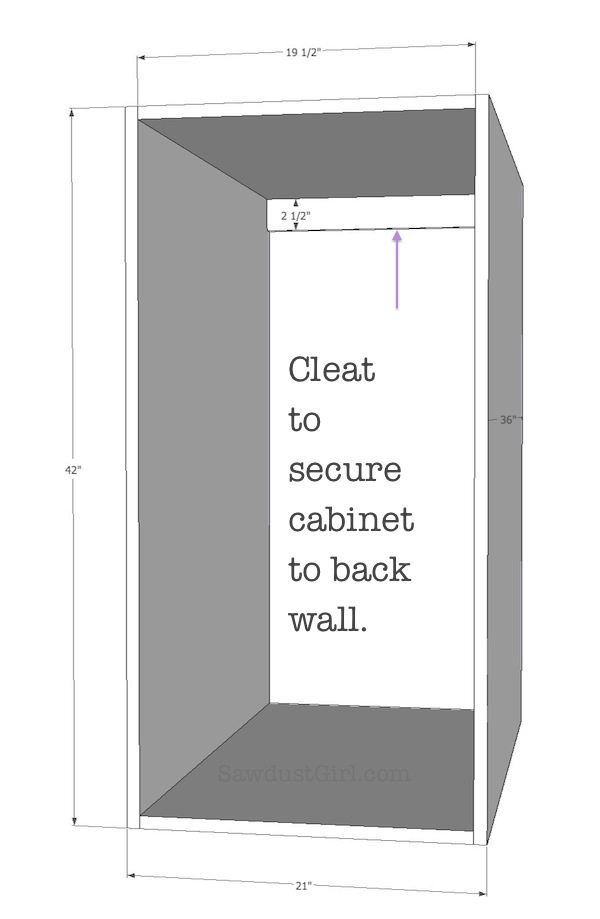
Here are the specifics on MY cabinet member.
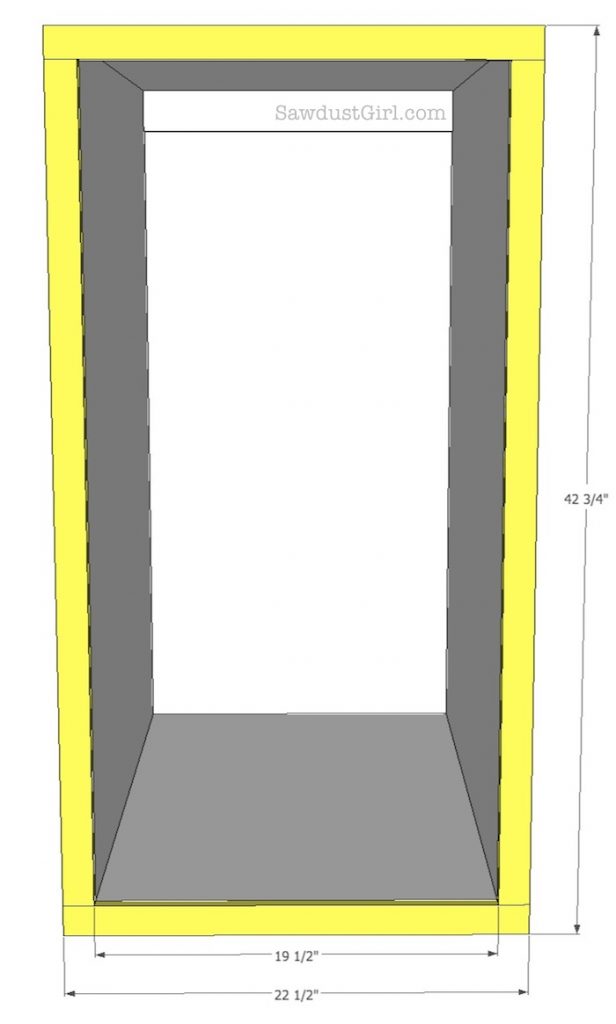
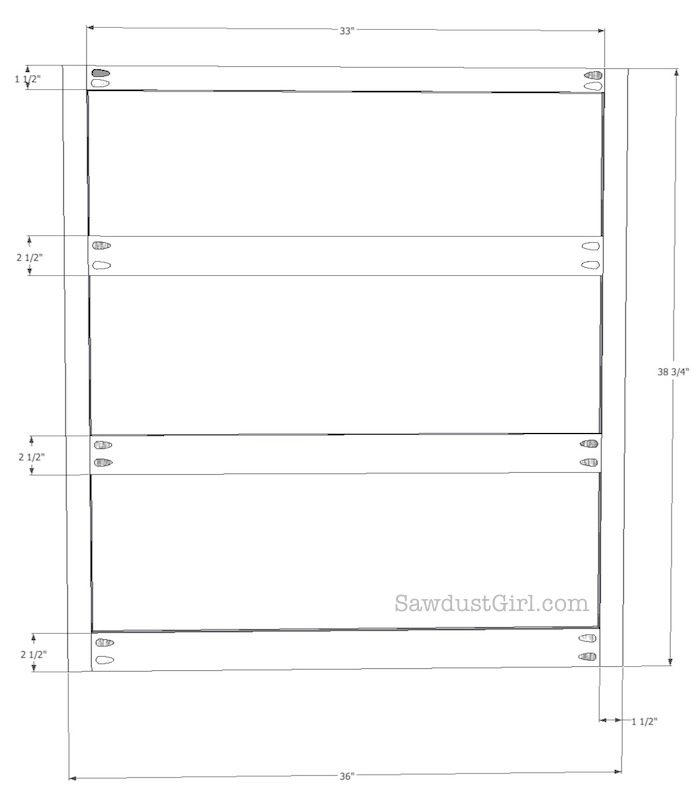
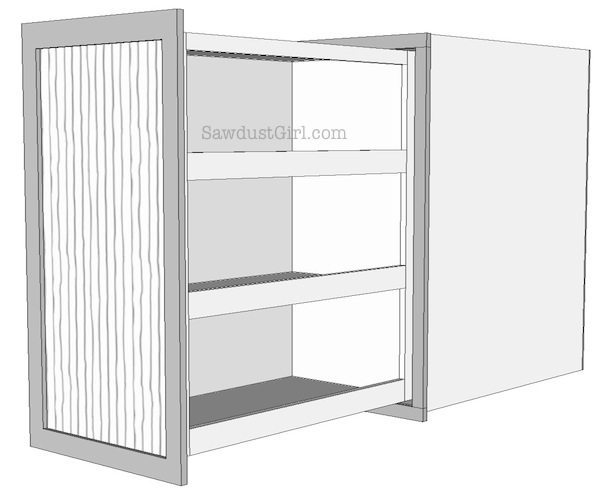
And with the faceframe attached.
Now for the pullout inside cabinet:
I built mine out of 1/2″ plywood with a 3/4″ faceframe. I attached one side to all the shelves first. I glued and screwed. No need to hide the screws because there will be a door front attached so you won’t see any of the fasteners.
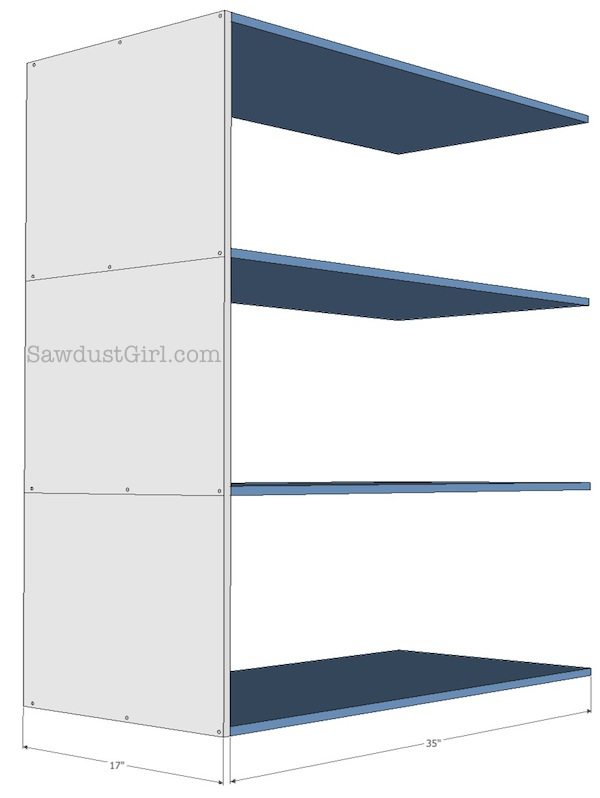
Second, I attached the second side in the same manner: glue and screws.

Attach the back with glue and screws making sure to square up the entire “box” first.
I built my faceframe out of 1×2 lumber with pocket hole screws using my Kreg jig.
Then attach the faceframe with pocket hole screws. Again, none of these fasteners will be seen once the door is attached. 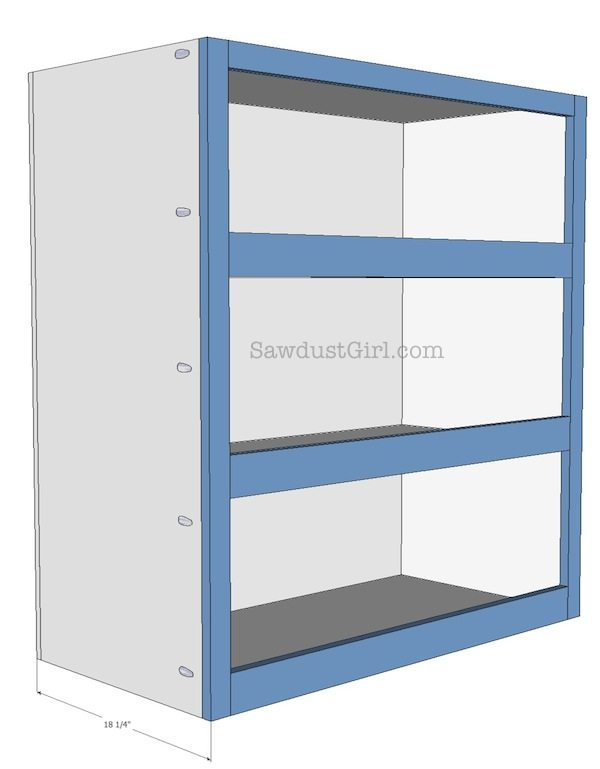
Now attach your drawer slides. Mine are 3/4″ wide, 36″ long, heavy duty, 250-500 lb weight capacity drawer glides.
Follow the installation instructions on your specific drawer slides. On mine, the slides were installed flush to the front of each cabinet part.
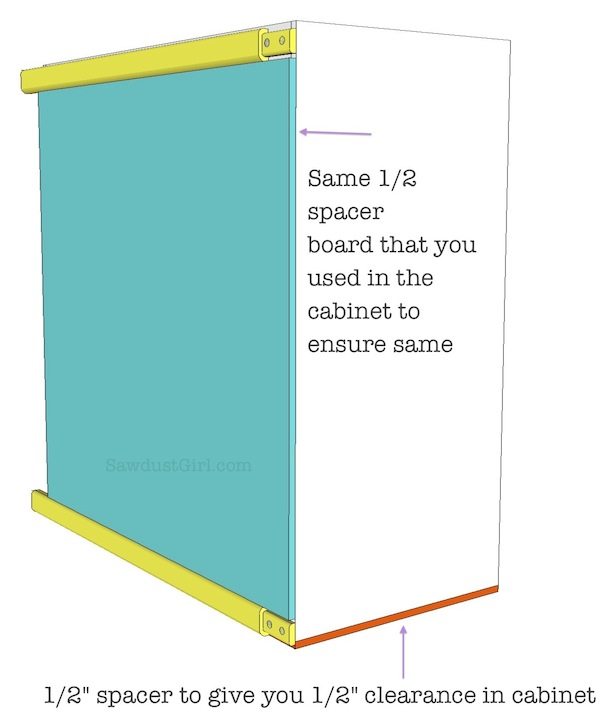
*I used a spacer to ensure that I installed the drawer slides exactly the same distance apart on both the cabinet parts.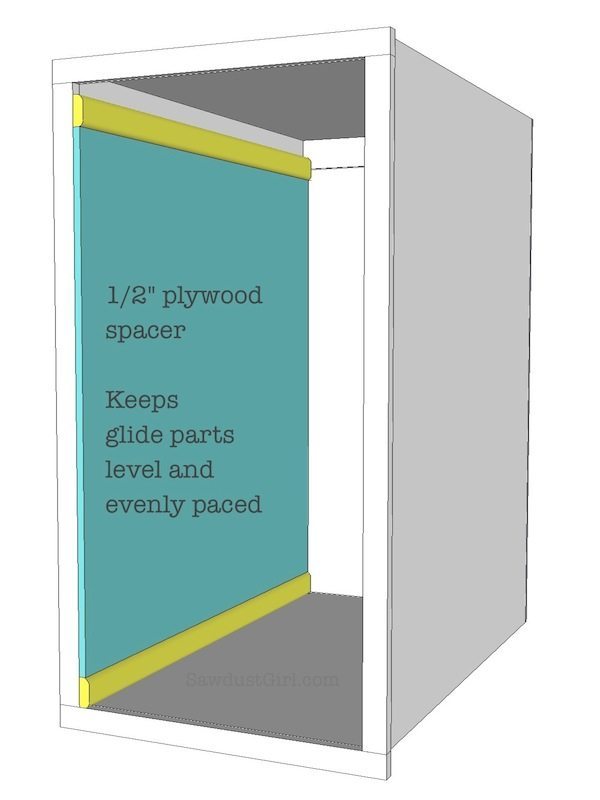
I set my pullout cabinet member on top of a 1/2″ board and then installed my bottom slide flush with the floor. I wanted 1/2″ clearance on the bottom of my housing cabinet so my pullout cabinet wouldn’t drag when I try to pull it out.
Then used the same spacer that I used in the housing cabinet to ensure my glides were in the exact right location.
Make sure you leave yourself some clearance on the FRONT of your pullout cabinet too. You don’t want it hitting the housing cabinet when you pull it out.

Now all you have to do is build a door, attach it and use your AWESOME pullout pantry style storage cabinet to your hearts content!
Resources:
Drawer Slides: I SEARCHED far and wide for affordable drawer glides. I found mine from TCHweb.com for $36 per pair which is unbelievable. Every other site I looked at sold them for over $100 per pair. It’s a crazy good deal– I don’t know how long they will be that price or how long they will last but as of right now, (1-19-2013) they are $36.
Pocket hole jig: I have the Kreg Jr Pocket Hole Jig. It is portable and I can use it in my shop or on the worksite. It runs around $40.
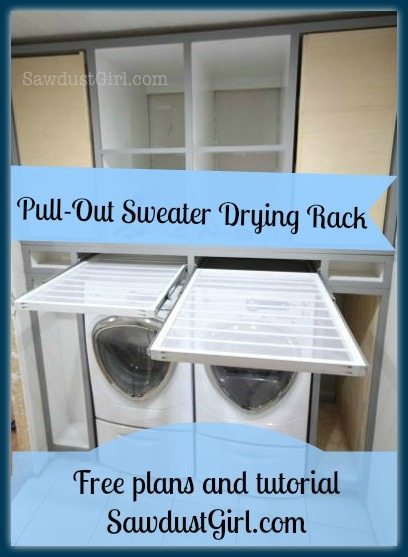
If you liked this tutorial, you might also enjoy my tutorial to build a pull out sweater drying rack.
Victoria Petersen says
Thanks for the tutorial! I would love one of these over the fridge.
Since you asked for feedback as you are changing your website and style: I like the diagrams as they are clean and simple, and sometimes show more than a picture can. However if only 1 type is shown, I’d rather see actual photos. It makes the process seem more approachable.
Sandra says
Thanks for your feedback Victoria. It’s very difficult for me to take pictures of what I’m doing while I’m doing it as I work alone and only have 2 hands. I often complain about that but I guess if I had more hands I’d complain about that too. 😀 I try my best to show you he process in the drawings because sometimes, that’s the best I can do. 🙂
Susan says
I’m so happy I found your site, thanks to my sister in law…I will be building a craft storage unit soon and plan to use this tutorial for some part of the cabinet…I love the thought of not having to move stuff to get to things in the back..thanks!
Sandra says
I’m happy you found me too Susan. 😉 Thanks for hanging out.
Shannon says
Love all the info on the pullout – I have one of these in my kitchen (in the small space beside the fridge) – and I love it so much I want to have these pull outs everywhere! To bad I didn’t learn how to build until after I had the cabinet custom made. Is there any reason that you didn’t use kreg jig joints when building all of the cabinet?
Sandra says
There is no need to go to the extra work of drilling pocket holes on the front and back (sides) because the screws won’t be visible. It’s faster and easier to just screw in straight through each board. I love pocket holes when I’m trying to hide fasteners or for tricky situations. There just wasn’t a need right there.
Shannon says
Thanks for the info – I’m still learning all about my Kreg jig and trying to figure out when to use it and when not!
Sarah says
Those are some drawer guides! I built several captains beds with my brother (and we’ll be making more this summer) and we searched for drawer guides that would let us make drawers the whole depth of the bed and we only found crazy expensive ones, so $36 is much more reasonable. If someone doesn’t need 36″, they might want to research 28″ ones. We ended up going with 28″ 100 lb fully extendable guides at a local lumber store. They were $18 each, or if you bought in a box of ten they came out to be $13 a pair.
I know what you mean about taking pictures. I thought about taking some while we were building the beds, but it just seemed like too much work and the garage gets super dusty! Maybe this summer because they are awesome beds with a ton of storage.
I need to incorporate a ton more storage into my house, so I’m definitely pinning this for future reference. Thanks for the great tutorial.
Sandra says
36″ glides are generally over $100 so I was super excited to find mine. They just get more and more pricey when you go over 24″ don’t they? Glad you found something that worked for you too.
Janet G. says
I was so hoping you would post a tutorial for this, and am so grateful that you did. Thanks! I love the diagrams!
Sandra says
Thanks Janet. Glad you found it useful! 😀
Beckie says
I am learning so much! I, too, need a cabinet with roll out shelves over my frig…which has nothing about it. Then there are issues of the corner cabinets that are a pain in the butt to get to. I am seriously working on getting the hardware for those in the immediate future.
Malisa says
Love the diagrams and tutorial. 🙂
Tamara Houseman says
OMG!!!!!!!!!!! I L-O-V-E your new site!!!! It is awesome. Just wanted you to know.
Dawn says
Thank you for all your wonderful tutorials and advice. My husband and I have been building a custom closet thanks to all of your wealth of knowledge. It is funny because when I suggest something he usually replies, “that’s not how Sandra does it.” haha I went to the site for the drawer glides and just to let others know they do have other sizes and prices that are similar in savings. I purchased 500lb glides to use with a trundle pullout now lets just see if I can build that trundle. ;p
Sandra says
LOL That’s so funny. Have fun building your trundle.
Dennis says
I like the pull out as I am reading to build one. I wanted to kow why you used the slides on top and bottom instead of the one on top and 2 on bottom? I have only seen the 1 on top & 2 on bottom before. Please let me know which is better if one is better.
Sandra says
I think you could assemble a similar cabinet any number of ways. It depends on the weight of what you intend on putting in your cabinet and how you build your cabinet. Mine won’t be holding anything too heavy so my pair of 250lb glides are sufficient. I can see how installing a pair of glides on the bottom shelf and installing one glide on the very top could help keep the cabinet centered if your glides are made for bottom or top installation. My specific glides didn’t offer any support when installed horizontally (as would be the case if installed on the cabinet top).
This was just my choice given the materials, hardware and weight of my cabinet.
Carri says
Can the face frame be done with glue & nail gun?
Sandra says
Sure. I use that method often times on larger pieces.
Carri says
BTW…. GREAT SITE!!! Will definately be visiting more often 😀
Vicki says
Love your site. Very easy to follow. I now feel empowered to do my own. Thank you for sharing all. Including where you bought your slides and what kind of tool you used.
Sandra says
You are very welcome! 🙂
Lorene says
Ah! This is a perfect solution to my deep cupboard “pantry”. Mine is only 24″ deep, but with things like canned food in there, I am always losing things and it’s difficult to keep rotated. I have looked and look for ideas and then ran across this on Pinterest and it was like an epiphany! Angels are singing hallelujah 🙂 Now I just have to get my very DIY beginner self to figure out what measurements we’ll need and get the courage to actually do it! I am sure I will be back with questions since I know nothing…
Sandra says
Awesome!
diane says
Need a 2 inch filler cabinet to put between cabinet and wall. Could this be use for this purpose?
Sandra says
By the time you subtract the material, you’d only have 1 1/4″ of cabinet and that’s without faceframe which doesn’t seem like enough function to warrant the time and expense of building the cabinet. But lot’s of people love their pull out spice racks so it’s ultimately up to you.
Magdalena says
Thanks for the wonderful directions!
I have been dreaming about having pull out cabinets under the poorly designed storage under my stairs…it frustrates me to have to use the small 3 ft by 3 ft doorway and crawl in to get items stored way in the back…no matter how organized they are. So, this will be my next project, after I complete the batten and board project. 🙂 You are an inspiration!
Sandra says
Thanks and good luck!
Bruce says
Building a similar arrangement….the backside of my pullout is close to a wall, basically the face door will just clear the wall….so my question is, will I need to reach in behind to release the glides to totally remove the unit if need be? If so, guess I better leave more clearance for my fingers! Or do they “release” by just tilting up a bit, pulling harder, or…..???
BTW, looks like the glides are still at the good price! And thanks for an excellent tutorial!
Bruce
Sandra says
On these hinges you do have to release a lever on the side. Mine is a tight fit.
Bruce says
Thanks! i’ll be careful to check it out!
Tom says
I love this project. How did you attach the cabinet to the wall though? On 12 inch deep wall cabinets I can see that you would just hang off the back. But these cabinets would have an awful lot of weight to hang just off the back wall. I would think that you would attach to the side walls, however, you don’t seem to make note of that. The faceframe on the wall side sticks out a bit, preventing you from screwing through the plywood sides and into the wall. Did you put a spacer inbetween the cabinet side and the wall?
Did you use a french cleat on the side? That might actually be a cool solution…
Tom says
Sorry, I should have seen in the picture that there is a big shelf there.
I was hoping to do this project with some open shelves in between. I have a ceiling HVAC vent near the rear wall, so I am trying to avoid having to move that. I was thinking about two of these cabinets in the corners with some open shelving between.
Do you think that a french cleat on the side would work for this? I have a couple of studs on the side walls that I could tap into. I could also get a screw into the back wall. Or would this just be too much weight to hang on the wall altogether?
Thanks so much. You are such an amazing inspiration!
Dustin says
@Sandra How do you feel about the quality of these slides? There’s such a wide range of prices on drawer slides I worry about the feel and longevity of cheaper ones like these.
Sandra says
They’re working great still for me.
dan says
I building a 2 36 wide and 36″ deep shelves. I got the extra heavy duty full pull out sliders from lee valley tools
The cabinets is part of my wife’s cedar pantry. I will mounting a sheet of plywood to the sliders then putting on adjustable metal black metal shelves that are 6″x 36 long . I got the shelves at solutions
Andrea says
I was wondering if you had any advice on the type of hardware I should use. I am building a simple wooden box that will have hanging files inside. It will be located at the bottom of a cabinet so I wanted to put some sort of drawer slides on it so I could just slide it out to access the files and push it right back in. I looked at some undermount ones (so the hardware wouldn’t be visible) but they seem to be just for regular cabinetry drawers where the bottom is inset which doesn’t work for me. Do you have any suggestions for my situation or should I just use typical slides that attach to the sides? Thanks.
Kim B says
Hi, your work is inspiring!!
Question: I have a nook I carved out from under our staircase for my desk. Id like to build a desk and shelves. But Id like to incorporate 2 drawers under the desk to house my big photographic printer (in one drawer) and my cricut cutting machine (in the other drawer) The printer is 27.2Wx8.5Hx15.2W. It needs about 3-7inch clearing on the sides when the trays open up when printing – so I thought about leaving the sides of the draw somewhat open so when I need to print I just roll the draw out and open up the printer. Do you think this design would work for that?