I’ve been remodeling and building for so many years, sometimes I forget my humble beginnings. I forget that once I didn’t know how to tile, or frame a wall, or do any of the many things I now just…do. I take a lot of my skill for granted. One of the most common questions I get from beginners who have just delved into their own remodel journey is how to patch drywall. And, hey, don’t worry! I’m going to teach you.
There are many ways to patch drywall, so I’ll show you a few that I know. It’s seriously something almost anyone can do. In fact, to prove it, I’m tackling this patch job at midnight when I’m half asleep!
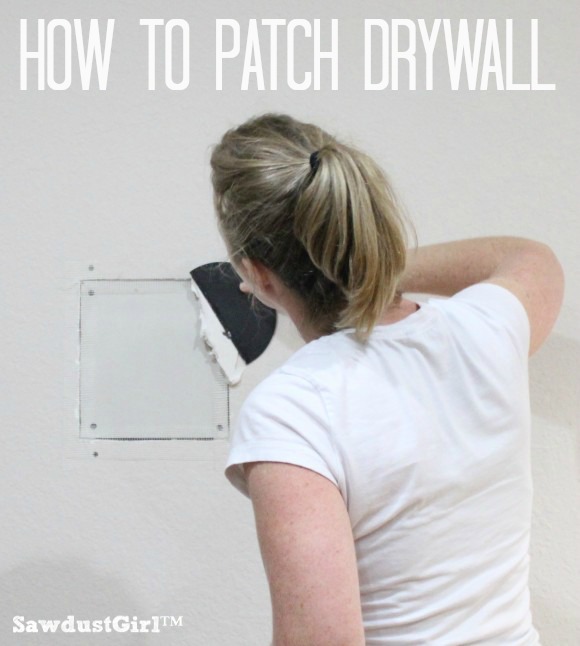
Method #1: Ready-Made Patch Kit
The easiest way to patch drywall is with a ready made patch kit. They come in various sizes and are made of a thin metal square covered with self adhesive fiberglass mesh tape, with “wings” of tape protruding beyond the edges of the patch that stick to your wall. With these kits, all you have to do is peel off the backing, stick it to your wall, and remove plastic film from the front. Quick and easy!

After applying the kit, just slap on some “mud” and your done! Well, and then repaint your wall.

Seriously, I go with this option as often as I can. The patches cost around $3 to $8 depending on the size. If you have to buy drywall and tape anyway, it’s probably cheaper to just go ahead and get the patch.
However, these patches don’t work in every situation. Sometimes the hole is an odd shape or is too big for a patch kit. Or, if you have a lot of holes to patch, you may not want to pay $3-8 per hole! That’s when you can move on to Method #2…

(Sometimes I don’t know my own strength!)
Method #2: The Old-Fashioned
If any of the above reasons apply to you, say, maybe you punched a hole in the wall, look no further! You can absolutely do it the old-fashioned way. In this case, get some drywall and tape, and get ready to patch the way we’ve been patching for decades.
Step #1
Start out by cutting a piece of drywall that will cover your “hole”.

To cut drywall, use a straight edge and utility knife to score the front paper. You’re not trying to cut through the drywall, just the paper. If you’ve never cut drywall before, I know that doesn’t make sense, but just trust me.

Step #2
Break the drywall by pulling back and Karate chopping where you just scored it! This step is my favorite as it’s just so, so satisfying. I’d recommend saving this step for when you’ve got some pent up anger (maybe because you just punched a hole in your wall)!

Step #3
Cut the back paper with the utility knife.

Step #4
Now, take your patch, and place it over the hole in your wall. Trace the outline.

Trust me, it’s much easier to cut a hole to fit a patch than trying to cut a patch to fit a hole!

Step #5
Now, take a drywall saw and cut out your new hole. If you aren’t sure what a drywall saw is, see below.

No, it is not a bread knife! Although…it is kind of like cutting bread. It’s just a lot more work!

Step #6
Now you need something to screw your drywall patch into to make sure it’s secure. If you didn’t expose a stud, no problem. Use a scrap piece of wood and affix it into the hole. Soft wood like pine is great so if you have a little left over from baseboard or a thick paint stick, that works perfectly!
Hold onto the wood and drive a drywall screw into the wall above and below the hole into the wood. If the hole is too small to get your hand into, use a piece of the mesh tape to wrap around the wood to hold onto while you drive your screws. It’s all about working smarter, not harder people!
For this tutorial, I exposed a stud on the right side so I’m only using one “cleat”.

Step #7
After that, you just need to secure your patch to your wood pieces or studs. I always use screws because I HATE “popped nails”! That’s when the nail wiggles loose a little and the mud pops up or falls completely out, leaving an exposed nail head. Just use screws!
When you drive your drywall screw, you just want to sink it in enough to create a dimple. Don’t break the paper.
Typically, depending on the size of your patch, one screw in each corner should be enough. Drywall screws can be placed about 12″ apart.

Step #8
Now you’re ready for the fun stuff: mudding! There are two different kinds of “tape” that reinforce the seam–paper and fiberglass mesh.
Paper requires a lot more skill to install properly so, for now, let’s just throw that option out! OK?

Let’s go with fiberglass mesh! Memorize the image below, because this stuff is amazing!

It’s self adhesive, so all you have to do is cut it with scissors and stick it to the wall. I love it!

Cover your seams with “mud”. I use premixed joint compound. It’s easy, and ready to use!

Now, your first coat of mud is going to look sloppy, so don’t try to get it perfect. Just glob some onto your spackle knife and smooth it over your tape pulling it out from the middle to the ends of your tape.
If you mess with it too much, you’ll end up pulling the tape back off the wall. Just slap it on and leave it alone, even if it is ugly! I’m a perfectionist, so I know the struggle, but it really is better in the long run if you just leave it all messy and goopy.

Step #9
Let that coat dry completely before adding another layer of mud. I don’t sand after the first layer. It’s unnecessary, and I am not one who believes in creating extra work for yourself.
After it dries, apply another coat. Use a large trowel on the rest of the coats of mud because it’s easier to build the patch up level with the wall around it.
Put a big glob on the wall, and then smooth it out over the patch, feathering it into the adjacent walls. Again, I know it looks really, really messy, but trust in the process!


Sometimes your trowel leaves a ridge like this that is easy to sand off after it dries, but if you keep going back over and over and over your mud while it’s wet trying to get it perfectly smooth…you’ll waste a lot of time. Get it relatively smooth, but don’t worry about perfection. The main purpose in your second coat of mud is to “level out” the patch with the surrounding walls.

I do 3 or 4 thin layers of mud. Remember that paint will only accentuate any globs, ridges or pimples in the surface so make sure that your patch looks good before you move on to primer and paint. Be patient. It’s an art!

Step #10
After your second coat of mud dries, sand down any ridges and apply another coat if you need to. You may not. If you do, it will most likely be a very thin layer to fill in a void or better blend the patch into the wall.
Once the last coat of mud is dry, lightly sand, dust and you’re ready to prime and paint.
That is unless you have textured walls in which case you’ll need to add a little texture…which is a whole other party! If you’re interested in knowing how to get rid of textured walls, check out my post here.

If you do need to add texture, it’s not that difficult. Buy a can of spray on texture and follow the directions on the can. Mostly, it’s trial and error getting it to match up as best as you can. Usually, you spray it on, wait a few minutes and then knock it down. If you don’t like what you see, scrape it off and try again. Well, and again and again until you like it well enough. With textured walls, it’s nearly impossible to create a patch that will disappear, even if you hire a professional, so don’t be too hard on yourself if you don’t get it perfect.
Of course, if this all sounds like too much work just to patch a stinkin’ hole, you could always just cover it up with some beadboard or wainscoting!
All in all, patching a wall shouldn’t be a daunting task. Hopefully, I’ve helped you feel confidant to go out and punch your walls without fear, because you will be able to patch them back up!
Stephanie Wilson says
This was awesome. Great tutorial!!
Margot Perry says
Thanks for these awesome tutorials! It is amazing what something simple like this can help you accomplish and SAVE you money!
Sawdust and Paper Scraps says
Absolutely. Once you have a piece of drywall, a roll of tape and a bucket of joint compound, you can patch holes to your hearts content and probably not have to buy any more material for a long, long time.
Brandy Miller says
Great tutorial! Have you considered putting them into a book?
P.S. I am totally loving the fist and thumb print hole in the wall. Pure awesomeness.
Sawdust and Paper Scraps says
Thanks Brandy. Maybe I will when I have a good compilation of them built up. 😉
sharlee says
Thanks Sandra! I needed this lesson again.
[email protected] says
Hi Sandra-
What a great tutorial! Wow you make fixing drywall look fun. I think I could take on the holes in my walls now.
My best- Diane
Sawdust and Paper Scraps says
It’s really fun to patch holes when they are shaped like thumbs up…or down, depending on how you look at it. 🙂
Sue B. says
Great tutorial! Oh, if I had a nickel for every filled wall hole…..
Jenna, SAS Interiors says
Such a thorough and comprehensive tutorial. I actually have a hole that needs patching from the babygate at the top of the stairs. I was going to use spackle, but the repair kit might do the trick. Thanks Sandra!
Jenna
Sawdust and Paper Scraps says
If the hole is small enough, like a couple inches, you could just use some mesh and mud.
Catherine A says
Great tutorial! Informative sprinkled with fun. Love the thumbs up hole. I have a hole in our wall. We’ve been staring at each other for weeks. It’s been bullying me…”you don’t know how to fix me… it’s too complicated…” Your tutorial took all the intimidation out of it and now I’m thinking “Oh yeah Mr. Hole, you’re going down. I’m on the DIY boot camp work out.” ah-bu-bye! Thanks Coach Sandra!
Sawdust and Paper Scraps says
You go, Catherine! You go tell Mr. Hole who’s boss! LOL
Andrea says
During some of college, Ty worked for ServiceMaster, repairing holes. It was the best money he has ever made. Seriously. It would take him a couple minutes/house (of course, he’d have to go back for second and third coats, but seriously maybe 20 min. altogether), and he got a minimum of $300/patch job. So this is a good thing to know how to do – it could save you a LOT of money!
Sawdust and Paper Scraps says
$300 per patch. I’m in business! Anyone need a patch they need me to fix? Anyone??? LOL
Now we can all feel even better about patching our own holes. And I can remind myself to stop dancing so close to the walls… I wouldn’t have so many holes to patch in the first place. (Are you picturing Elaine from Seinfeld?) Ha!
Beckie says
I watched too many PBS “This Old House” episodes. Each step, I kept thinking, “yep, that’s how they did it!”. Excellent tutorial. Let’s face it, drywall repair is easier than plaster.
Erin @ Two Story Cottage says
Good stuff! I have a hole that needs patching from where my 91 year old grandmother jabbed her cane in the wall by accident. I will let you know when I fix it – you just saved me a whole lot of googling. Love the pics, girl! Fun.
kathleen says
great tutorial! I love your blog! I am trying to patch a ceiling where there was water damage. I have gone through way too much spackle and 2 cans of spray stuff. It still won’t blend well…. I am so frustrated, but will try again. I am not patient, so every time I “play” with it, more of the ceiling comes peeling off. Apparently, it’s been patched before. Argh! Thanks for this encouraging post. I’ll be thinking of you. I can do walls, but ceilings, ugh! Plus, I hate covering furniture and such to prep… where is my magic drywall fairy? LOL!
Sandra says
Hope you got it done Kathleen and it wasn’t TOO much work. Ceilings are HARD.
Monica M says
I read this on the drive home from home depot (I wasn’t driving) and fixed it when I got home! Such a good tutorial! Thanks!
Sandra says
Sweet! Glad it helped.
Hole filler says
You are such a hottie! I would love to do some naked wrestling with you!
Emily says
What a great post! Something that may seem simple, but this is very helpful to us novices 🙂