Kellyn here to share tips on how to sand like a pro! You may have seen my posts on The Sawdust Diaries. And I am so excited and honored that Sandra asked me to contribute some of my building knowledge here on her Sawdust Girl blog.
Sanding 101 – sanding basics
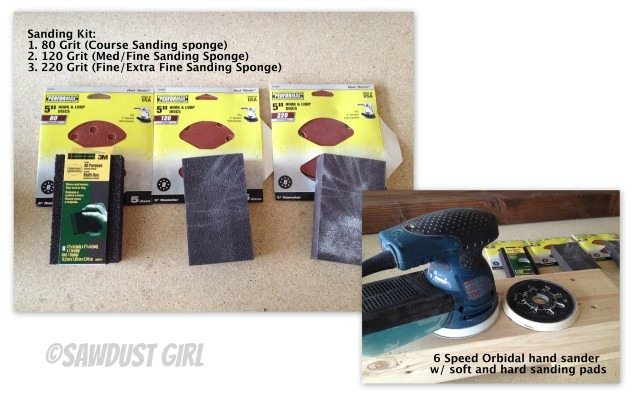
I always have on hand the following sanding tools:
1. 80 Grit sandpaper (Course/Med Sanding Sponges)
2. 120 Grit sandpaper (Med/Fine Sanding Sponges)
3. 220 Grit sandpaper (Fine/Extra Fine Sanding Sponges)
I also have a Bosch 6 Speed Random Orbital Sander that I love, and use on pretty much every project.
Side note on orbital sanders: There are 2 kinds of pads ( the round disks that the paper sticks to.)
Hard- for flat surfaces and fast material removal. (I use this when I am sanding down large flat surfaces)
Soft- for general purpose sanding and polishing. (Use for everything. But I notice that the soft pad’s middle starts to concave and will leave round marks on large flat surfaces.)
Now, this is not rocket science, the steps are fairly easy:
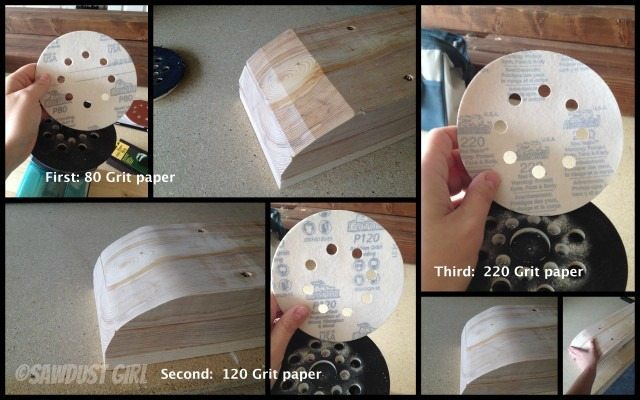
Step 1: Use the 80 Grit sandpaper (Course/Med Sanding Sponges) to smooth out all defects, gouges, scrapes… or in this case my example is to round out the curves. The 80 Grit is rough, and is used to mould or remove large amounts of material faster.
Step 2: Use the 120 Grit sandpaper (Med/Fine Sanding Sponges) to buff out the harshness from the 80 grit sand paper. When you run your hands over the wood, you should be able to tell the difference immediately from the 80 Grit.
Step 3: Finally, use the 220 Grit sandpaper (Fine/Extra Fine Sanding Sponges) to polish off your work. This is the best step and leaves the wood nice and smooth and ready for paint or stain.
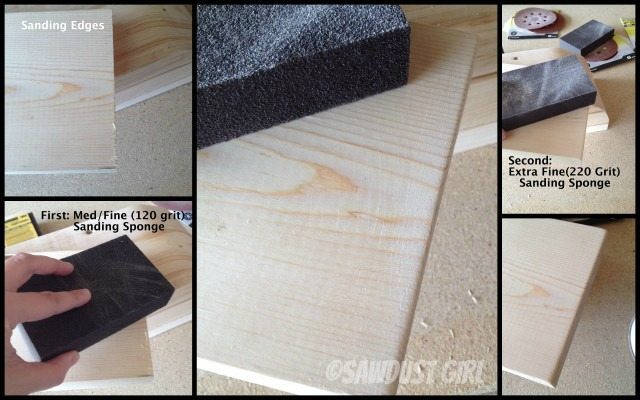
When sanding down edges of boards, I usually stick to the Med/Fine and the Extra Fine Sanding sponges. It’s quicker to go over them with the sponges, and doesn’t take much before you have nice clean edges.
Don’t forget to sand. It is a tedious and long process, especially if you have been building a project for a long time. Sometimes I am spending full days of just sanding. But it is well worth it in the end. Happy Sanding!
Annet M says
This is excellent. I always skip some sanding steps too and then wish I knew why it doesn’t look as good.
Catriona J says
I love foam sanding blocks. An excellent invention. Don’t forget to sand in-between coats, especially as the first coat always raises the grain.
At Rivercrest Cottage says
I vow to sand. I have skipped it in the past, but will do it in the future. You’ve made me realize it is a necessary step.
KELLYN says
That is exactly what I said after I painted the cabinets. I vow to sand every project going forward! Stain is much more forgiving, and paint will show EVERYTHING!
Melanie D says
I have such a love hate relationship with sanding. I hate doing it, but I really love how smooth the wood feels when it is done.
KELLYN says
Melanie- I totally agree! Love it and hate it all at the same time. I have tried to get into the habit of taking a break between building and sanding, because I get so excited to finish, and I can feel that I’m going to rush and cut corners… so I step back and rest for a day then I go back and sand with a passion! And I’m always so happy I did because the wood feels and looks amazing.
David H says
When staining a peice, please sand the end grain of all peices with at least the next finer grit, ie. 220 if using 100 on the flats, 320 if using 220 on the flats. The end grain is basically a bundle of straws that the tree used to move water up the trunk or limbs. These have to be closed off or crushed down to equalize the stain drawing into the end grains. You will notice the edges are much darker than the flats if this is not done before staining. After it dries completely,you can just sand the darker stain back off with the higher grit paper and restain the end grain.
It also hepls to close the end grain up before painting.
I have wiped the end grain with wood glue, allowed it to dry, and lightly sanded to make the ends smooth. The dried glue doesnt allow the paint to wick into the grain so much.
Also do yourself a favor and buy a cheap box fan and an air conditioner filter the same size. Tape the filter to the inlet side of the fan and sit it beside your project, blowing away from you. Most of the dust will stick to the filter and clean-up a lot will be easier. Power sanding is extremely dusty.