One of the easiest ways to build a cabinet or bookshelf with adjustable shelves is to drill holes for shelf pins. While there are quite a few manufactured shelf pin drill jigs out, I pretty much always make a custom template out of inexpensive pegboard. This shelf drilling jig is free if you have a scrap of pegboard in your garage! Small jigs that have to be moved many times to span the length of the cabinet are notorious for giving you wobbly shelves because it’s difficult to make sure all four holes (two on each side) end up exactly level with each other when you’re using a jig that you have to move up, insert a pin into the last hole you just drilled, clamp, and then drill some more. It’s cheaper, easier and better to make a custom shelf pin drill jig!
DIY Shelf Drilling Jig
You can cut your shelf drilling jig the same size as your cabinet sides, mark and drill all your shelf pin holes before you even assemble or drill them after assembly.
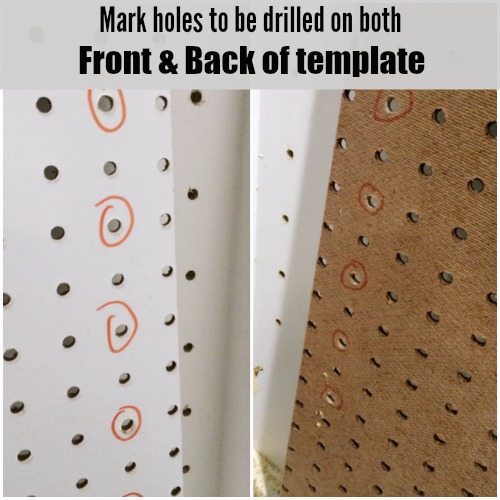
Either way MARK your shelf drilling jig with a permanent marker so you know exactly where to drill your holes and they all end up in exactly the same location.
- There is no need to drill holes all the way from top to bottom.
- Mark location of any FIXED shelves that will be permanently attached to cabinet sides.
- Start and stop holes 6-8″ from top and bottom of any fixed shelf and cabinet top and bottom.
- Shelf pin holes should be 1 1/2″ – 2″ from the outside edge of the cabinet sides.
- Pegboard holes are very close together so skip every other one. Circle the holes you will drill with a big, bold marker!

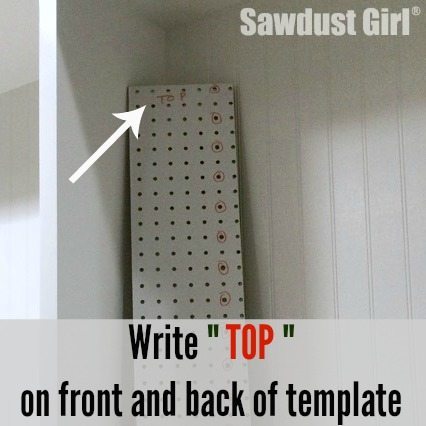
*Most importantly, write TOP at the top of your template! If pre-drilling before cabinet assembly, also write TOP on the top of your cabinet sides so you assemble your cabinet correctly.
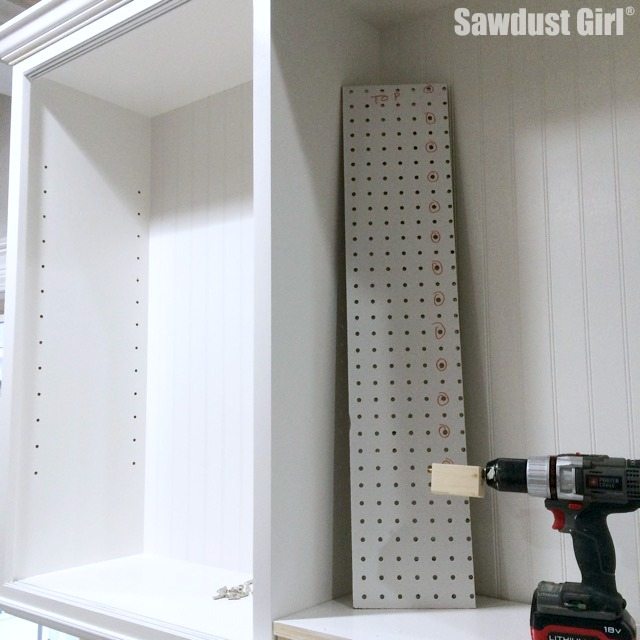
If you are drilling your shelf pin holes after cabinet assembly, youy jig will have to fit inside the cabinet. It’s easiest to cut a piece that will span the full depth of your cabinet but if you have a scrap of pegboard that is tall enough and don’t want to purchase a whole new sheet you can make it work.

You’ll have to flip your half template to make sure the holes are exactly level from front to back so you’ll need to mark the Font and Back of this template. And make sure you mark TOP at the top of both sides. (Trust me, it’s easy to set a template down to answer the phone and pick up where you left off — only pick it up backwards and upside down!) Mark Your Template! 🙂
Now you’re ready to drill!
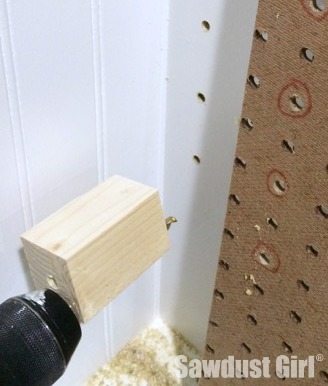
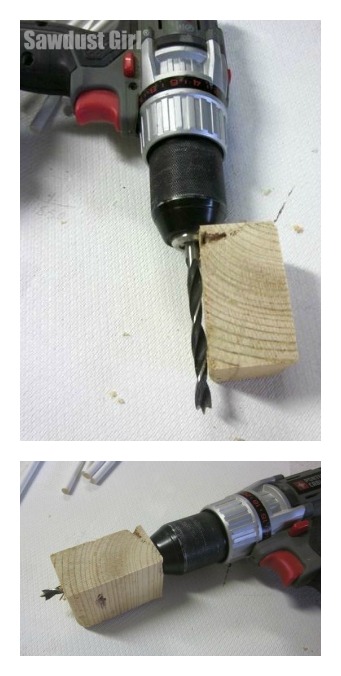
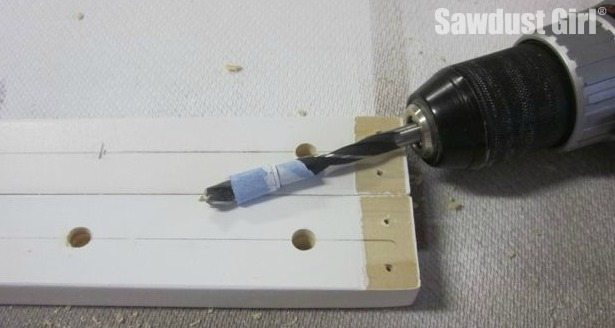
But wait, you need a depth stop on your drill bit so you drill your holes deep enough but not too deep.
I make my own with a scrap of wood. It like this method because it also becomes a handle to hold while you drill and helps you keep your drill straight.
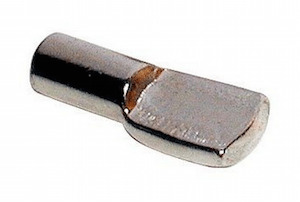
I always use 1/4″ shelf pins and 1/4″ drill bit. That keeps things easy. I buy shelf pins in bags of 50 and keep tons of them on hand!
1/4″ Shelf pins – Bag of 50 for about $5 on Amazon. (Affiliate link)
- To determine how much drill bit you need sticking out of your stop block, add the length of the shelf pin shaft (part that inserts into the cabinet) and the thickness of your pegboard template. (Its about 1/2″ combined but you want to check your specific situation.)
- Insert your drill bit into the drill.
- Put your wood block up next to the drill bit and mark where you need to cut it off to leave 1/2″ (or whatever you need) of the drill bit exposed.
- Cut your wood block to the correct length and then drill through the center.
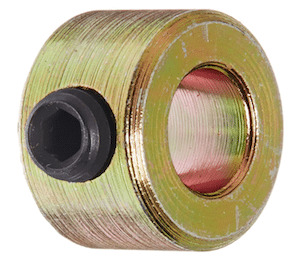
There are stop collars that you can purchase to fit on your drill bit. Drill Stop Collar 1/4″ bore size – $1.16
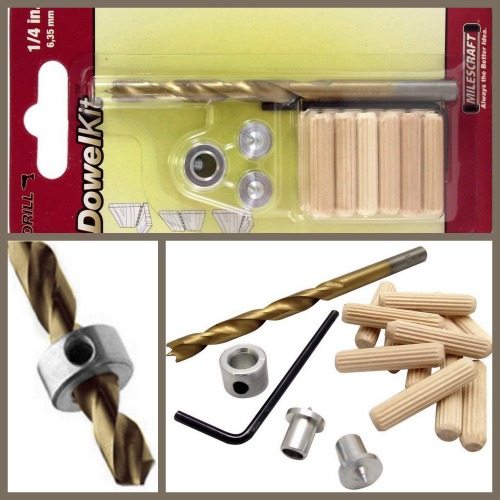
And this $5 1/4″ Doweling kit would actually be really handy to have on hand. It comes with a 1/4″ drill bit and stop collar plus a few 1/4″ wood dowels and dowel markers.
Or you can always use the old painters’ tape method to tell you when to stop drilling but it’s not very precise because the tape doesn’t stop the drill bit when you’ve achieved the depth you want. It just shows you when to stop drilling.
I prefer the scrap wood stop block and the scrap pegboard shelf pin jig over any of the “for purchase” items I’ve seen.
Cheap, easy and awesome is always my preferred method!
Denise says
Brilliant! I’ve tried to use the metal stop collars, but find it hard to tighten them down with the bit threads spiraling around. Thanks for the tips. You should see what I’ve done in my house with your inspiration.
Sandra says
Denise I would LOVE to see what you’ve done in your house!
Rachel says
Freaking brilliant! And one of those “why didn’t I think of that” moments…lol.
Sandra says
LOL Thanks.
Phyllis says
Thanks, very useful information!
Dale Kastle says
I see using this in my future!
Courtney Harris Burge says
I like to use painters tape to block out the holes I don’t want to drill, so I can reuse my pegboard without being confused by old marker lines.
Sandra says
That’s a great idea Courtney!
Jo Eisenberg says
I have been looking for pre made bookcases to fit the spaces in my house. NO LUCK. I love the genius, simple, well thought out technique. Can’t wait for all the men in the house to go away for a day and build these two bookcases! Kudos!
Jo
Lyle hamer says
Been doing woodwork and construction for 60 years. An old guy I met way back when said everybody had at least one trick you SHOULD learn, even if it was the clean-up guy. Thanks for posting this. It seems so obvious after the fact, but a simple brilliant idea. Thanks so much.
Adam Floyd says
I tried this, but the hole drilled is cupped at the bottom (not flat). The pin the flat-bottomed. I looked at some pre-built bookshelves and the holes are flat on the bottom. Actually, it looks like the holes are all the way through one piece of wood and there is another thinner piece of wood attached. Is there a special drill bit that makes the holes flat at the bottom?
Sandra says
Try using a drill bit with a flat tip instead of rounded.
Adal says
Forstner bits work well for this application. There are other flat bottom bits, too.
Dane Buson says
This was brilliant. Thanks for your tips, this made turning a very-shallow closet into a pantry go quite nicely.
toddb says
When shopping for a jig, I found this gem of a site. What a treasure :-), I’ll just buy pegboard. It is cheaper than a jig AND the rest of the sheet will make my wife happy.
George Joy says
Great tip and really helped me out when I put together a book case type shelving unit. Worked like a charm!
mehdipoor says
hello thanks for sharing…. how much space is between hols exactly?
Sandra says
When you get the pegboard, you can decide if you want to drill every single hole, or skip every other one. (That’s what I did.)
Laura Adams says
Sawdust Girl to the rescue, again! I inherited a set of drill collars from my father-in-law, but the 1/4″ one was missing the set screw. As I was changing it out from another collar, I, of course, dropped the set screw, and haven’t found it yet. I am not a fan of the tape method, so I was tickled to find your wood block solution. Great idea! Not only does it set the depth, but when the block is held flat against the pegboard, it keeps the drill bit perfectly plumb. (or level, depending on whether you’re drilling on a vertical or horizontal piece.) Thanks!
Alexandra says
Great idea! I finished building my bookcase but I keep wondering… do I drill the holes before or after painting?? I’m leaning toward after so the paint doesn’t fill the holes… suggestions?
Sandra says
I’ve done it both ways. If you have a sharp drill bit you’ll hopefully get cuts. Sometimes the jig or clamps can mark up the painted surface.
Ella says
Thank youuuuuuu. You’ve just saved me a lot of time, money, and headache. Closet tower, here I come!
Jeremy Thorowgood says
Is there a risk that the drill will widen the hole in the leg board, or can be prevented?
I love the idea, and plan to adopt it for a large shelving project.
Sandra says
Yes, with use, the holes will become too large and you’ll have to get a new scrap of pegboard. It’s not a big issue if you’re creating a custom piece for each cabinet project.