• Home
  • About
    • Personal Posts
  • Privacy
  • Shop
    • My Account
    • Checkout
    • Email
    • Facebook
    • Instagram
    • Pinterest
    • Twitter
    • YouTube
Sawdust Girl®

Sawdust Girl®

Renovation, cabinet building and woodworking plans and tutorials. Build like a Girl®

  • My Home
    • Clinton TN House
      • Clinton TN House in Progress
    • Maryville TN House
      • Maryville TN House Tour – Completed Rooms
      • Maryville TN House in Progress
        • Basement
        • Basement Storage Closet
        • Bedroom Office
        • Craft Room
        • Dining Room
        • Entry
        • Garage
        • Guest Bedroom
        • Hallway
        • Jack and Jill Bathroom
        • Kitchen
        • Kitchen Entry
        • Laundry Room
        • Library
        • Living Room
        • Loft
        • Madison’s Room
        • Master Bedroom
        • Master Closet
        • Pantry
        • Porch
        • Powder Room
        • Wes’ Office
    • Illinois House
    • Calderwood Cottage
  • My Workshop
    • Clinton Workshop
  • Build & Breakfast
  • Cabinet Making 101
    • Cabinets
    • Doors
    • Drawers
  • Projects and Plans
    • Countertops
    • Beds
    • Benches
    • Bookshelves
    • Desks
    • Gift Ideas
    • Holiday
      • Christmas
      • Halloween
    • Home Accessories
    • Kids
    • Kitchen Cabinets
    • Lockers
    • Nightstands
    • Organization accessories
    • Recipes
    • Sewing
    • Tables
    • Vanities
    • Wardrobes
    • Woodworking
      • Wood Finishing
    • Workshop
    • Workshop Storage and Organization
  • Remodeling 101
    • Baseboard and Trim
    • crown molding
    • Demolition
    • Door and Window Casings
    • Door Installation
    • Drywall
    • Electrical work
    • Flooring
    • Home Maintenance
    • Painting
    • Plumbing
    • Resources
    • Safety
    • Tile
    • Wall and Ceiling Treatments
  • Sawdust Squad
  • The Sawdust Diaries
    • Andrea
    • Ava D.
    • Beckie F.
    • Cara C.
    • Courtney B
    • Fawn T.
    • Jenn D.
    • Kelly C.
    • Kristy K.
    • Lara T.
    • Malisa B.
    • Marnie D.
    • Robin C.
    • Val F.
  • Tools
    • Products
    • Tool Reviews & Overviews
    • Inspiration & Ideas

How to Make a DIY Book Holder

All Posts, Free Plans, Gift Ideas, Home Accessories

One of the most irritating things about reading is actually holding the book. After a couple hours, I have to just keep switching positions and it gets pretty tiresome. Or sometimes, like with cookbooks, it’s just nice to have something to keep the book open so sticky fingers don’t get all over it! Plus, when I’m in the bath, I want something to hold my book so I don’t get it all soapy until I’m ready to turn the page! So, I designed a book holder! A sure fire way to pump up the relaxation value of a bath is to add a bath caddy and book holder, you know, so you can read your favorite book or magazine while soaking in bubbles.

Now, if you don’t have a bath caddy, you could spend close to a hundred bucks on one, or make your own for less than $5. I figure I’d rather do the latter! I made this plan for a book holder and bath caddy, but if it’s just the book holder you’re after, feel free to only build that part! Just check out our easy DIY tutorials here and here. Then make this book holder!
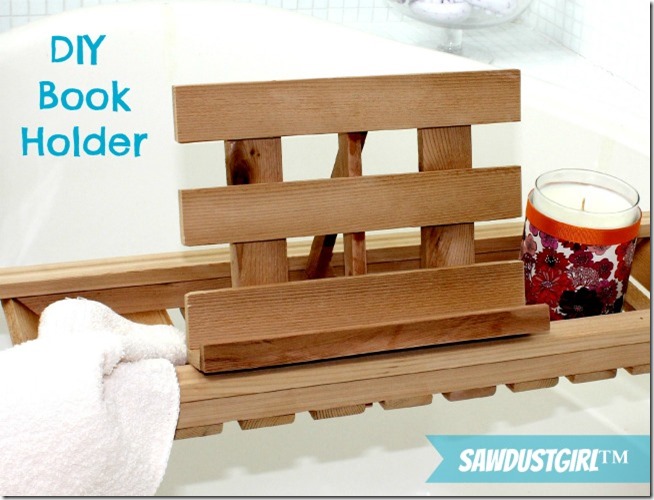
How to Make a DIY Book Holder

Materials List

What you need:
  • 2 Cedar Lattice strips 1 1/2″ x 4′ ($0.25 ea. lumber yard)= $ 0.50
  • 1 #10, 3/4” binding post = $1.18
  • 2 washers = $0.10
  • Waterproof Wood Glue (I estimated that I used about 25 cents worth)
  • Galvanized or stainless steel staples (I estimated that I used about 25 cents worth)
Grand Total = $2.28

1.  Cut Lattice

For a book sized holder cut two strips 7”, and six strips 10” in length. For a magazine sized holder cut two 8” strips and six 12” strips.  Then cut two of the longer strips in half length wise so they are just under 3/4 of an inch wide.  Sand edges and ends so the strips are smooth.
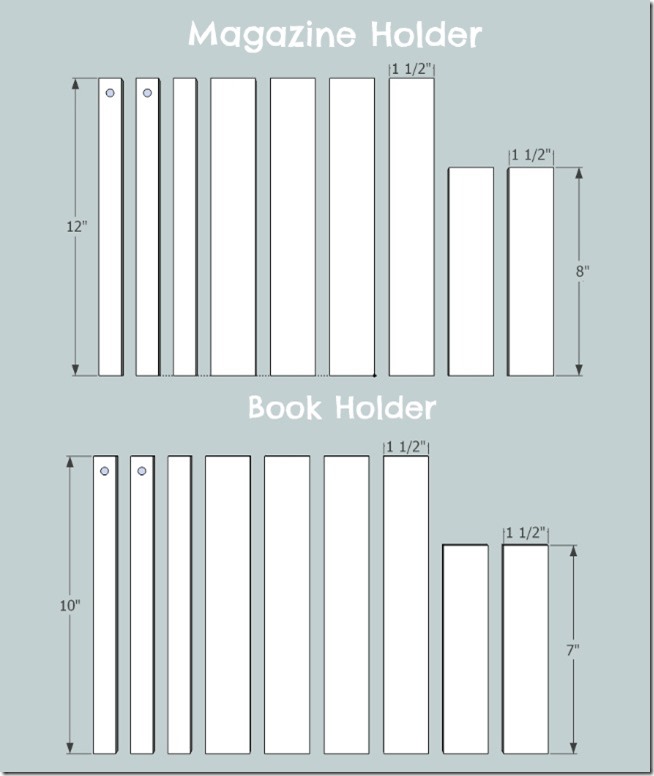
How to Make a DIY Book Holder - book holder cut list

2.  Create Bracing Legs.

Take two of the 3/4 inch strips and mark the center of each strip, 1 inch from the top edge.  Drill a 13/64” hole (or diameter that will fit your binding post). This wood will split out easily so it is a good idea to start with a smaller diameter drill bit and work your way up, say 1/8, 5/32, then 13/64.  After the hole has been drilled, cut the slats so that the holes are 1/2” from the top of the slat.
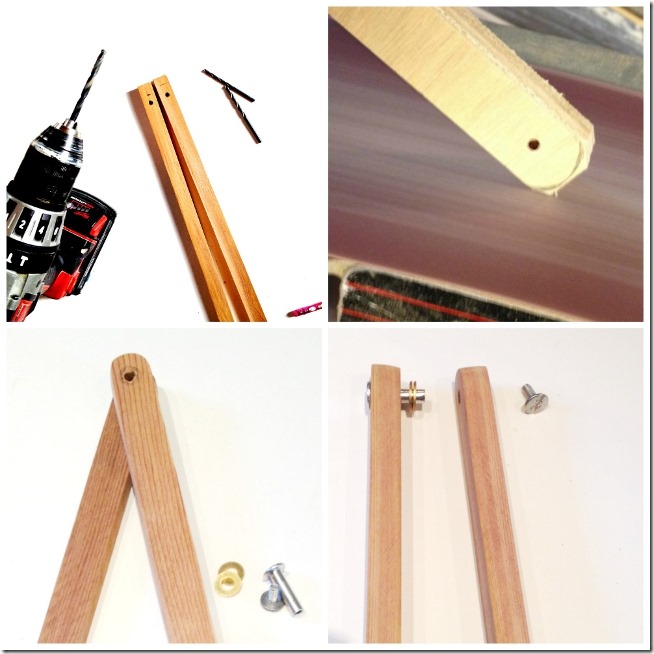
How to Make a DIY Book Holder - DIY Book Rack

Sand the corners to create a rounded end. Put the binding post through both slats with two #10 washers in the middle (the washers allow the wood to rotate more smoothly without binding).

3.  Assemble Holder

Create a tray by gluing and clamping together one long slat with one of the slats that was ripped in half.
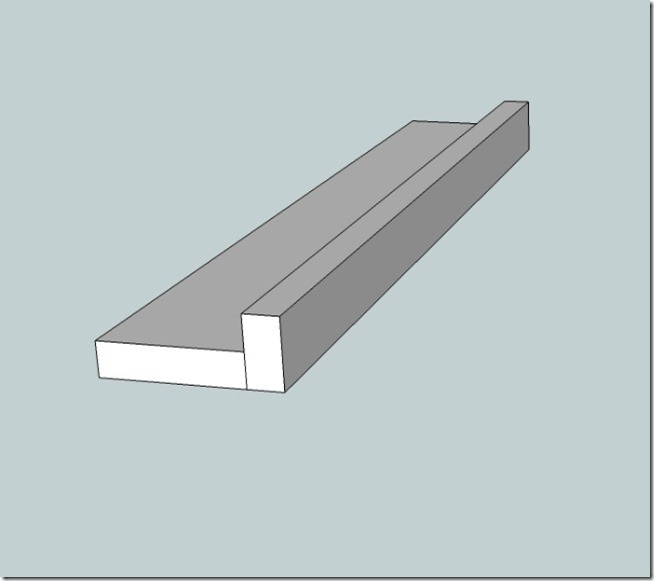
How to Make a DIY Book Holder - DIY Book Rack

While the tray is drying, assemble the back portion of the book holder using glue and staples or clamps.
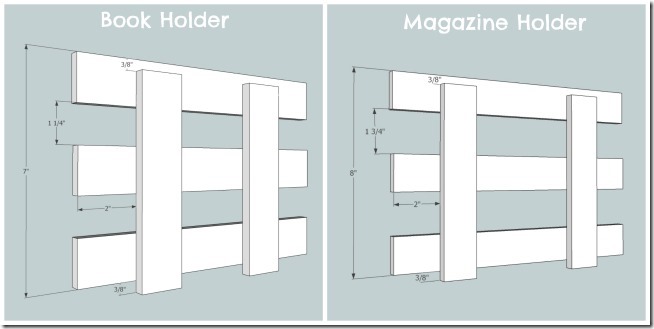
How to Make a DIY Book Holder - DIY Book Rack

Attach the tray to the back using glue and/or staples.
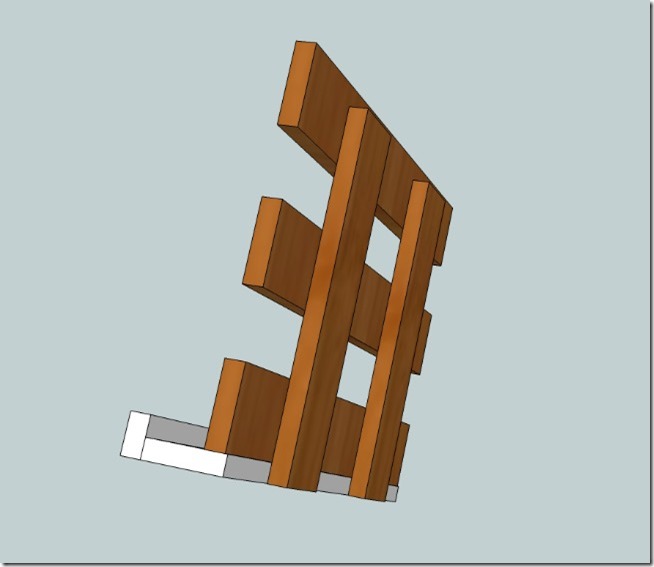
How to Make a DIY Book Holder - DIY Book Rack

4.  Size and Attach Bracing

Place the book rack into position on your bath caddy, holding the legs about 3/8 of an inch below the top edge. Adjust the legs so that they hold the book holder in place at the angle that you will enjoy while in use.  Make sure that the back leg will rotate freely when the front leg is attached.
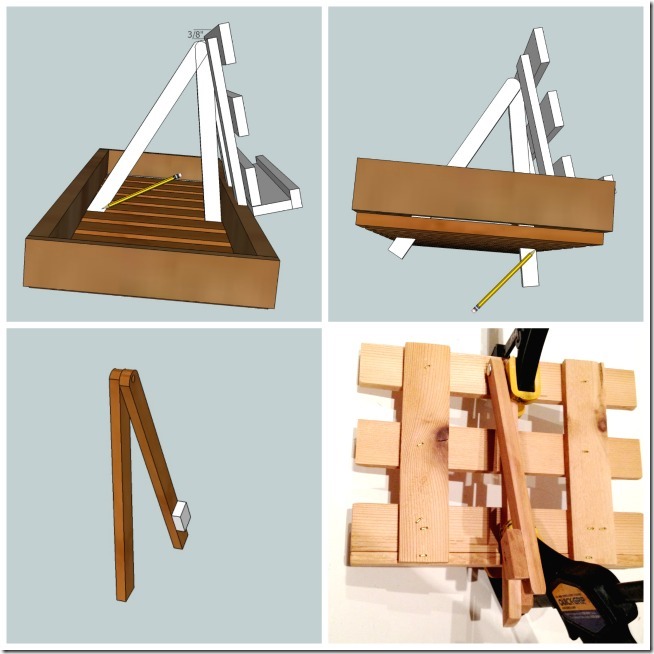
How to Make a DIY Book Holder - DIY Book Rack for bath caddy - free woodworking plans

Mark the bottom of the caddy slats on both legs, ad the top of the slats on the back leg. Remove the binding post and cut the legs just a hair above the line marking the bottom of the caddy. Attach a piece of wood to the back leg at the line that you drew marking the top of the tray. Sand and reattach the binding post, making sure to place the two washers between the legs. Use Locktight or drop of clear nail polish on the screw of the binding post to prevent it from coming undone with use. Now glue and clamp the front leg to the caddy.

5.  Final Sanding

Once the book rack is assembled and the glue is dry, do a final sanding just to round off the edges of the slats and clean up any glue or clamp marks. You know, just make sure that it is nice and smooth everywhere because of that whole NO SLIVERS IN THE BATHTUB rule. That’s it, place on your tub caddy (or on your counter if you’re not into baths) and it’s ready to use.
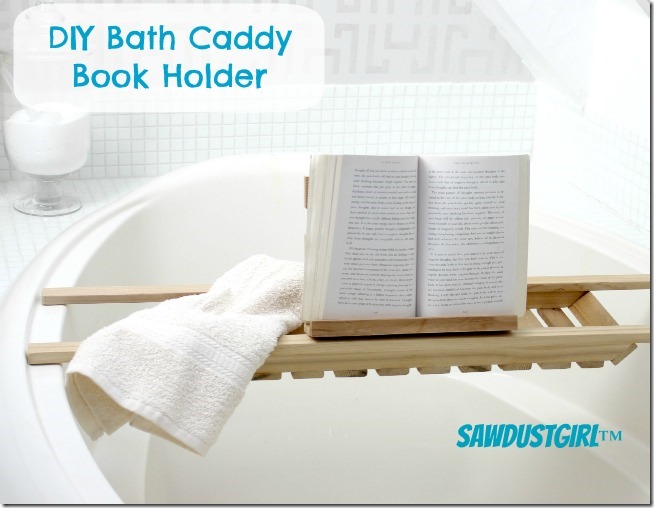
How to Make a DIY Book Holder - Book Holder for Bath Caddies

Now go take a relaxing bath and don’t get any library books wet!

February 11, 2021 · 2 Comments

« How to Winterize Your Home with Window Shrink Film
A Guide to Winterizing Your Home with Pipe Wrap Insulation »

Comments

  1. Rebecca says

    May 12, 2022 at 8:10 pm

    THANK Y0U!
    Have gone through 2 book holder bathtub caddy things in 2 years and they’ve both sucked for holding books correctly. Came across yours while searching (AGAIN)
    Plan to make this very soon.
    (Wait…unless you have another already made?! I would buy it right now!!!)
    ~Rebecca

    Reply
    • Sandra says

      May 14, 2022 at 7:58 am

      LOL No I don’t have items to sell. Though you are the second person to ask this week so maybe I should consider it. Good luck with your next book holder. I hope this one works out for you!

      Reply

Leave a Reply Cancel reply

Your email address will not be published. Required fields are marked *

Categories

New Post email notification signup

You Subscribed!

Legal Stuff

Terms of Use

Privacy Policy

Disclosure

Recent Posts

  • Lodge Update – Floors, Cabinets, Countertops, and Appliances
  • Lodge Kitchen Cabinet Progress
  • Halloween Mad Gab – Halloween Party Ideas
  • Concrete Backsplash or Vertical Wall Treatment
  • Building and Installing a Giant Faux Beam on the Ceiling

Disclaimer:

Although it is my intention to provide accurate plans and clear instructions, not all plans have been tried and tested. Using plans or information found on SawdustGirl.com indicates that you agree with the Terms of Use policy and will accept full responsibility for the process and outcome of any project you attempt. All plans are for private use only. Plans and information published on SawdustGirl.com may not be reproduced, republished or distributed in any manner without written permission from Sandra Powell, Sawdust Girl. Actual projects built using Sawdust Girl plans may be published on your own site without instructions or "tutorial" as long as you provide a link to my original post with full post title or "SawdustGirl.com" as link title.

Copyright © 2022 · anchored theme by <a target="_blank"