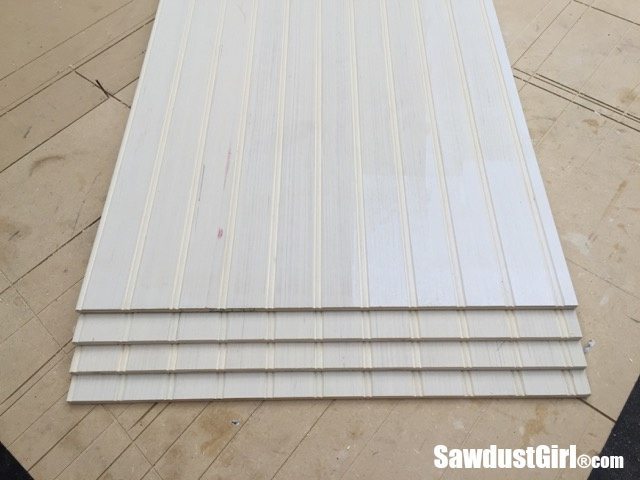
I often install beadboard to the sides of built-in cabinets in addition to using it as a decorative element on walls ceilings. The most cost effective beadboard material I have found is 4×8 paneling sheets found at most home improvement stores. If 8′ isn’t tall enough, you have to install multiple pieces and the seam is pretty obvious. Generally I plan to hide the seam with trim but there are occasions that I just want seamless beadboard. It requires a bit of work to hide the seam, but it is possible.
1. Make sure beads and grooves line up
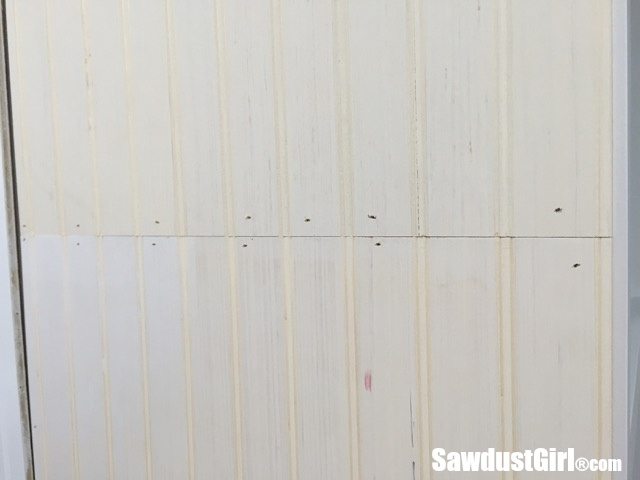
When installing multiple pieces of beadboard vertically, the most important thing is that the grooves and beads line up as perfectly as possible. There can be a difference from one sheet to another so take some time to select beadboard panels that match.
2. Attach beadboard firmly to surface
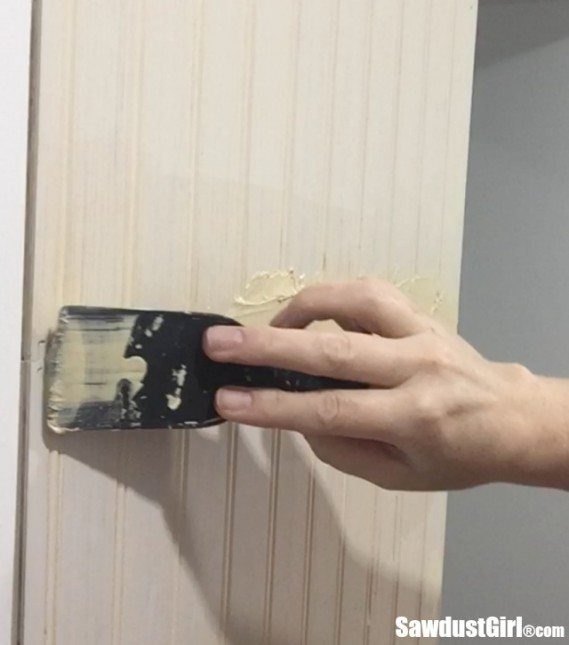
When attaching beadboard to the cabinet, wall or other surface, in addition to nails, use caulk as adhesive. It may not be necessary to use adhesive on the entire panel, but apply it on the area where the seam is being created. The objective is to prevent future movement and cracking in the wood putty and reveal the seam.
Make sure the beads and grooves line up as perfectly as you can get them and drive nails wherever you need them to pull the panel flat against the surface.
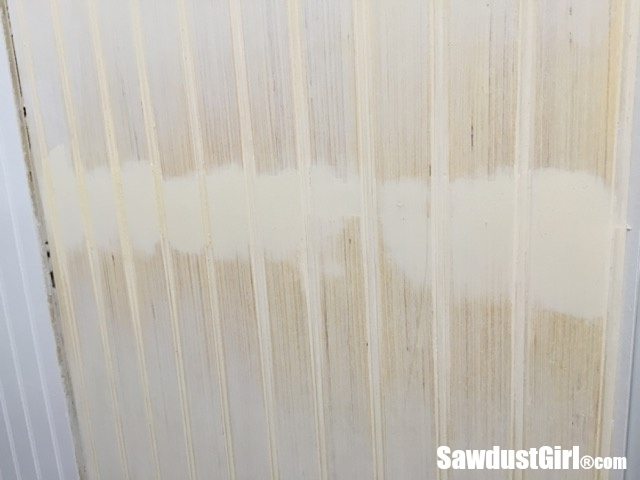
3. Apply wood putty
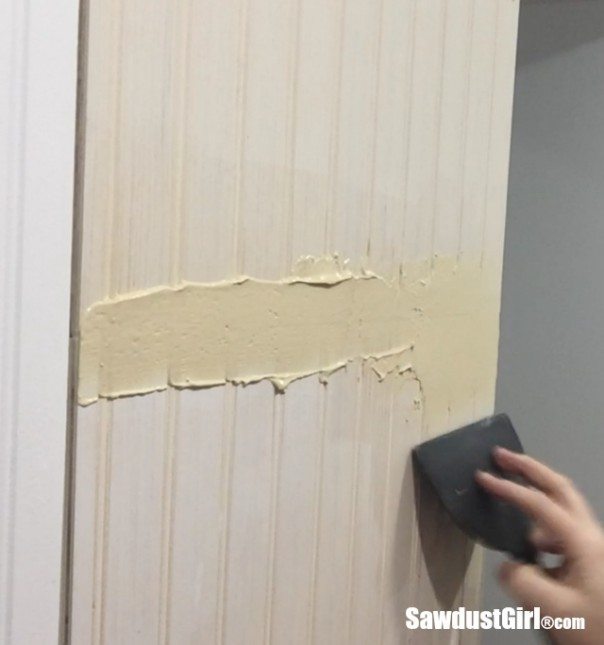
Apply your favorite wood putty generously, making sure to press it into the grooves. In order to build up a strong patch over the seam, spread on an ample supply of wood putty. Then use a wide putty knife to feather it out, sreading a portion of putty both above and below the seam. Feathering it out and spreading the wood putty over a larger area will help hide the seam.
4. Clean wood putty out of grooves
Use the corner of a putty knife to scrape the putty out of the grooves. In some areas you may find that this action reveals the seam. If this happens, reapply putty in that area and take less out when scraping the groove. You may have to use your fingers to shape and round the wood putty over the beads.
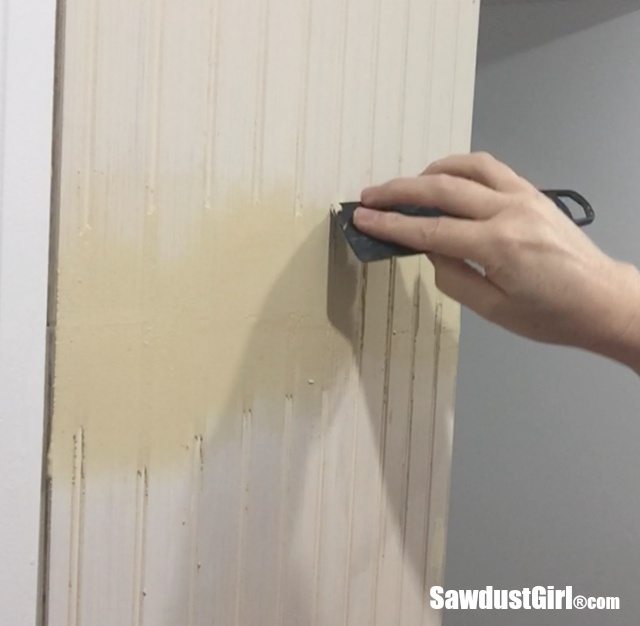
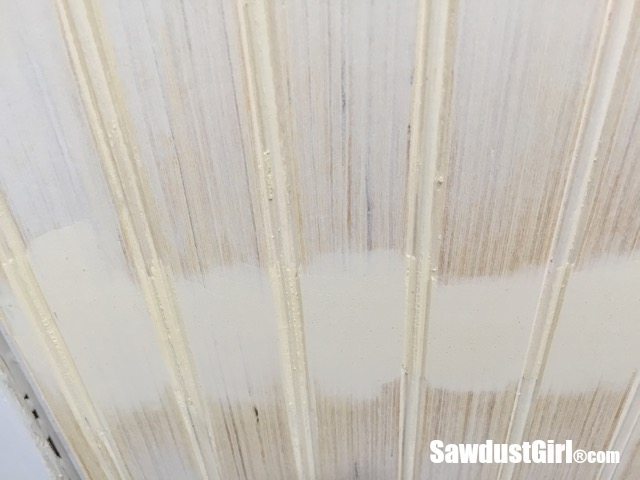
5. Sand face and grooves
Face
Wait for the putty to be completely dry before sanding. The flat face of the beadboard can be sanded with a fine grit sanding block or using an orbital sander. Either way, use gentle pressure and only take off a little at a time so you don’t remove too much putty and reveal the seam.
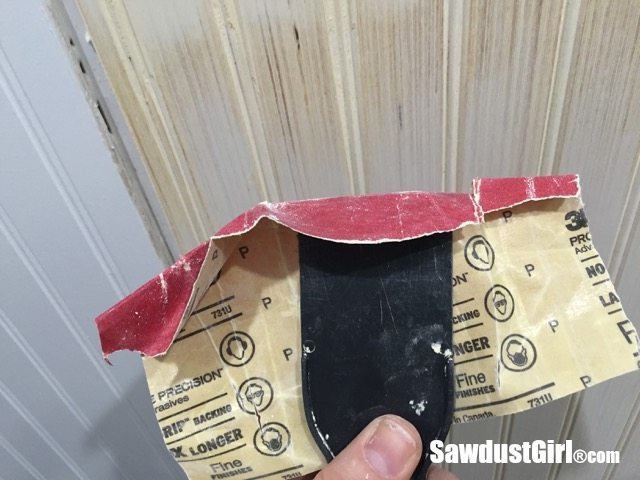
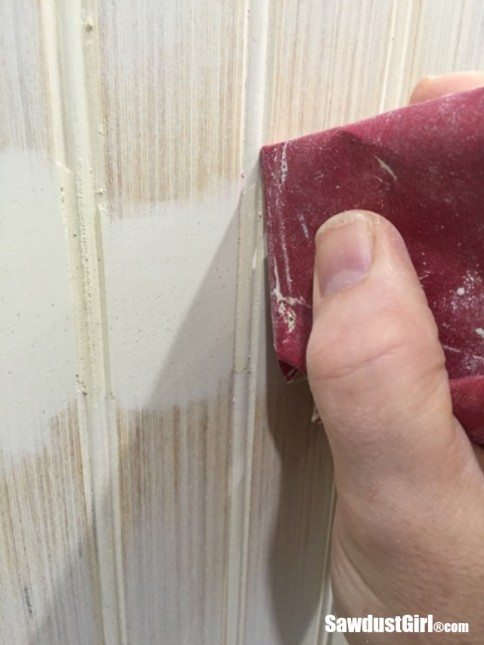
Beads and Grooves
I like to wrap a putty knife is sandpaper to create a thin, stiff, and flat sanding block. (I start with 120 grit sandpaper followed by 220 grit.) Using a gentle up and down motion, sand all the beads and grooves. You’ll probably have to reposition the sandpaper frequently because there is such a small area of sandpaper surface being used.
6. Decide if you can move forward or need to repeat a few steps
Once the whole seam is sanded smooth, look at it with a critical eye from multiple directions. Decide if it looks really good or needs another coat of wood putty. If it needs another coat, go back to step 3 and repeat.
7. Prime
If it looks great, prime it. The primer will accentuate any and all imperfections. If any imperfections are revealed that you don’t want to live with, repeat the necessary steps to hide the seam to standards you can live with.
8. Paint
Once you decide the hidden seam looks great, go ahead and paint the beadboard.
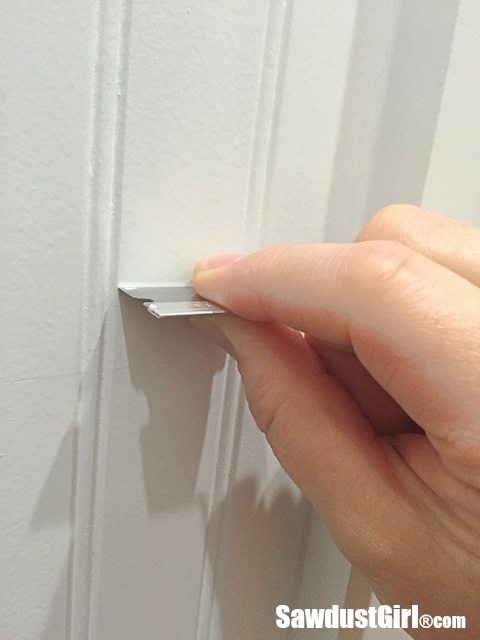
Tip: If after painting you see a visible hairline crack, scraping the paint with a one sided razor blade might do the trick. Hold the blade at close to a 90 degree angle and gently scrape across the crack/seam. If the first pass doesn’t do anything try again with a little more pressure. This trick only works with very small seams.
If you’re still not happy with the hidden seam, you can keep perfecting it until you’re happy with it.
Rachel Lynn says
Ha, ha. I love the phrases “nose twitch” and “putty likes it’s 1999.” But I think you are giving away your age. Wait, does the fact that I got that give away my age, too? 😉
At any rate, great post. Have loved watching your pantry come together.
Rachel Lynn
@ queenbeeofhoneydos.com
Sandra says
Well I haven’t been keeping my age a secret. After all, Madison is 16! LOL
Wayne says
I like your post on bead board! I have a room where I’d like to install it on a ceiling! Great idea on hiding the seams!!! Thank you😊
Barry Bratus says
And don’t you just hate it when someone else looks it and says – what took you so long ?
Vineta @ The Handyman's Daughter says
I never would have guessed that there was a seam there. You did a great job. I don’t know if I would have had the patience!
Roxanne says
Thanks for the details in the preparations of doing a DIY.
You always have such good pictures of how to do certain things that words cannot describe. (I mean you can say “sand the wall” … but the pictures of the sanding process and the sanding “tool” are much easier to visualize)
Bonnie Morris says
Very well done. You are both artistic and patient. Very impressed
patti Bayliss says
Just had beadboard installed as a kitchen backsplash. Is the putty product a wood filler type thing? Hope I do as good a job as you!
Sandra says
Yes, the wood putty is a wood filler.
Dianna says
This is by far the BEST tutorial I have EVER seen. OMG.
I have LOTS of shorter beadboard pieces left over from when carpenter did my dining room & kitchen, and they were SO expensive I had him leave me the ‘leftovers’. … My bathroom is VERY old dingy white paint, I want to repaint and beadboard the bottom half of the walls….
But, the leftovers are 1/2 the height they’ll need to be. Thus, I will have horizontal seams.
NOW, I know how to fix them! Thank you SO much.
I do have patience, and with my very full schedule it will take me weeks to complete it, but the anticipation will be a.w.e.s.o.m.e. LOL
Thank you SO much for this ‘pictorial’!! Luv luv luv
Tony says
You never mentioned the type of paint you used to match the original headboard. Is there a particular shade of white? Is it semi-gloss or high-gloss?
Sandra says
That beadboard is only primed so once I patched it, I painted the whole beadboard wall.
Christine says
I’m sooo glad this can be done. Though I had to track down longer sheets. Thank you for sharing your tips!!!!
Resa M Doherty says
I have beadboard that is cracking everywhere. I have dug out the seams do I fill with woodpuddy or adhesive caulk then paint? Only after 5 months there are so many cracks. The builder says its because of the weather?
Sandra says
If it’s separating because of seasonal expansion, you’ll most likely have it recur frequently (each time the seasons change and your HVAC changes from cool to heat or visa versa). You could try a flexible caulk. I had a house whose upstairs hallway would get a 1/4″ gap every summer and every winter it would close back up. That expansion will happen so it’s good to find a way to work with it rather than fight it.
Angela says
Thank you so much for doing this article. A previous homeowner installed the exact beadboard you showed in the two-car garage / master bedroom conversion floor to ceiling in bedroom, closet, hallway, master bath and the laundrey room. (What a pain to prep for painting! took me a day of filling nail holes, another day to sand the putty, then several days of priming and painting – and that was only putty/sanding the master bedroom – with priming/brush painting only one wall before I quit and that was several years ago – still waiting on a hero to come in and finish them all for me!!) Anyways, the guest bathroom I changed out the vanity which had a 4″ backsplash glued to the wall so of course there are huge gauges in it that I couldn’t fake fill it. Eventhough I’ve decided to just add another backsplash could you advise we readers on how we might fix any big repairs? And what your thoughts on maybe making my floor to ceiling beadboard look like a chair rail style by filling in all the lines from 36″ up in a similar way you did your repairs here except not scraping out the lines, just sand smooth and add horizontal rail moulding? I’m thinking that would be less of a hassle than covering or removing the upper portion of a whole room. P.s. Another question is how are the corners where two walls meet supposed to be treated when doing beadboard walls *and* ceilings? I don’t think they used the correct mouldings in the corners where the ceilings and walls meet. Thank you again for sharing your extensive knowledge!
Sandra says
I don’t think there is ever one way to do anything. I think of most things as an experiment (if not structural) and just try something. If I don’t like that I’ll try something else.
-if I were creating a floor to ceiling beadboard wall in a large room, I’d create a grid so I didn’t have any horizontal seams to hide.
-When you remove glued on wall coatings and the drywall paper tears, prime those areas with an oil or alcohol based primer before “mudding”.
-I just butt one wall up over the previous and then caulk the corner. I like crown moulding so that’s what I would use at the ceiling but you can get creative and do 100 different things.
Experience comes from doing and the more you do the more confidence you’ll have in trying the next project.
Lindsay says
Hi there! Thanks for all the great information! I have a slightly different question. I have a ton of headboard panels in my home and I’m looking to work more of a board & batten look. Can I use the same products that you suggest in this article to permanently fill the grooves in the existing bead board with the overall goal of making it smooth? Any suggestions in doing that?
Thanks a million!
Lindsay
Sandra says
Possibly but that would take A LOT of wood filler and if it’s painted with a glossy paint, would it stick permanantly? It might be less work and expense to cover the beadboard with a very thin, smooth panel like 1/4″ plywood or MDF.
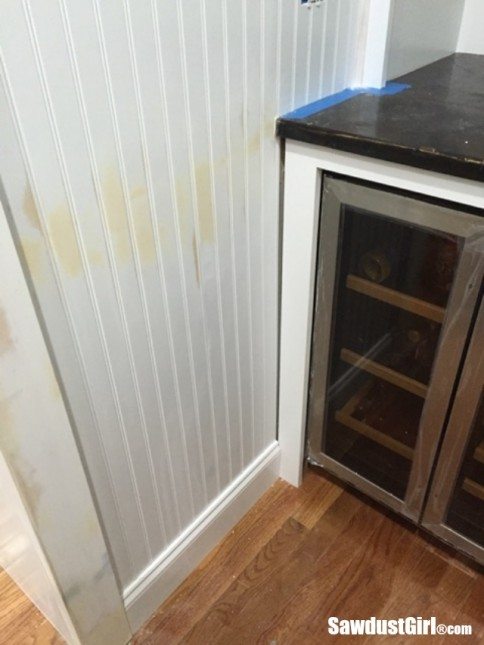
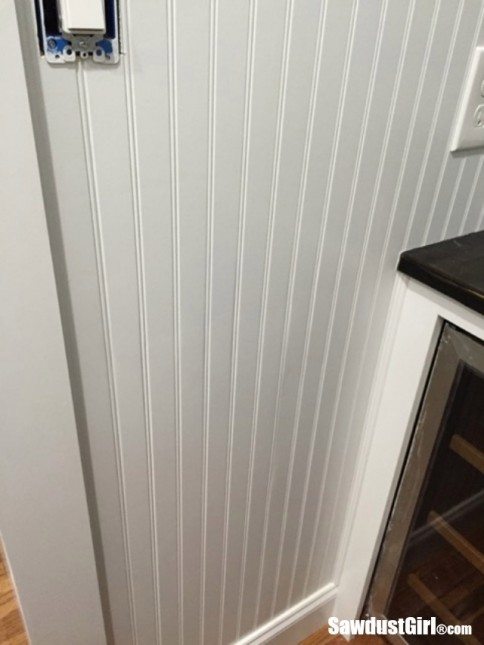
Barbie S. says
First of all I have to say, YOU are a rockstar!!!! Thank you for all of your amazing tutorials. I only hope to learn more from you in future:) I do have a question for you on finishing your beadboard. In the top two pictures above, the after picture shows a strip hiding the seam of the inside corner where the beadboard butts up agains the cabinet. Where do you get that and what’s it called? I did beadboard on an end cabinet that covers the side of the refrigerator and I have a gap between the wall that it butts against and I don’t know how to find a really thin piece that will look nice and hide the imperfection without using shoe molding or something clunky. Thank you!
Sandra says
Thanks Barbie. That little strip is a piece of picture frame moulding from the big box store.