While focusing my efforts in the basement a couple weeks ago, I set my sights on “up-scaling” the bathroom with some visual improvements like installing board and batten wainscoting. A big thank you to Arrow Fasteners, maker of the iconic heavty duty T50 stapler.
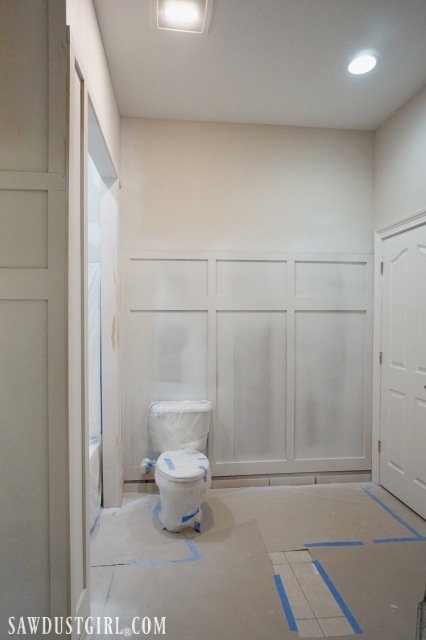
Before
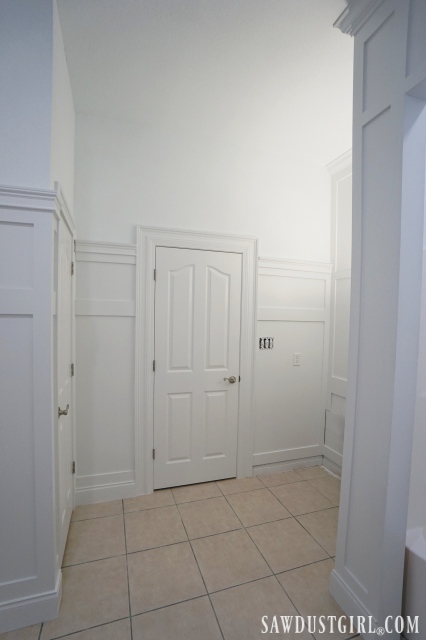
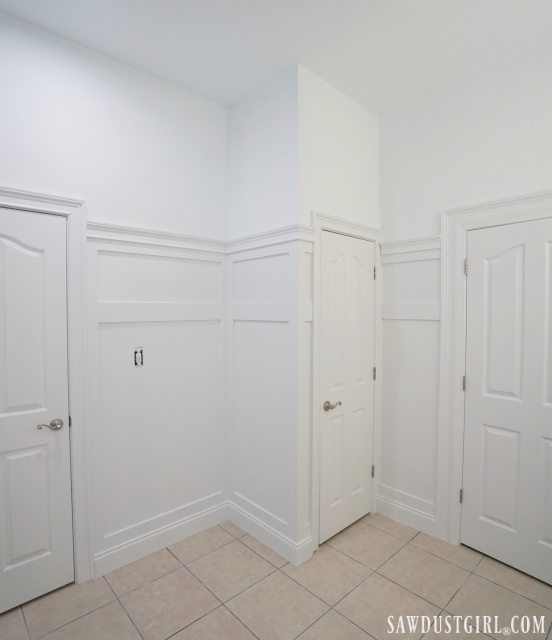
Aside from the visible ceiling guts, this bathroom was just blah. Rather than jack hammer the concrete and reconfigure the space (like I always thought I would do), I opted to use the current layout but improve the look of the bathroom. 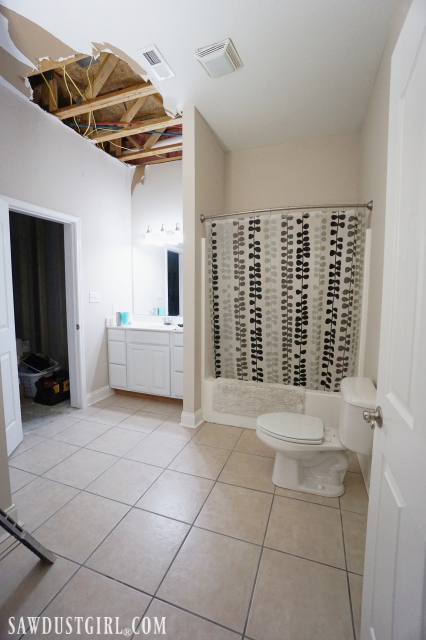
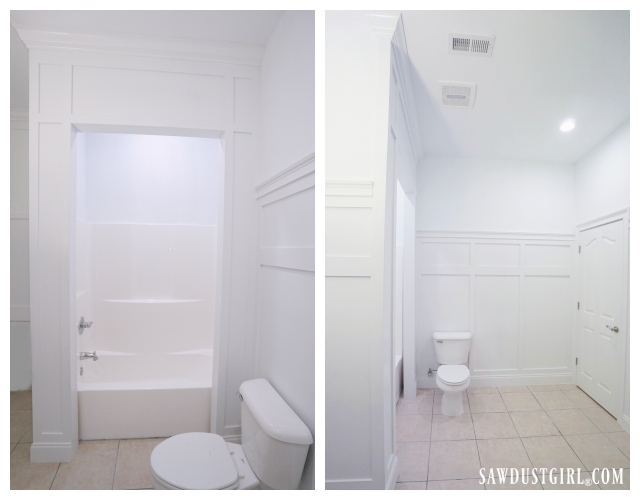
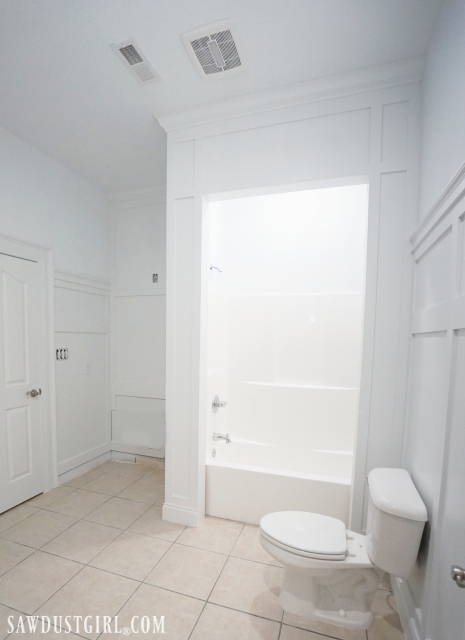
After
Huge improvement! Right?
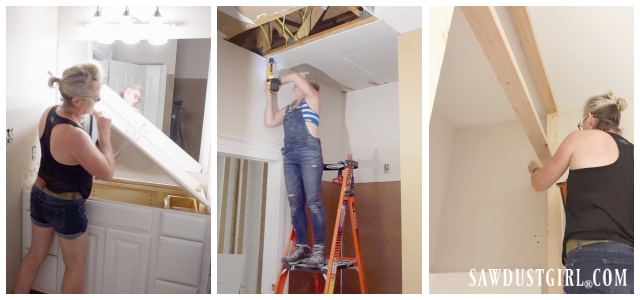
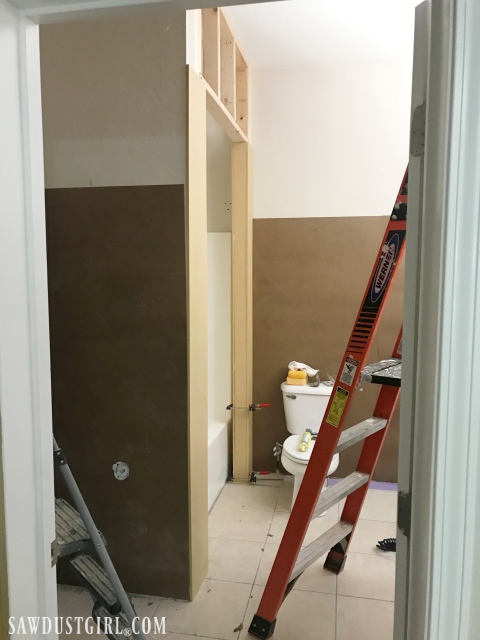
In my October Update, I shared a few things I did to start this bathroom remodel. 1. Removed the vanity, mirror and light. 2. Covered the hole in the ceiling with some new drywall. 3. Built an “entrance wall” in front of the shower/tub. Then I got out of the way so Bucket could do all the drywall repair in the rest of the basement.
Tools and Materials
- 1/8″ tempered hardboard
- 1/2″ mdf
- RB03 casing
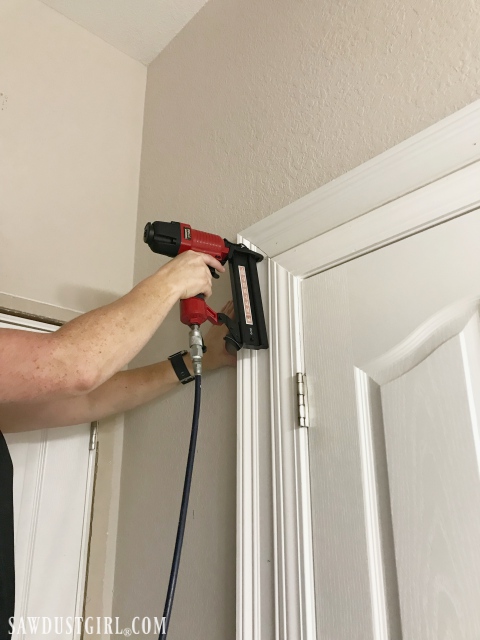
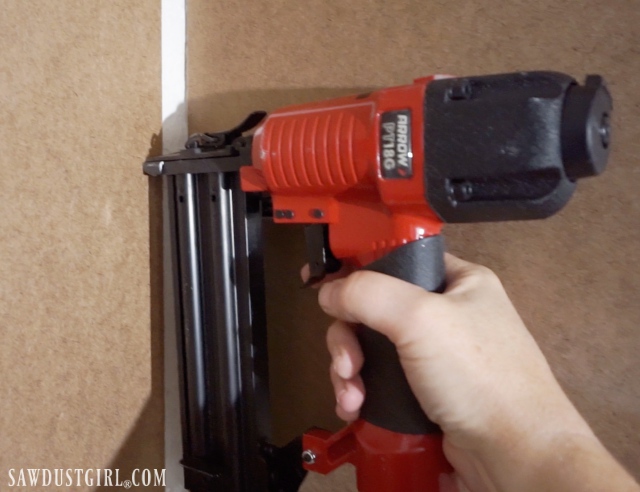
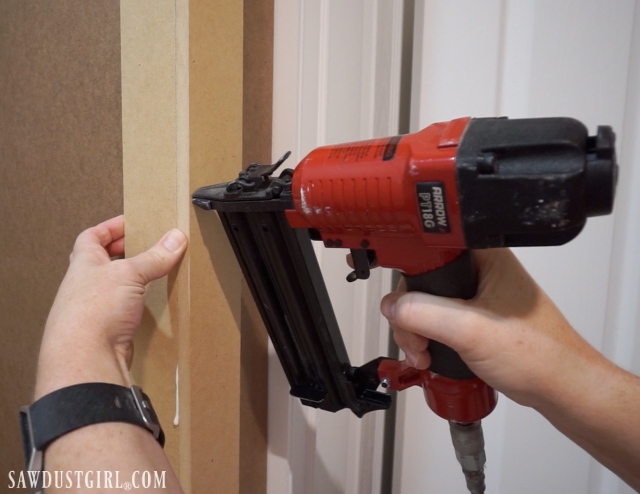
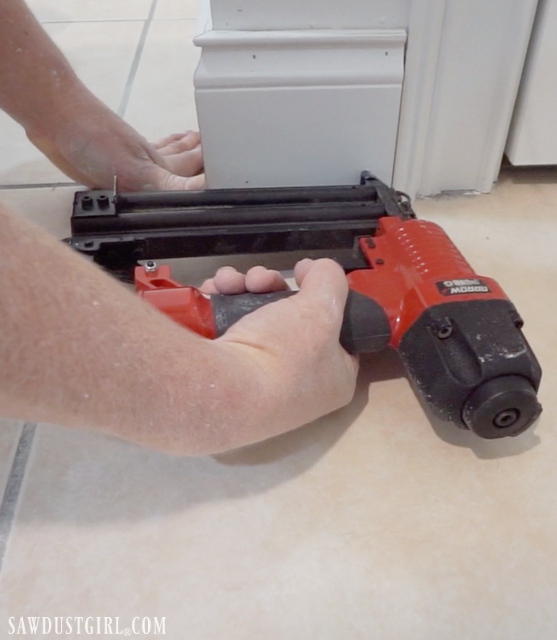
- Arrow Fastener 18 gauge nailer
- 1 1/2″ nails
- Baseboard
- Crown moulding
![]()
Installing Board and Batten Wainscoting
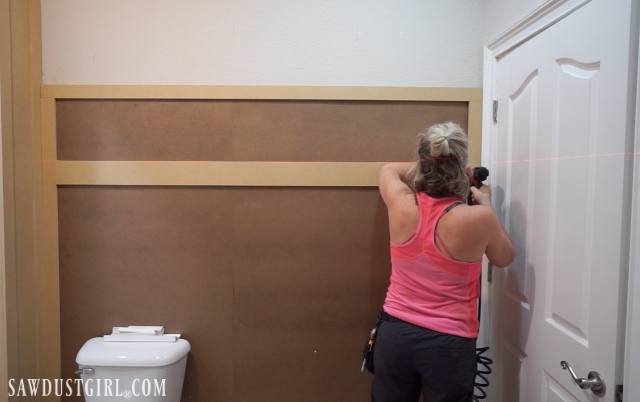
First thing I did was bulk out the door casings to match the rest of the house. The RB03 molding is 1 inch wide at the outer edge. This is an important step since the wainscot is thicker than the thin existing door casing. Personally, I do not like the wainscoting to be proud (stick out farther than) of door or window casings.
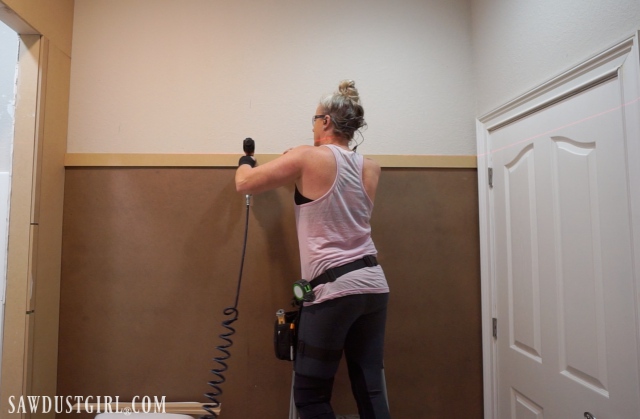
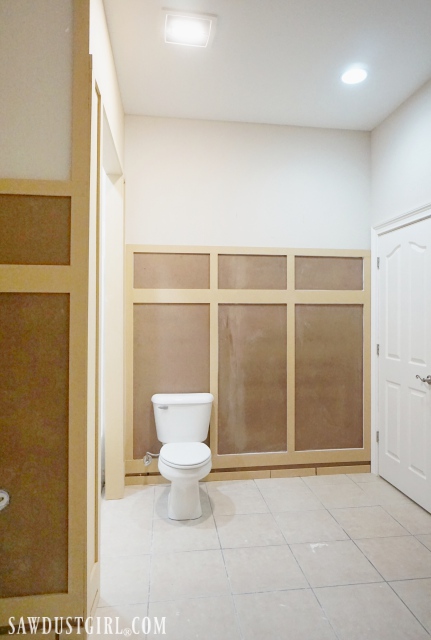
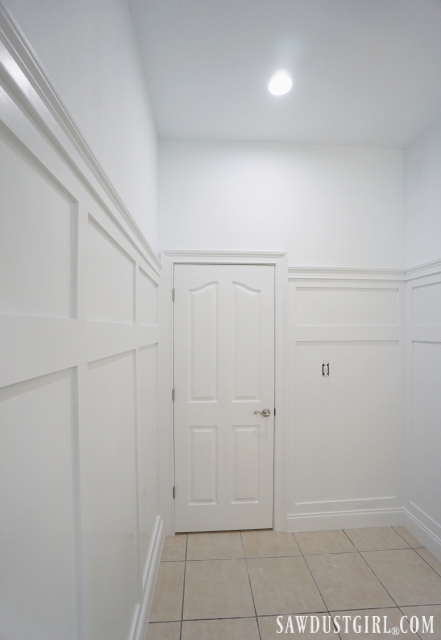
I covered the walls with 1/8″ tempered hardboard to achieve a smooth finish. This step is faster than skim coating my heavily textured walls. I determined how high I wanted the wainscot to be. There was no mathematical equation used, I just made my eyeballs happy.
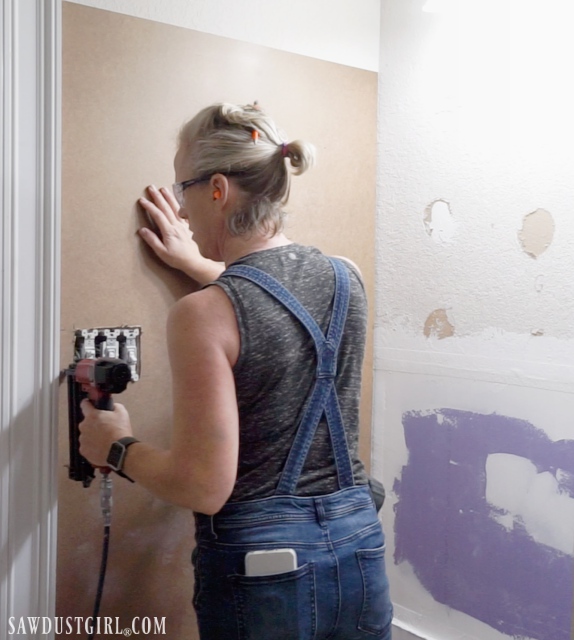
Because the hardboard is so thin and flexible, I used construction adhesive as well as nailing into the studs.
The sheets are 4×8 and some of the walls were wider than the sheets would cover without a seem. I didn’t mind a gap on the sides as it will be covered by a 2 1/2″ frame.
I did end up with one seem that couldn’t be avoided on the long wall. It would be smart to determine the location of the vertical boards before installing the hardboard so any seems would be hidden by those boards.
I didn’t do that so it was more work for me to hide that seem later with wood putty. That’s why I’m telling you to plan ahead. You’re welcome!
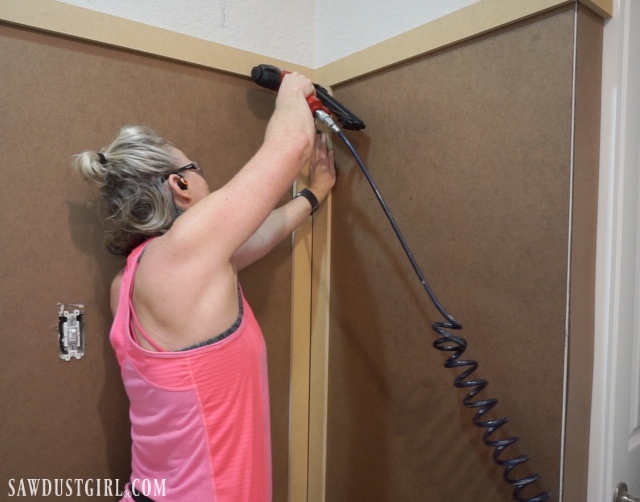
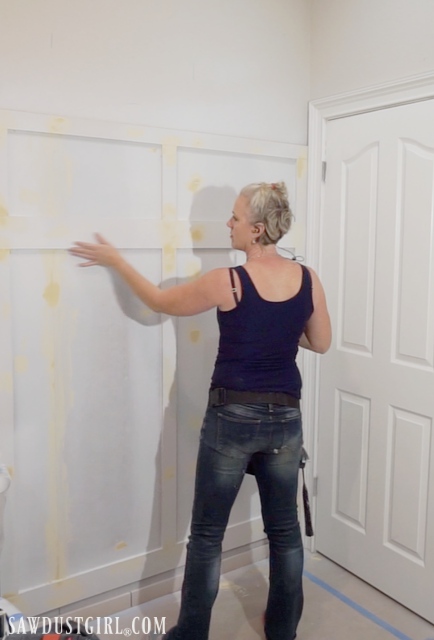
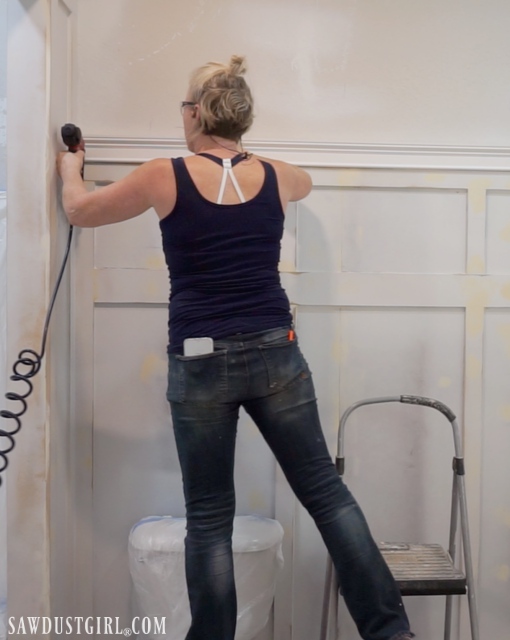
I ripped a bunch of 2 1/2″ strips out of a sheet of 1/2″ MDF. These are the rails and stiles that I used to create a “frame” over the hardboard. I used a laser level to project a line around the room while I attached the pieces. The MDF is rigid enough to rely solely on the nails to hold it in place. After priming, I will caulk everything which will provide additional adhesive strength as well as sealing the MDF against moisture.
The bottom rail is wider than the rest. It is installed at 8″ off the floor so that once I attach the 5 1/2″ baseboard, 2 1/2″ of rail will be showing. The wider material gives me something to nail the baseboard onto. I will come back later and install scraps at the bottom to support the bottom of the baseboard.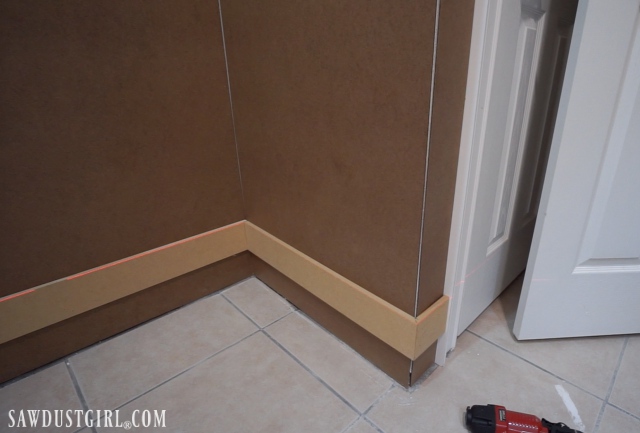 After installing the top and bottom rails, I added 2 1/2″ stiles to complete the frame. On inside corners, I left a 1/2″ gap, so that the entire 2 1/2″ stile was visible.
On the outside corner, I butted one stile over the other. I applied glue to the area where the two stiles joined and nailed them in place.
 Next, I installed a center rail which is 4 1/2″ wide. Visually, I like the wider width on this rail because it’s between the upper and lower (vertical) stiles. Functionally it will hold towel hooks if I decide I want to put some there.
I divided that wall into thirds and added stiles above and below the center rail. Again, the laser level came in handy to make sure those stiles were in perfect alignment.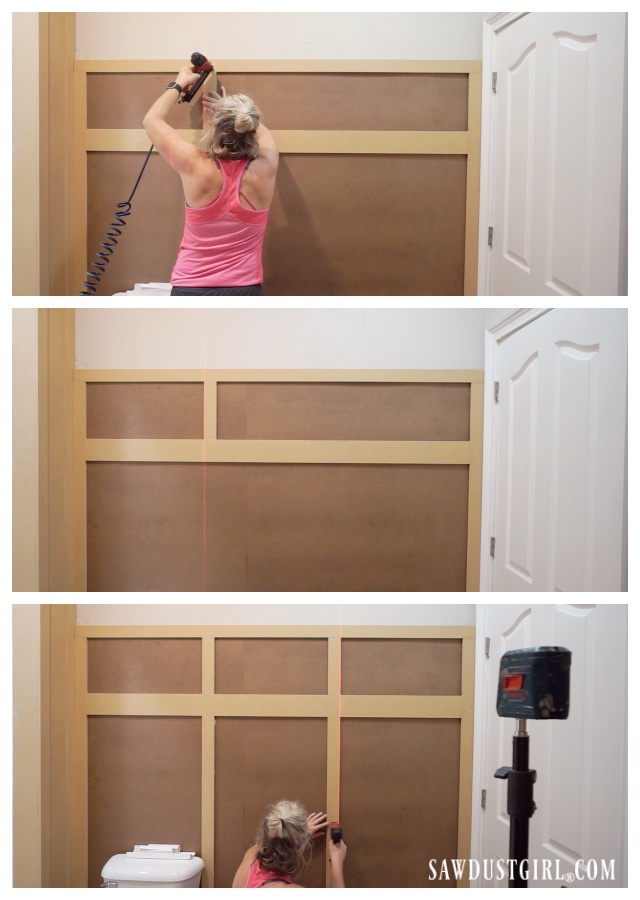 It looks great like this and you could paint it and be done. However, in my opinion when it comes to moulding, there can never be too much. So I wanted to cap it off with something. I cut sample pieces of 8 different mouldings before I found the perfect one. It was already primed, so didn’t add it until everything else was sanded, primed, ready for paint.
Prime
I used my airless sprayer to apply a coat of primer.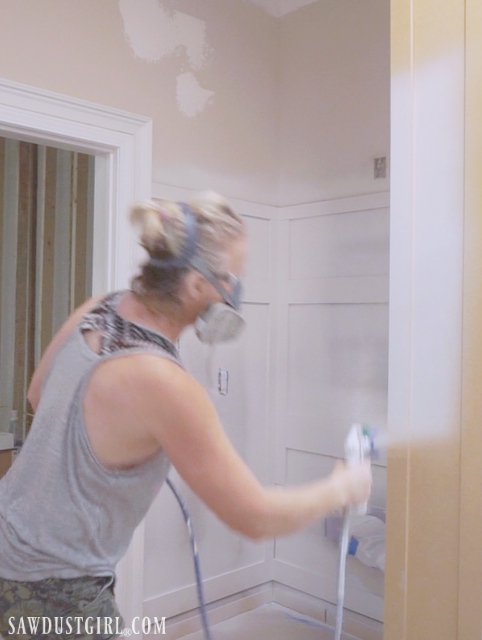
Fill, sand and caulk
Taking time to prep before painting makes all the difference with the final finish. Blemishes will be accentuated by the paint so take care of them now.
I used wood filler to fill in all of the nail holes and cracks.
Once that was dry, I used a power sander (connected to the dust collection vacuum) and sanded away any blemishes and imperfections I could find.
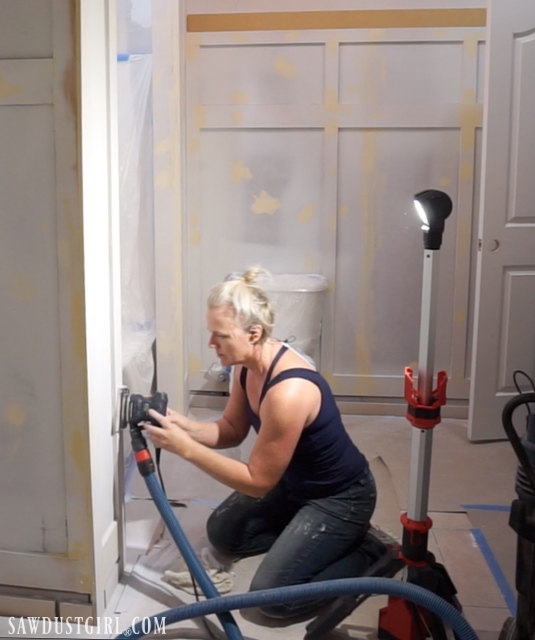
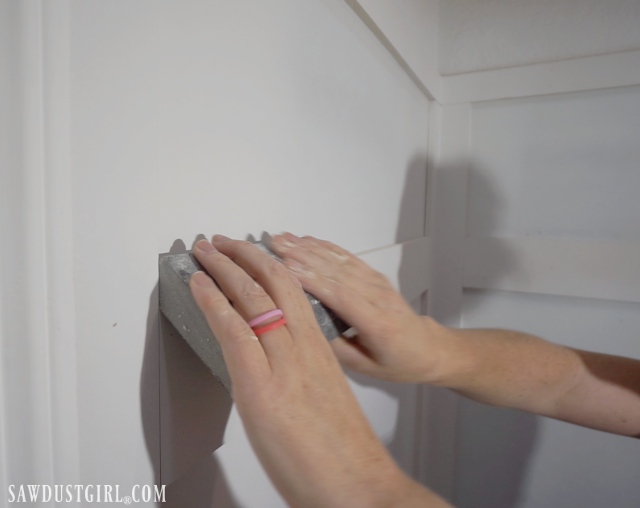
I used a hand sanding sponge to knock down all of the sharp edges. This isn’t something that “shows” but you can definitely feel the difference.
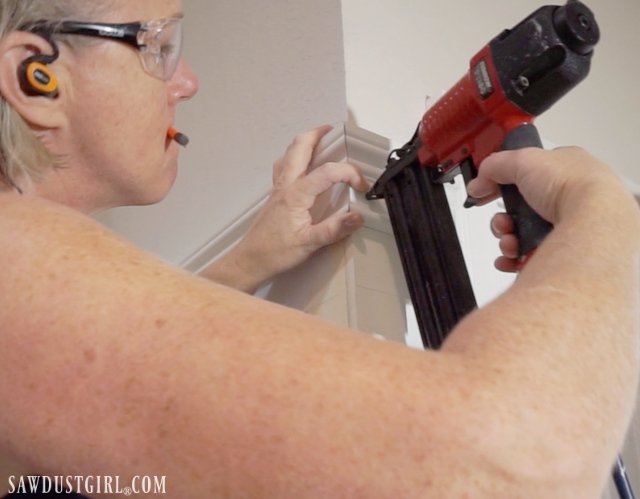
 Finally time to install the topper!I added a scrap of MDF to push the moulding forward, making it appear thicker than it actually is.
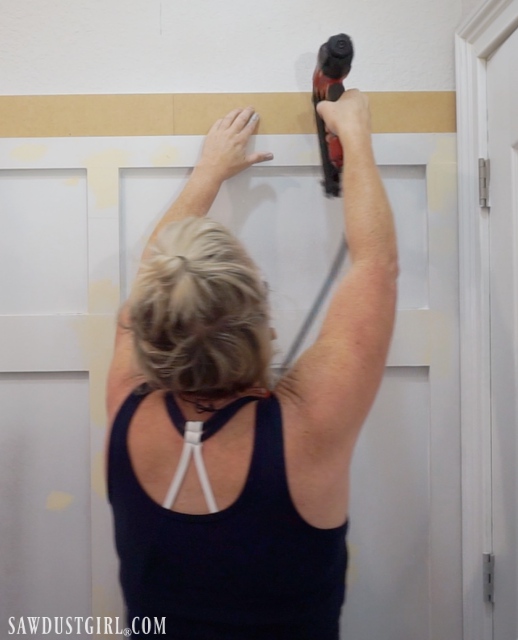
Topper
After trying 8 different mouldings, I ended up liking the casing I used to bulk out my door trim.
I mitered the inside and outside corners where the trim wrapped around several walls. On the pieces where they butted up to the door trim, I sanded the edges slightly rounded. Just so they weren’t blunt.
Paint
Next I sprayed everything with semi-gloss paint. In the other room, set up on sawhorses, I sprayed the baseboards too. I don’t like to paint the baseboards while in place. It kicks any bit of dirt on the floor into the baseboards which dries in the paint and makes for a VERY messy finish.
Base and Crown Moulding
After nailing the baseboards in place, I came back and filled and painted the nail holes.
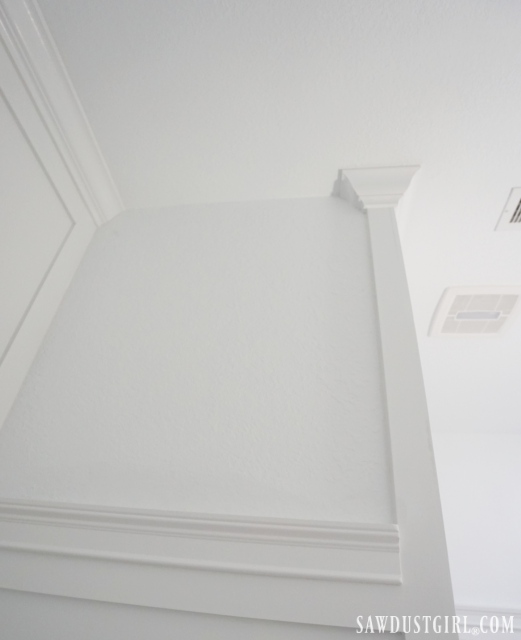
I added crown moulding on the two spaces where I took the wainscot up to the ceiling. This included the tub wall enclosure wall and the vanity wall.
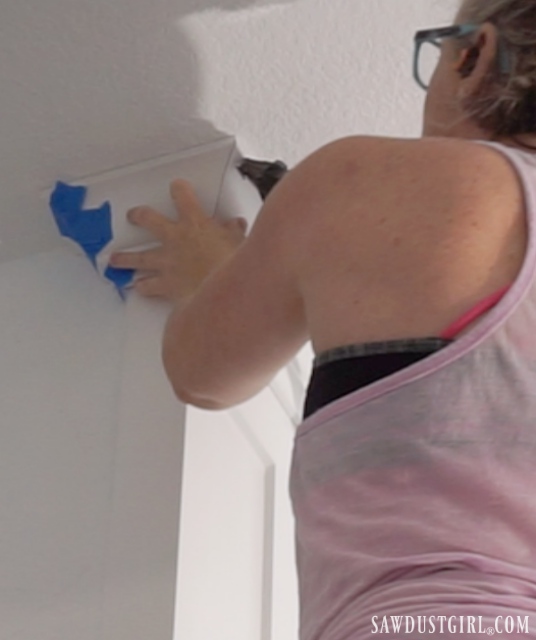
I wrapped the crown around the side of the tub surround wall and ended it with a nice clean return.
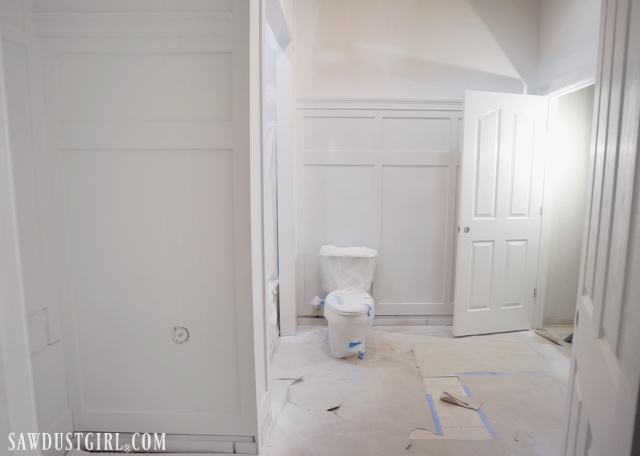
The application of more caulk and a little touch up paint (where needed) completed the board and batten wainscot project! I know, it’s all white! For now because I have’t installed the hooks and there are literally NO accents in the room. Even without accents, I think it’s beautiful!
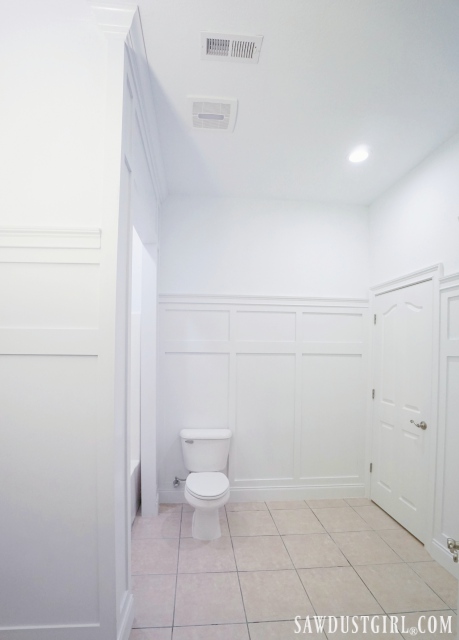
Except for that tile. I wish I would have chipped it out and replaced it before I started the wainscot. I’m going to paint the grout and hope that makes my eyes a little happier. Even if it doesn’t, at this point, I’m not changing the tile. It is what it is! The rest of the bathroom is lovely! (Or soon will be.)
The next project for this bathroom is to build a vanity! I’m looking forward to that small project. I’ll get on that after I finish installing all the kitchen cabinet doors!
Debbie says
Beautiful!! Just beautiful!! Love your work, you’re such an inspiration!
Researched tempered hardboard as I’m thinking of using it on a coffered ceiling. Removed the popcorn texture and it left an ugly mess! So I’ll do a simple coffee and fill in the boxes with the hard board. Did you have any odor issues with this product? And, if so, did primer and paint resolve it? Thank you kindly!!
Sandra says
Thank you so much, Debbie! I love reading comments like these. 🙂 Also, yikes to the popcorn texture! I’m glad you liked my solution… there were no odor issues, so it should work great. I did prime and seal it though. Hope your project goes well! Thanks for the kind words of support.
Laurie says
Looks great. You can always paint and stencil the tile. Then coat it in a poly or acrylic sealant to protect the paint.
Sandra says
Thanks, Laurie! I’ll look into painting/stenciling. I’d love it if I could just paint the grout and be done, but I’ll probably have to end up doing something more. 🙂 I just can’t stand it when the room looks amazing but the tile is that awful color! LOL!
Maryann says
Love it!
Sandra says
Thanks! 🙂
Vickie H. says
It really is GORGEOUS! Great job! And thanks for sharing your details! Much good info in there!
Sandra says
Thanks Vickie! I’m glad you found my post helpful. 🙂 It was a pain, but I’m really happy with how it turned out.
Autumn says
That is killer. Looks especially good with that high ceiling, very classy!
Sandra says
Thanks so much, Autumn!
Jayne says
Great job — I would love to see some color or wallpaper above the wainscot and I liked Laurie’s idea of painting stencil on the floor!
Sandra says
Thanks, Jayne! Madison probably agrees with you, but I love the clean look of an all white room. I like to add my color with the decorations rather than the foundations of a room (decorations tend to be easier to change with the trends, and I’d rather not have to re-paint a room in 5 years–I’ve got enough on my plate LOL!). 🙂
Teresa Kirkland says
Love it! Yes it’s very white, but the trim and wainscoting really appeals to the eye. 🙂
Sandra says
Thank you so much, Teresa! Madison always laughs when my rooms are all white, but I agree–it’s just a pleasing, clean color for the eye.
Arrow Fastener says
This project turned out awesome! Glad our pneumatic nailer could help. ? #MadeWithArrow
Sandra says
Thanks, guys! The nailer really did make it 10x easier. 🙂
Mariele Storm says
I will vouch for changing the grout color–it completely changes the overall effect of the tile.
You are just such an incredibly impressive and awe inspiring lady. I can’t believe your strength, creativity, and know-how! This looks better than professional!!
Sandra says
Oh my gosh, Mariele! This comment made my day–maybe even my week. This bathroom was a PAIN to finish, as everything always is, but your kind words make it all worth it. 🙂 ‘Better than professional’ is a whole new level of compliment–thanks!
Arlette Au says
Love it! I have seen some people painting tile as another option 🙂
Sandra says
Thanks for your support, Arlette! 🙂 I may have to try that. Some others have mentioned stencils or paint….I think anything will be an improvement from what’s down there LOL!
ShellY caRpenter says
You are such an inspiration. I love love your work. Have you thought of doing floor decals or painting stencils on your tile. I’ve never tried it but recently saw it.
Sandra says
Thanks so much, Shelly! I hadn’t thought of that, but I may have to look into that… the more I look at the tile next to the nice white walls, the more I hate it. I’m going to have to try some different solutions. 🙂
Lisa says
Simply BEAUTIFUL!!
Sandra says
Thank you so much, Lisa! It was a ton of work, but it looks so much better…
Ro says
Amazing!! Take s moment to be proud of yourself ❤️ I think if your mindful of the tile color when you choose countertop and accessories you can make it look intentional.
Sandra says
Thanks. That is a good point about choosing the other finishings in the room. I am planning on painting the grout first to see how that changes things- before I do anything else.
Taffee says
Beautiful!! You are truly talented. I have heard of a product at Home Depot called Polyblend Grout Renewal. It comes in lots of different colors. I personally haven’t tried it. Here’s a link to a family that has…
Again great job!
Sandra says
Thanks, Taffee! I think I’ve seen it there before, but I’ll have to do some research on it. I haven’t used it either, but that could be the solution to my tile troubles…LOL! 🙂
Sharon C says
What a difference, from ordinary to classic and glamorous!!!! Great job.
Donna L. says
Hey Sandra,
Amazing bathroom transformation! It looks ELEGANT!!!
I hear ya on the grout that’s bugging you, cuz I’ve got the same problem, except the tile runs through my whole house in all the traffic areas. Hallways, bathrooms, kitchen..(single story home)
I saw this blog post on Young House Love awhile ago https://www.younghouselove.com/how-you-like-me-now-grout/ and I am going to try the stuff they used. Now it’s a matter of when. I’ve got 4 little kids and scheduling them all out of the house for two days is far easier said than done…
Tiffany says
Beautiful and classic. I love all of your trim. I hope you paint the tile so you can post about it. I don’t have the heart or energy to remove all of my foyer tile but it needs an update too. Thanks for all of the inspiring posts (and for keeping it real).
Leah Shearer says
It looks beautiful. Great work!
Just wondering – What type of water-proofing steps did you take? You’ve mentioned in the past that there is risk in using MDF in bathrooms and kitchens.
Thank you for any guidance you can provide!
Andy C. says
That looks awesome! I’ve considered using MDF for projects like this – but the cut/exposed edges are so fibrous and fuzzy. I can never seem to get them to finish nicely – even with copious amounts of sanding. What’s your secret?
Sandra says
I have a whole tutorial on “how to get smooth edges on mdf”. https://sawdustgirl.com/how-to-paint-mdf-and-get-smooth-edges/
Teresa says
Hey sweetness!
Just out of curiosity, if you could wiggle your nose and change the tile in the bathroom, what would you put down instead? LOVE the white. 🙂
Sandra says
Yes! Yes yes yes. I often wish I could wiggle my nose and get things done magically!
Anupama Niranjana says
I hear ya on the grout that is bothering you, cuss I have a similar issue, aside from the tile goes through my entire house in all the traffic zones. Lobbies, washrooms.
Check this for Home Improvement Ideas on a Budget .
Richard says
Looks great. I’m going to follow your steps for a project in the living room. I have read that the edges of cut mdf can suck up the paint and become rough. Some recommend filling every edge of the ripped mdf. Did you have this problem with your project? Can you share a close up picture of the edge of a batten? Thanks for the tutorial, I’m exited to get started.
Karrie says
Love how bright & white it looks. You’re ✨AMAZING✨ What paint color did you use?
Sandra says
My current favorite white is Sherwin Williams Falling Snow. I change it periodically.