Hey guys, this post is sponsored by GRR-RIPPER 3D Pushblock. (Thank you so much for your support!) If you are following me on Instagram, you’ve probably seen that I’ve been upping my game in the woodworking department with a jointer and planer, and you’ve no doubt seen some sneak peeks of this table as I created it.

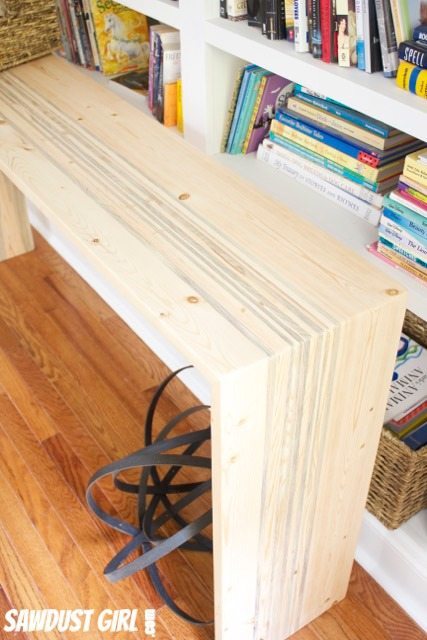
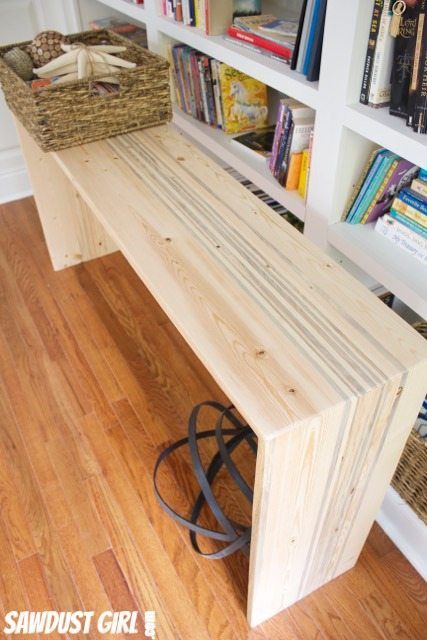
Rustic Contemporary Console Table
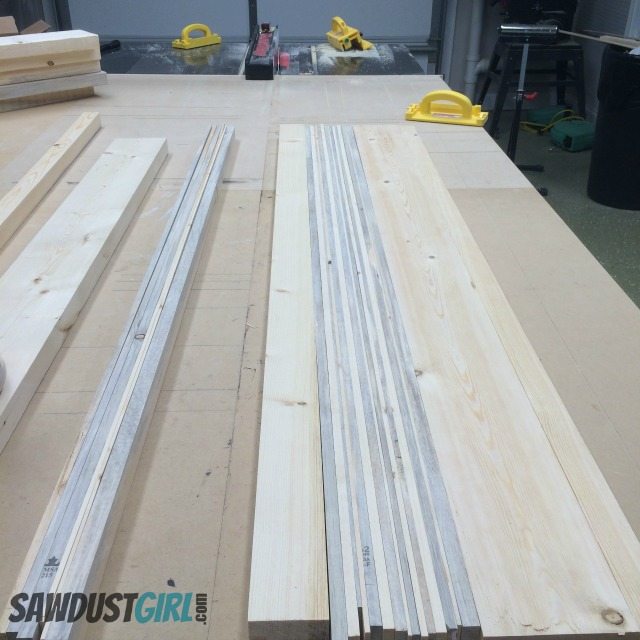
The table was an experiment of sorts. I wanted to test out the GRR-RIPPER’s ability to help me cut thin strips of wood because that is a task that I do ALL THE TIME (think beaded faceframes). With the thin strip cutting jig/tool/thingamajig I had before, the task was a total pain and did not give me the cleanest cuts. (I’ll be sharing my thoughts on that as I share the details of the process of building this table.) So I was very interested to see how easy, safe, clean and accurate “thin strip” cuts would be with this 3D Pushblock –so I wanted come up with a project design that incorporated thin strips. Lot’s of strips!
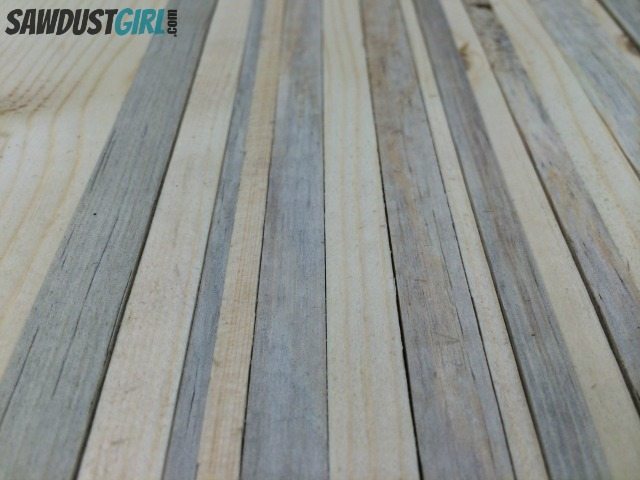
I built this table out of inexpensive construction lumber. I spent a total of $15 for three 2×6 planks. I picked through the pile of lumber looking for something interesting and happened upon some amazing Blue Stained Pine! I found a great article explaining this phenomenon but if you want my short and sweet version here it is:
The Mountain Pine Beetle attacks the tree and introduces the blue stain fungal spores. The fungal spores germinate and spread to the sapwood and causes the sap flow to become blocked and the tree dies. Then the tree is harvested so it doesn’t go to waste. Voila’!
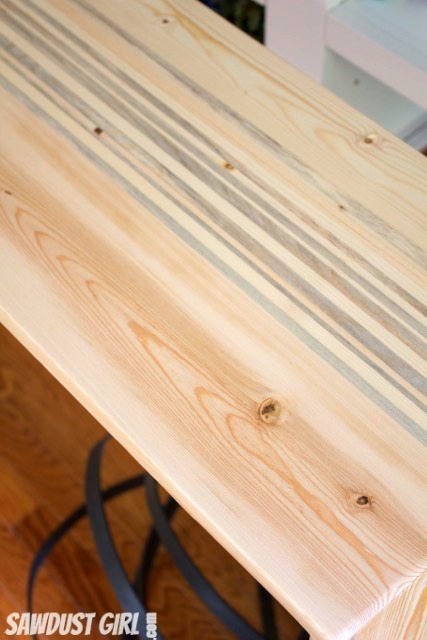
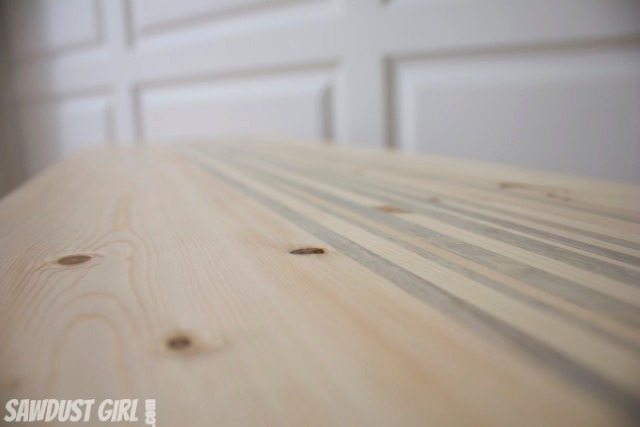
I wanted to create a striped effect using natural wood, without traditional stain or paint. So finding the Blue Stained Pine was perfect! All I had to do was cut a bunch of strips of varying widths in each color so I’d have plenty of options to play with in creating my design.
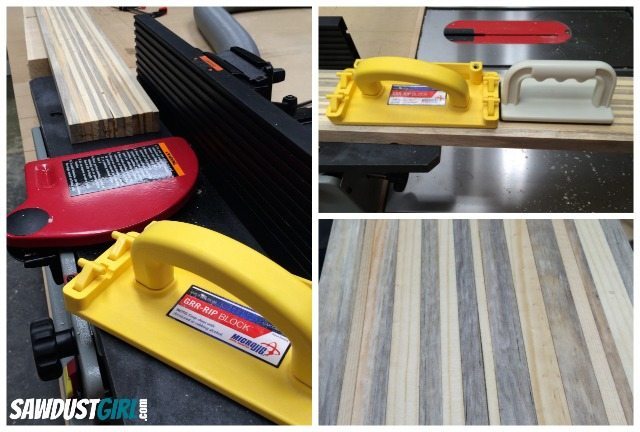
GRR-RIPPER review
The GRR-RIPPER 3D Pushblock was perfect for this task.
The bottom of the pushblock is super grippy, so it doesn’t slide on the wood. One side is 1/4″ wide, the other is 1/2″ and the middle support can be adjusted to clear your sawblade. The L shaped balance support can be removed or added to either side. There is a different attachment that allows you to make cuts as thin as 1/8″. Lots of configurations to accommodate lots of scenarios.
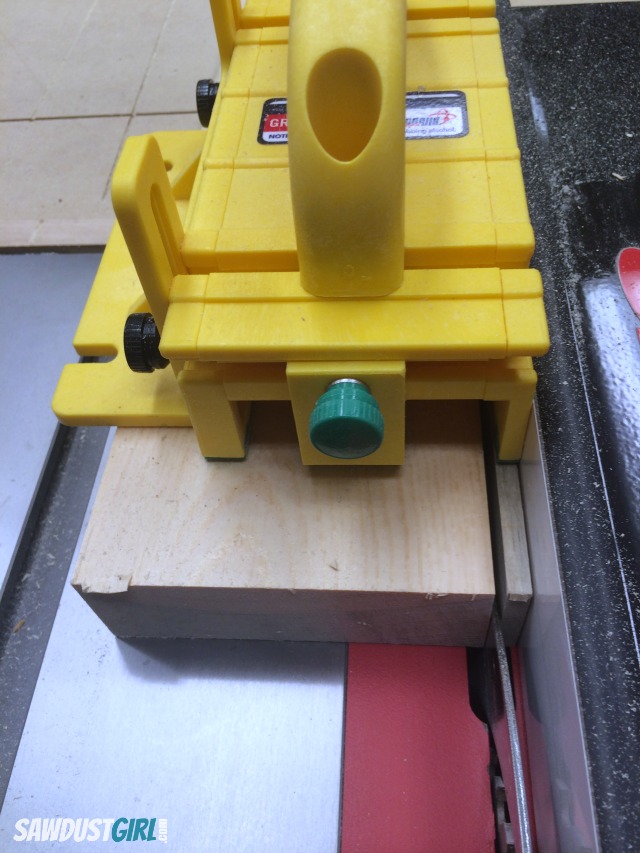
The L shaped adjustable balance support drops down to the surface of the table saw to hold the pushblock level when ripping smaller pieces of wood. No tilting or rocking, just steady and solid. I specifically appreciate this feature.
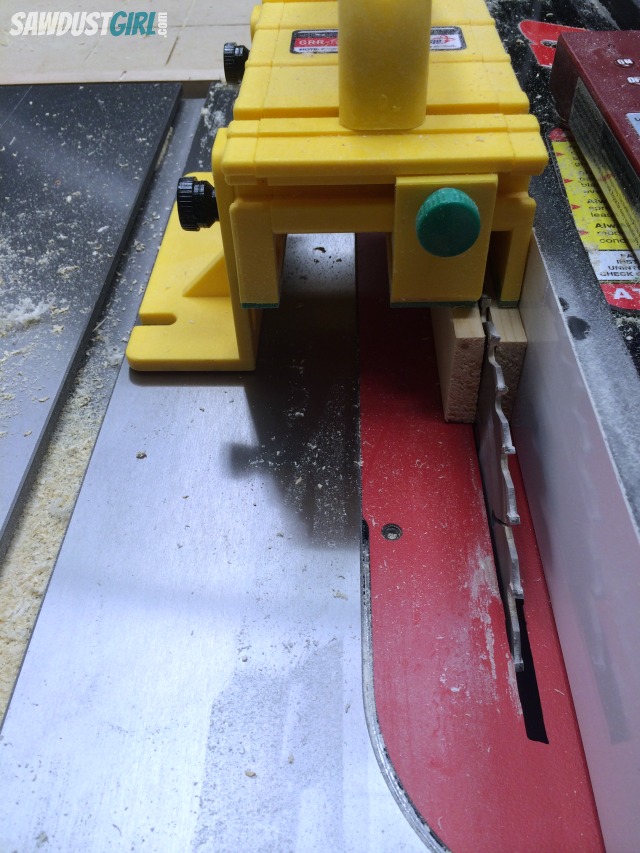
I found this “drop arm” feature especially useful when ripping beveled cuts. When the sawblade is beveled, it’s always more difficult to keep the wood snug to the fence and keep it from pulling away in the direction of the tilt in the blade. The GRR-RIPPER kept the wood straight and true– on the fence, and in turn on the blade, so I was able to use both sides of my beveled cut.
Additionally, without a bladeguard, my old school push stick did a fine job of pushing the wood into the blade but did nothing for applying downward pressure while over the blade. With smaller pieces especially, a featherboard would need to be added to the fence to apply that downward pressure — but I don’t have any kind of featherboard that works with my fence and have never taken the time to custom make one. (Who has the time?)
So, problem solved. The GRR-RIPPER pushes the wood through the cut WHILE applying downward pressure.
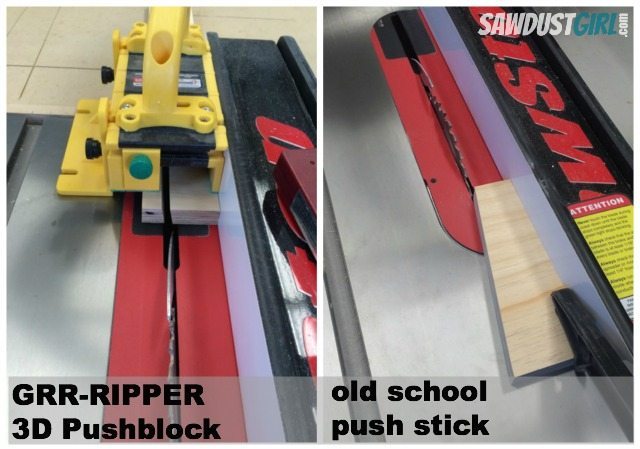
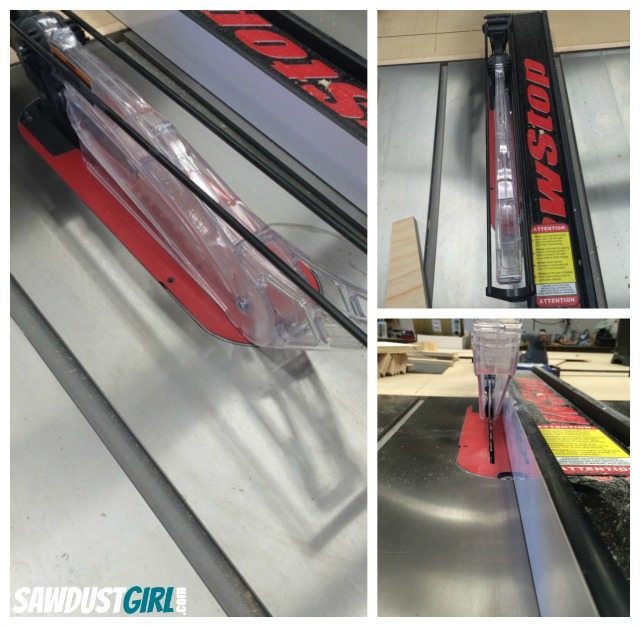
And while we’re on the subject of bladeguards (kind of), I like to use my blade guard as often as possible. It’s an added safety feature in addition to allowing me to collect more sawdust into my dust collector instead of my floor! But it’s not always possible to use the blade guard. The guard itself takes up space and gets in the way when I want to make thin cuts. And even when I do have enough room to push the wood through the tiny opening, there is never any way to get my push stick far enough through so I’d have to reach around and pull the wood through the rest of the cut — which is awkward if not unsafe and did not always produce the cleanest cut.
So for thin cuts, I REALLY like the GRR-RIPPER. Like when I’m ripping off my 1/4″ bead for faceframes! (But I’ll show you that another time.)
How to build a rustic contemporary entry table
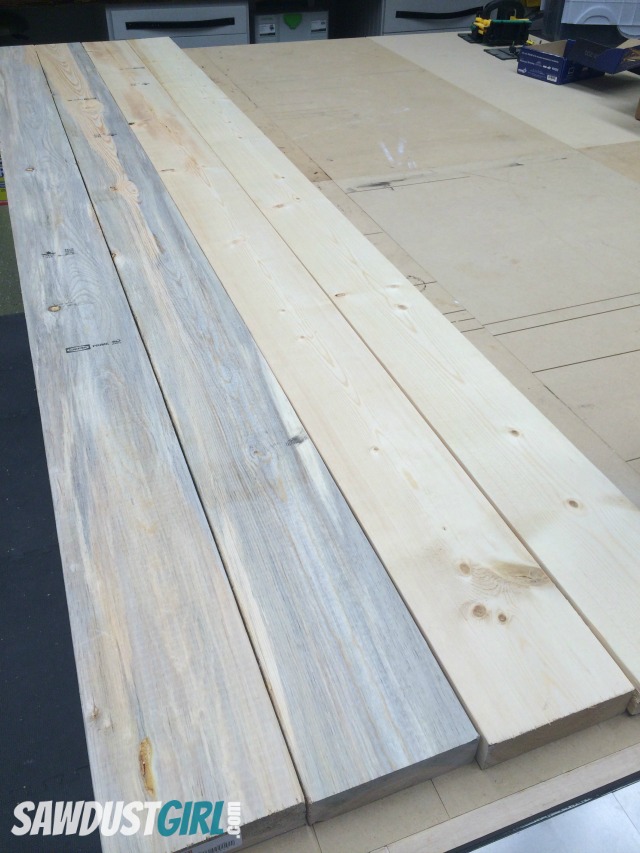
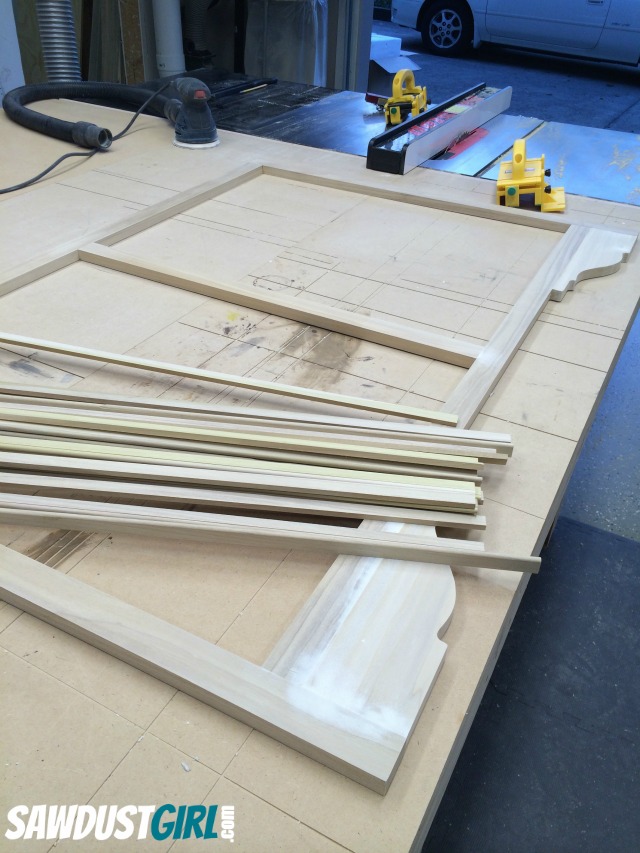
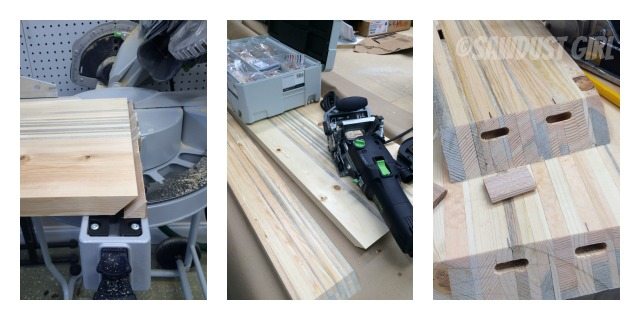
We’ve established that I used the GRR-RIPPER 3D Pushblock to rip a whole bunch of thin strips out of the two colors of common 2×6’s. I cut strips of varying width and cut way more than I needed so I’d have plenty to play around with while creating my design. I finally decided on just the right configuration.
Then I glued up my strips into two manageable sections. Then glued those two sections together. During glueup, there’s a lot of slipping and sliding so I ended up with wonky surface – not to mention the glue globs.
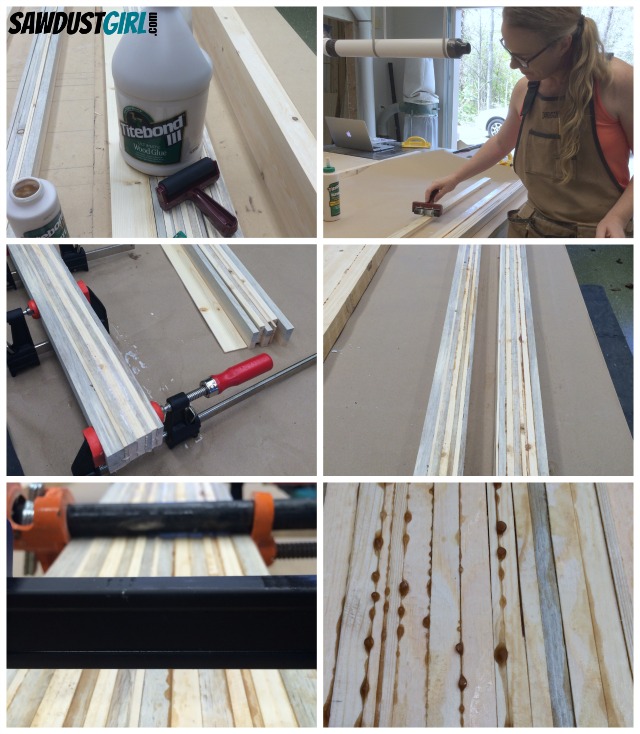
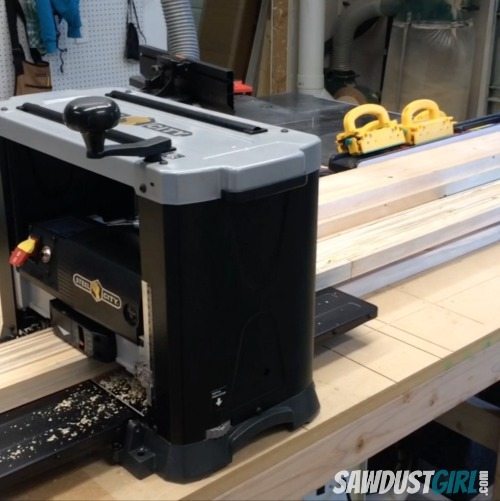
I normally would have scraped off the glue with a scraper and then sanded for hours and hours to get a level surface but since I just bought myself a jointer, I put that baby to use. I love the jointer! I did not love the little pushblocks that came with it though. They literally slid across the surface of the wood. I tossed them and opted for the GRR-RIP BLOCKs that MICROJIG sent me.
They worked 100 times better than the piddly ones I tossed! (I also used these with my router table to route my faceframe beads which was awesome — but also for another post at a later date.)
I jointed and then planed ALL my wood to the same thickness before I moved on to building the table.

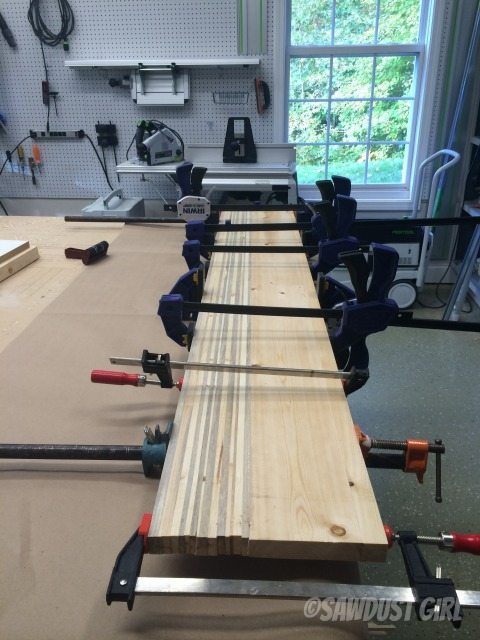
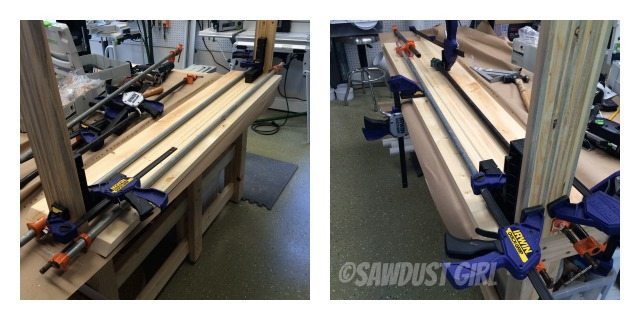
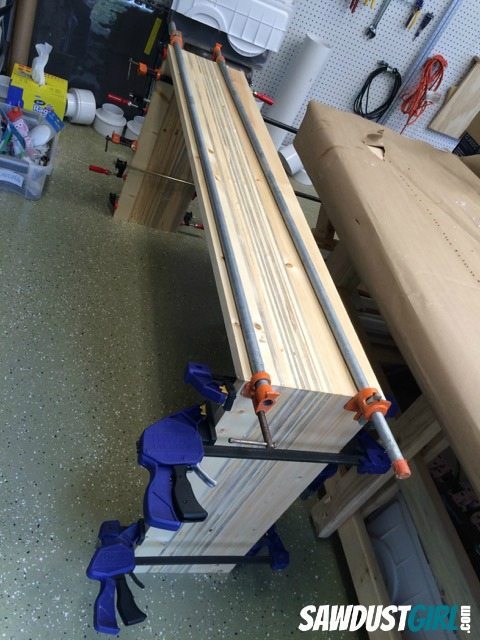
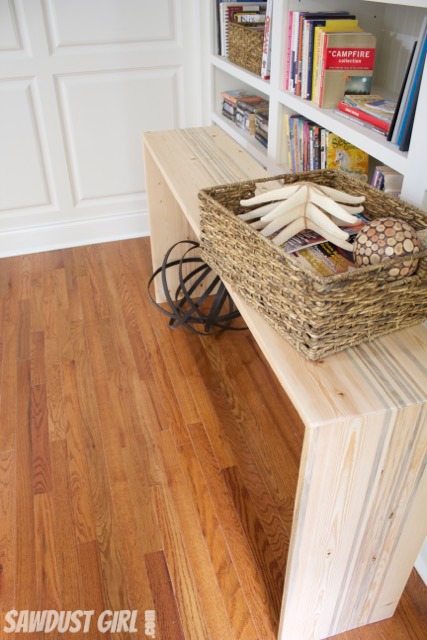
At this point I glued the parts together to create the full width of the table. I WISH I had a jointer and planer that were wide enough to accommodate the whole 14″ but that would cost like a million dollars so at some point you make it work with what you’ve got and I’m thrilled with what I’ve got.
The tabletop and legs are mitered and I used loose tenons to add strength to my joints. A biscuit joiner or dowels would work or you could use a number of more technical joinery methods to join the legs. I used my Festool Domino. I glue all surfaces: in, out and on. Then clamp, baby, clamp!
As you can see from the pictures, I added the legs in stages which is NOT the best way to go about it! BUT…I originally was going to make a bench, not a table…but I had TOO much fun playing with my jointer and planer and actually made my material too thin for a bench! You know I’m all about keeping it real and sharing my honest to goodness experiences: the good the bad and the ugly.
So I had make a table instead because it wouldn’t need the same strength — which meant instead of cutting the ONE leg in half and having two bench legs I had to cut more thin strips, trying to match the widths and colors as best as I could, and just schlopping through it.
It would be so much better if you could create the width of the table and then cut it into three parts, bevel the joints and put it together! However, working with 11′ long pieces of lumber is really difficult. My table is 5′ long, legs are about 32″ tall. I chose to cut my pieces to just over finished length before ripping, stripping and gluing. I just find it more manageable to work with shorter pieces, even if it’s more work on the other end of the project.
Finish
I only waxed my table which does not offer any kind of durable protection but I wanted a quick finish that would enhance the wood and let me see what it would look like if I were to oil it. I was debating darkening it first.
I can easily remove the wax with mineral spirits and finish it with tung oil, which is my preferred finish. Then I might wax it again.
Wax on, wax off, wax on… Here is a great article from Woodworkers Journal about understanding wax and oil finishes if you’d like to fill your brain with a lot more info on that topic. You are welcome! 😉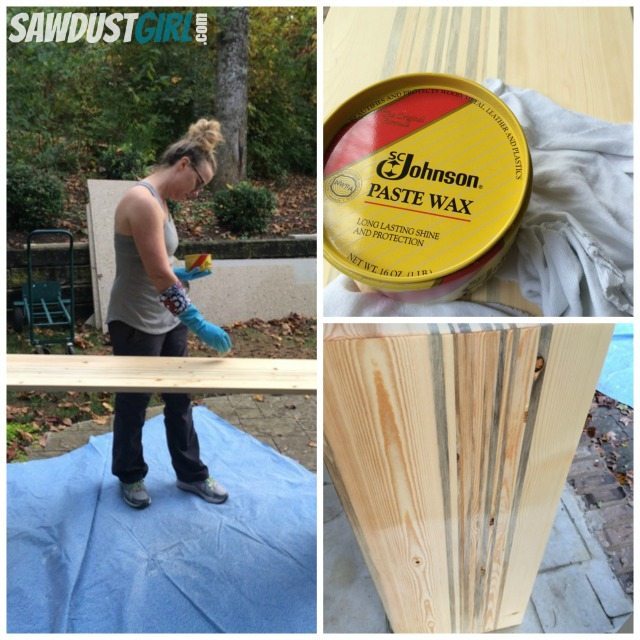
I had a ton of fun playing with my tools to build this table and am pretty happy with how it turned out!
I give the GRR-RIPPER 3D Pushblock my thumbs-up of approval.
This is a sponsored post! What does that mean?
I was hired to create a project using the GRR-RIPPER. My idea, my project, my work, my technique and my voice. All the opinions stated are my own, based on my own experience. If you pay attention ’round here, you know I only recommend items/tools/materials that I organically want to. If and when I feel an item is the bomb-ditty – I tell you why and show you how. It is very important to me that you, my readers, have an honest, organic and valuable experience. I will always tell you when I am being sponsored whether that means I’m being paid for my work, receiving free tools or materials or being reimbursed after the fact. My relationship with brands and sponsors allows me to continue to create and share content and tutorials that are free and available to everyone. Thank you so much for your support!
diana says
i never win but I keep trying!
Russell Roefer says
Great job on that table. I like your integration of naturally occurring colors in the project. That gives me quote a bit of inspiration to build a similar table.
teri says
Sweet table, but I’m going to stop sharing what I see on your site because each member of my family decides that they like and must have either equipment or project. LOL
Diane Y says
What an amazing job you did. I think you have the patience of a saint!
Jen says
I love how the table turned out! And what a great tool to use! The blue pine adds a great contrast as well. Bravo!
Bruce R says
Love the table. Trying to figure out how to make a wall hung vanity with similar style. I just don’t have a jointer or planer. (Unless I can figure out how to restore one of the two ancient small jointer/planers that I “inherited”.)
Karen says
My husband really needs this. I like the table.
Gloria ruiz says
I would love to create an island with a top resembling your table that you constructed. Love your creations!
Paul B says
Beautiful striations. You did an awesome job making this simple design stand out. I work mostly with destructed pallets and reclaimed lumber, with lots of shades from weathering that would make this project interesting at my end. Now that I have a thickness planer and can joint on the router table, this is must-do soon. Thanks.
Terry says
Love your new table! The GRR-Ripper works great on the router table also.
Julie W says
The table looks amazing! If I won the blocks, I’d be making my dad help me use his table saw to FINALLY build the dining table of my dreams!
Ashley says
I love your new table, especially because it looks so great but is made with low-cost materials! Just got my dad’s table saw and desperately need some push sticks!
Mike Cochennic says
I’d use it for every cut on my table saw. How do I pick just one? I’d use the heck out of the GRR-RIPPER 3D!!!!
Sandy hood says
I would use the GRR-RIPPER 3D Pushblocks to help building Sandy’s Massive Wardrobe. (by the way…could not enter a comment in the entry section). Thanks for offering this useful tool.
Megan S. says
What an amazing tool. The table turned out amazing!
Cristin vosburgh says
I would LOVE this!!!!!…like full on flip out if I won! 🙂 Beautiful job on the table! Didn’t know that about the blue-stained Pine!
Cristin vosburgh says
Oops!! I’d probably make an entertainment table or headboard for our oldest boy! 🙁
Kathy says
I love love love this table. I am thinking of the possibility of face frames that are perfect 😉
Rick says
I need to make a shallow drawer for our kitchen. The GRR-RIPPER 3D would be perfect for cutting the narrow sides.
ChristanP says
I had no idea this color wood was available, thanks for sharing! I thought for sure you used grey stain!
Mike says
Great table!
I’d love to use the Grr-ripper to cut thin strips to cover the plywood edges on some bookshelves I am making for my kids.
Abbey C says
We are mid construction of our basement. Showed this to my husband who is building all my plans and he says ‘oh, I need that’. Guess I need to win if I want him to keep building all my ideas!!
Sarah says
Your table is BEAUTIFUL. Love your honest in this post and sharing why you built a table and not a bench. 🙂
Anne says
This is gorgeous!!
Nick P says
I would love a Grr ripper block! I just got a table saw as a wedding gift and have already been told by my wife that I need to make a built-in to hold our new dishes and platters! Love your blog!
Matt says
The holidays are coming up so that means I will be making some gifts in the shop. The Grr-ripper would definitely come in handy when making some cutting boards.
Mike C says
Great job on the table! The Grrr-Ripper looks like a good addition for any woodworker. Love to add one to my collection.
Bobbi says
Would love a Grr-ripper!
GWen says
Your table turned out lovely! I didn’t know the pine beetle infestations result in the blue stained wood. Sad the tree dies but nice that something beautiful can be made from the damage. Your post on the gripper blocks is just what I needed. I’m new to woodworking after following you for a while and discovered the same things you talked about – sometimes I needed to remove the blade guard to get the thin cut I needed and it was so scary for me pushing things through that close to the blade, and getting push pressure and downward pressure has been difficult. Looks like the GRR-Ripper 3D pushblock is just what I need. Thanks!
Morgan says
I will make some picture frames which require skinny pieces!
Liz VanKirk says
That would be so useful! My husband would love it.
Kristy Kelly says
That would definitely help me finish the hundred different projects I have going at once lol!
Jeannie Garcia-Buechele says
I am a newbie DIYer and just purchase a table saw and this would be a great help in building my first kitchen table and benches for my family. I need all the help I can get..lol..
Jan says
I love the color of the table. It would be great for making gifts.
Joyce T. says
I would love to have a Grr-ripper push block. I never used one until I took a class at the local Vo Tech. What a revelation.
rick hart says
Sweet table. Nice job
Robin says
Thanks for the informative post, I really appreciate it.
BRIAN says
These would definitely help with jointing. I would also love to use them on the tablesaw. I would probably more safely make a lot of rips instead of using a wooden push block that doesn’t always give proper support.
chris says
I tried to enter the contest , I’m not too sure what I was doing wrong, but I would build a full wall built in in my dining room , flooring in my living room and a coffered ceiling in the living room and built ins in my bedroom to name a few…
Chuck young says
That looks like a great table. I have thought about doing a project like that. Would have loved to have a Grrripper or two a couple weeks ago had to cut about 50 strips 1 1/2 wide. Real pain.
Mary R says
I would love to win the Grrr-ripper to make bead trim for the cabinets in my closet that my husband and I are constructing following tutorials and information from reading your blog sometimes 3 or more times a day. I keep waiting for a tutorial for the bead trim that I first saw you install on the cabinet beside your oven, maybe soon, I hope. Have done a lot of reading about it but would love to actually see you making it. Your blog has given me the courage to try building things I never would have tried, thank you.
Frances says
Now that is a super design. I have a new table saw and I need a safer push stick than the one included with the saw. I’m building closet organizers and slowly increasing my tool inventory. Hope I win!
BrIttany says
I’ve been wondering about this for a while. Thanks for the review! I’d use this to make a new entertainment unit I’ve been planning for my living room!
Brittany aka Pretty Handy Girl says
Very cool project Sandra. The blue pine is a great find. Thanks for sharing and I have to admit I love the GRR-Ripper push blocks too!
Annet M says
We got a second hand table saw from my dad. It would almost burn the wood instead of cutting it. We finally thought that we should change the blade, and it was like cutting butter with a hot knife! But the guide on the table saw doesn’t hold well and I don’t have any kind of push stick, so I was very interested in this review and I’d certainly love to win this!
rick says
I would love to win the GRR-Ripper to add to my workshop safety tools. I am on a very limited budget and find it difficult to afford new items like the GRR-Ripper and often have to settle for cheaper products that are not as safe. I love building things such as shelves, benches and stools and this would make a very nice accessory to help make the new bed frame for my daughter and help teach her while doing so witha decent, safe, quality product.
Bob Smith says
love the idea of the table, love your stuff, love your light-hearted spirit.
please add me to your list wanna be jig winners. 🙂
Sam says
Wow didn’t think that a couple of dominoes would be enough to hold that. Neat.
David setliff says
A guitar.
[email protected] says
I rip sheets of wood down into thin strips to create simple frames for signs I make. This would be so handy!
Sarah says
I have been wanting one of these!!!
Darlene says
This looks like such a great tool. Thanks for letting us know about it!
Janet says
I would LOVE one of these. Especially because my kids doesn’t like to assist me when I’m ripping boards on my table saw.
Cate says
This will save my fingers…
Sue p says
I never use the guard on my table saw and using scrap pieces of wood makes for some tense moments. I can always hear my husbands voice in the back of my head saying “what did you do know” if I should cut myself or have my wood fly past me at warp speed. This looks like an amazing tool to keep me safe. Thanks for the info.
Chris tRUDEL says
I really like my Grr-Ripper as well, a second one would nice for leap-frogging longer pieces! The table is great! Came out really nice!
Stacy says
I will create all the things!!
JulieW says
Absolutely beautiful.
roger bayne says
Awesome use of the wood and the tools. Thanks for the complete explanation
Marisa says
Hey this would be a great Christmas present. Thanks for the info.
Amy says
I’m adding beadboard to my bathroom walls and would use the GRRRRR Ripper to help me rip the teeny, tiny trim I need to add onto my baseboards and corners.
Jackie says
I have so many projects going on in my house right now. This tool would be so helpful!
Megan says
Looks handy for those thin cuts!
Chris bryant says
Super custom closet for my wife. SAFETY FIRST!!!!
stephanie Nexon says
I would love to win one so that I can surprise my husband and make my him something. BTW awesome table! I hope to keep working to make something so beautiful.
Leslie says
This is exactly what I need.
Leslie says
I’m building new stair treads and risers and I just got a new tablesaw. This would be awesome!!
Debby says
I have no idea..way too many projects in the pipeline.
Jill says
I would love to build a new buffet or stairs or trim There are just so many projects on the list
Danielle Kuhns says
I would make a dining room table (with the help of my husband)
Ana Ammons says
We are constantly building something and my husband scares me to death pushing wood through the table saw. He says he is completely safe but it terrifies me! I have been looking at these things for a while. I would love to win them!
Stacey says
A new entryway table!!
Jenni D says
I love learning about new tools, thanks! It seems there is always something new and cool to buy. Would love to hear more about your jointer and planer. Like 101-type posts. I really know nothing about those tools. Love your blog!
helen says
oooh, I’d make cutting boards!!!
jessica w says
we need to make some end tables, and we would love to make mini versions of your table above
Joyce T. says
I had no idea about these grr-ripper pushblocks until I took a class at out local Vo Tech. I would love to have one when I make the Christmas gift serving tray I’m making from salvage wood I’ve glued together.
Kim says
The table looks amazing! There’s nothing better than quality tools to make a job easier.
LD says
Need to redo the office. Bookshelves, desk.
Ronda Batchelor says
Awesom! I need one!!
Lori T says
My husband and I work together to make a lot of art for our home. This Gripper would be perfect. We’d use to cut wood to make picture frames for Christmas presents.
Kara Pothier says
This is much better than the way I’ve been trying to cut small pieces of wood!
Jeremy Miller says
I don’t own a push stick. I normally just use another piece of wood I cut a notch into. However, this looks very nice!
Bob Rankin says
Beautiful table, I can see the need for a good push block with thin strips like that, I guess another way would be to use a good bandsaw. If like to make a special end-grain cutting board but with variable thick strips from 1/8″ to 2″.
Stacie says
That push block is way better.
Autumn says
This would be fantastic for the cutting boards I want to create
Candi r says
This would make using the saw a lot less scary. I freak that I will hit a knot and it will jump and cut my hand.
Kim C says
I think the pushblock would make me less nervous using the table saw!! Love it!
Trilby C says
We are going to build bedside tables for our master bedroom soon – this would be a very nice addition to our tools!
Colleen N says
I have an old school table saw that doesn’t have a blade guard, so this would be handy for the closet build-outs I’m doing in the house.
Lisa E says
I don’t know what specifically I would use it for, as I work on various things, but I like the looks of it and it looks a lot safer than the old way. Love the build!
Kelly says
So many things… but I love the safety feature of this gripper. I would love to make a bench for my kitchen.
nicki hanson says
One of the most important things I would create with the GRR-Ripper 3D Pushblock would be a sense of peace for my husband while I power through my woodworking projects. He sweats bullets when I use my homemade push sticks!
Jennifer F says
I want to make cabinetry in my craft room and my current push sticks scare me!
Seansmom says
Love the table! And the Gripper sure looks like it makes things a whole lot easier!!
Laura says
Perfect for the new bench that I’m going to make for my mudroom!
Becky says
I would love this, I build furniture and use an old piece of wood to push plus I’m short so it is super dangerous.
Dana says
Good solution to a common problem.
Sonya Burton says
I would love to use it to make a bench for my entry!! Thanks
Tom says
I would use this to rip a lot of lumber down for face frames. Seems like a great tool to have around!
kara kieran says
A rustic coffee table!
Maren says
What a great shop tool! I think I’ll have to procure one before my next big project. I’m planning on building floor-to-ceiling bookshelves in my living room w/ beaded face frames and a rolling library ladder. A task I feel confident in tackling, but would never have dreamed of doing if it hadn’t been for following your blog and building my skills over the last few years.
Thanks for empowering me, Sandra!
Lori R. says
I love this blue pine. Thanks for the explanation of how it turns this color. Your table is beautiful!
Crystal R. says
I have many projects I could use this for – new dining table, new bed, entry table, etc. Thanks for the opportunity. And, your table is beautiful!
AMY says
I would love to get one. If not, it’s going on my Christmas wish list!
Liz says
I really love this table! It looks great.
Karisa | Petite Modern Life says
I’ve always wondered about making anything with mixed natural wood for this modern effect. Your table is gorgeous and tutorial will help us make a dining room table someday! Have fun with your “toys.” You’re a building machine and inspiration.
-Karisa