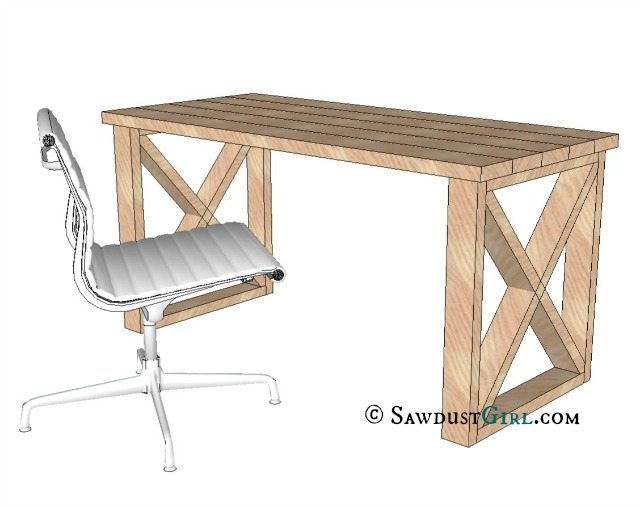
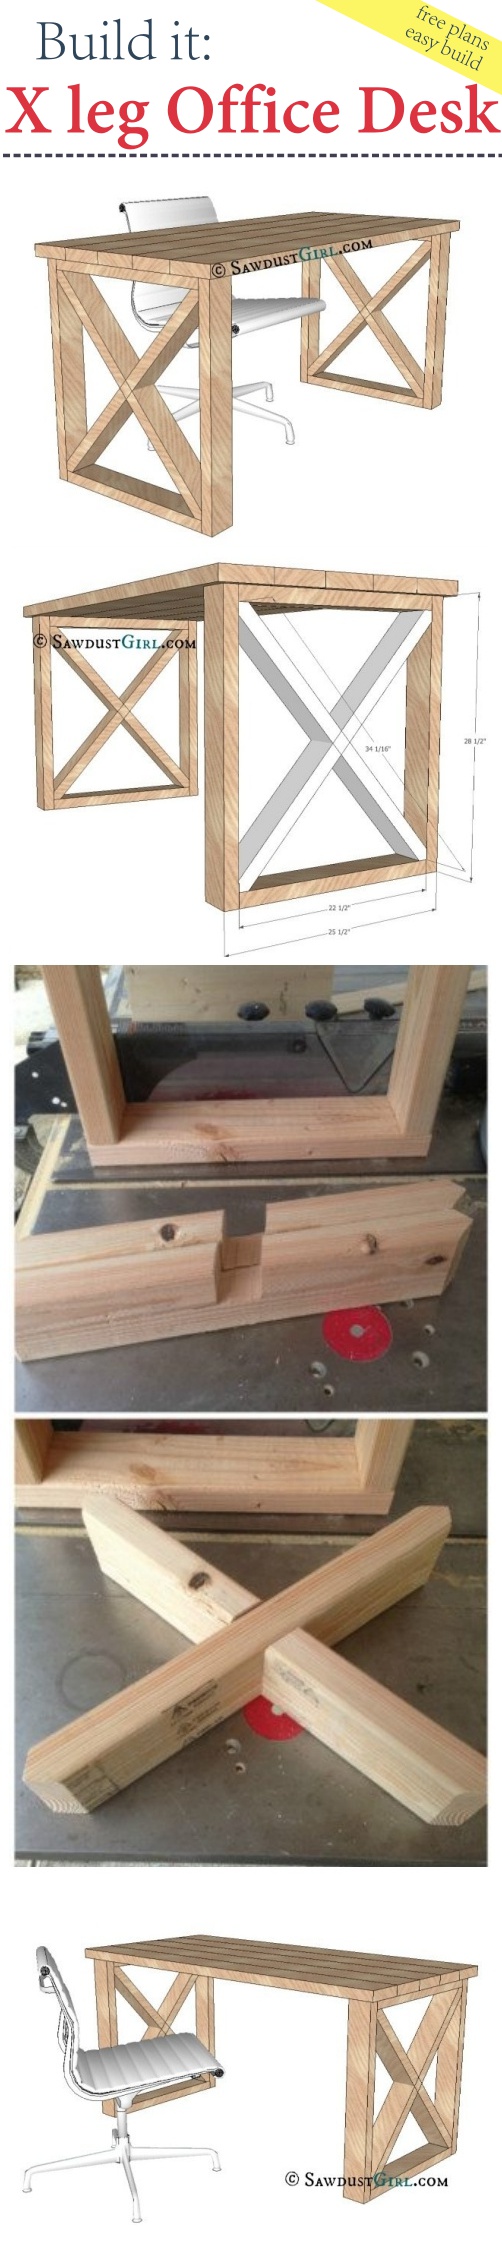
This office desk is a spin off of my X leg bench. A reader suggested it and I thought that was a great idea! I also modeled plans for an X leg dining table and a console table. With this plan you can build with very simple construction to create a sturdy, inexpensive desk. For about $30, it’s hard to beat!
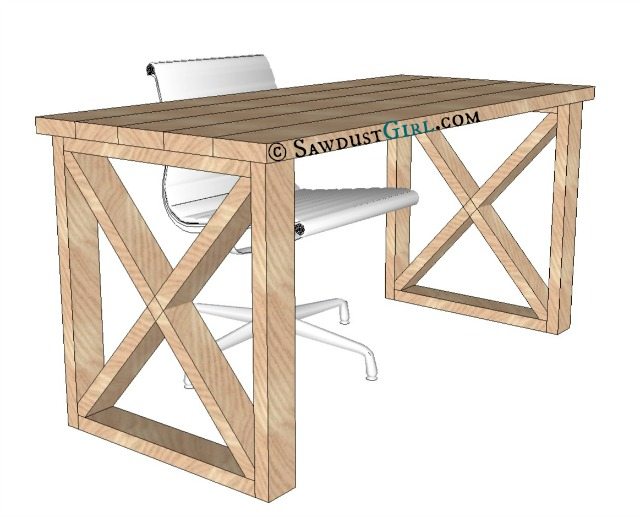
Build an X leg Office Desk
Supplies:
- Five 60″ 2×6’s
- Four 96″ 2×4’s
- 2 1/2″ wood screws
- wood glue
Tools needed:
- Miter saw that cuts up to 49 degree miter (mine cuts up to 55 degrees)
- pipe clamps (lots of them)
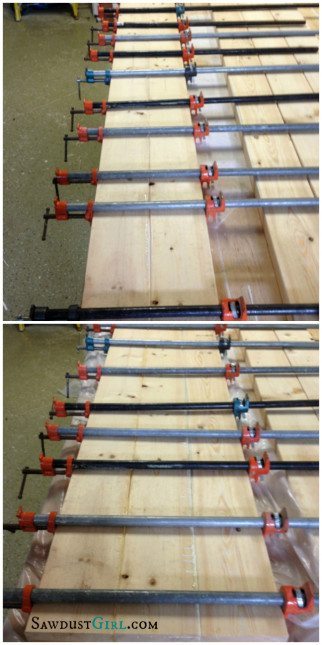
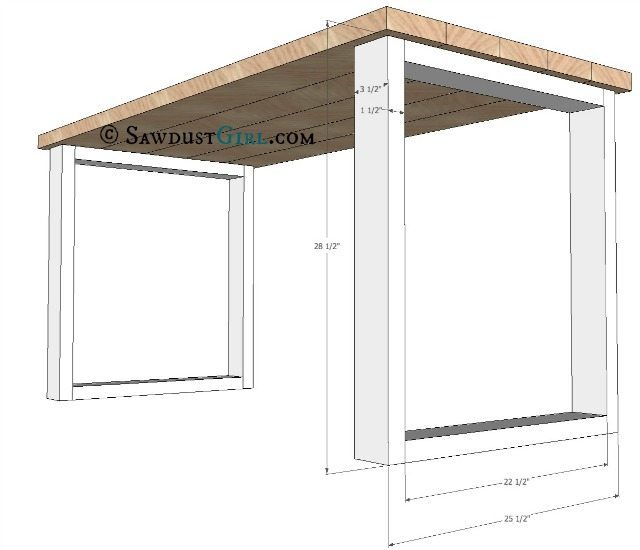
Step 1: Build your desktop. Use glue and clamps to glue up the 2×6’s into one large slab. You can use a belt sander to sand down the top and get rid of the seams where the planks were glued together.
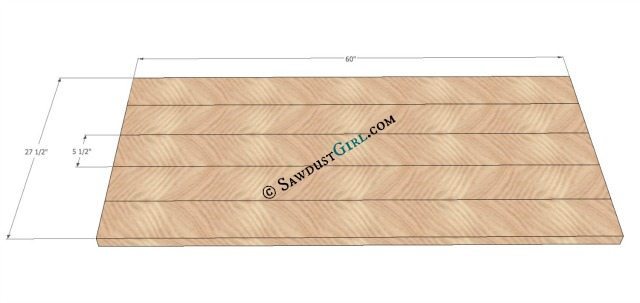
Glueing tip: It’s easiest to work in pairs. Glue up two pairs of 2×6’s and then sandwich the last one in between the two pairs for final glue-up.
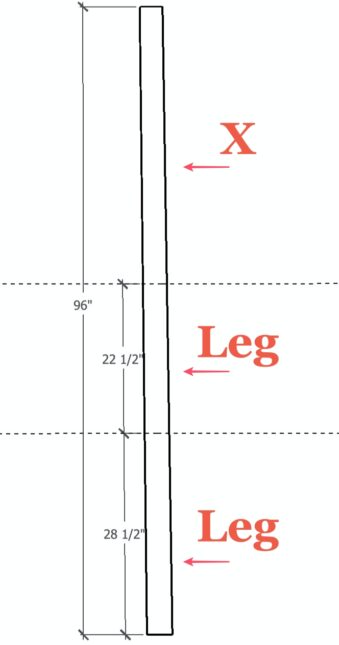
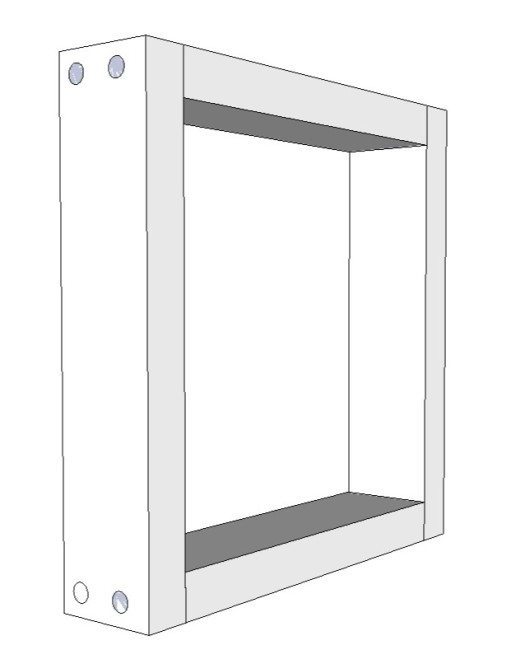
Step 2: Build leg boxes. Use wood glue and 2 1/2″ wood screws in each joint.
*It takes two 2×4’s, cut as shown below, to create each “leg”.
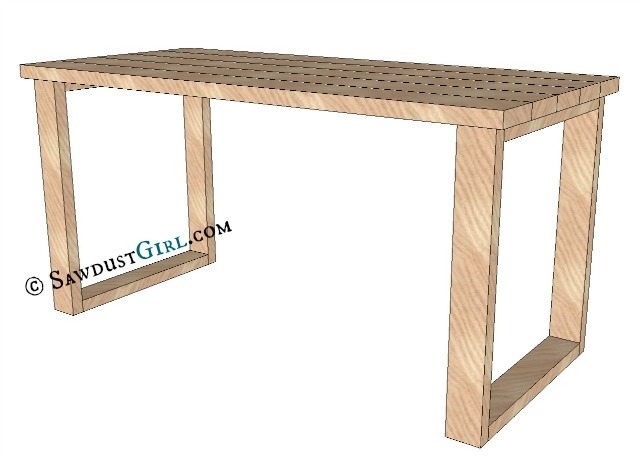
If you don’t want to mess with the angles, you could always leave the X’s out.
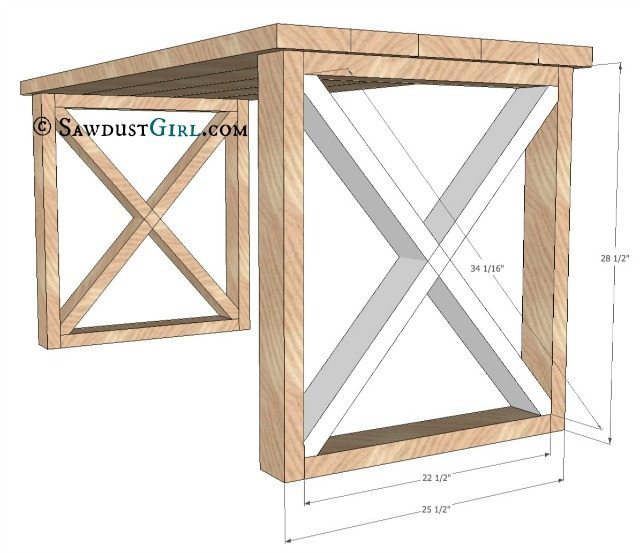
Step 3: Cut angles for X leg pieces.
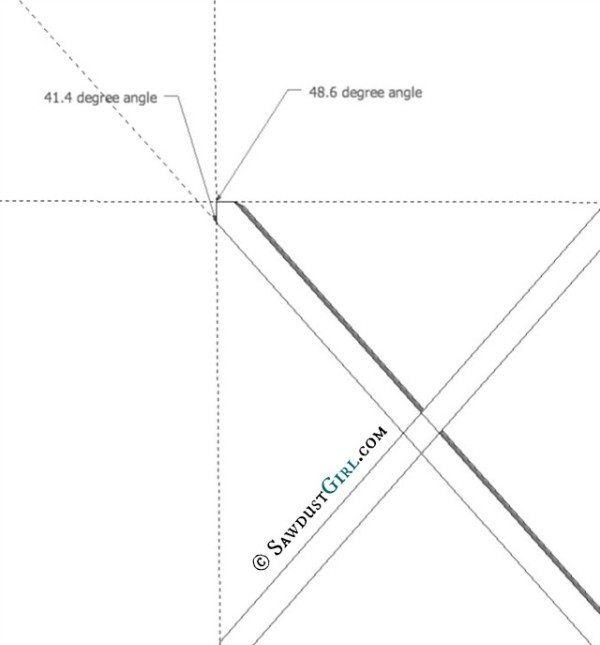
4. Cut notches for half lap joint
Once you have two X pieces cut, insert them into the box (they’ll only fit halfway in at this point) and mark where they cross. Mark one side then flip the entire leg over and mark the other side.
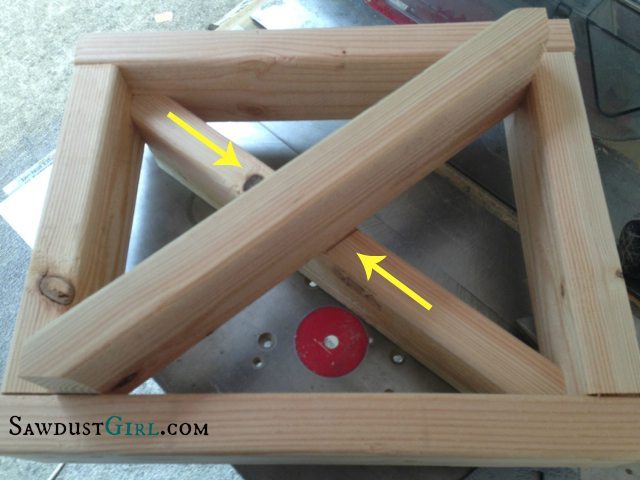
Cut out the wood where you just marked – but only halfway down on both boards — this creates a half lap joint.
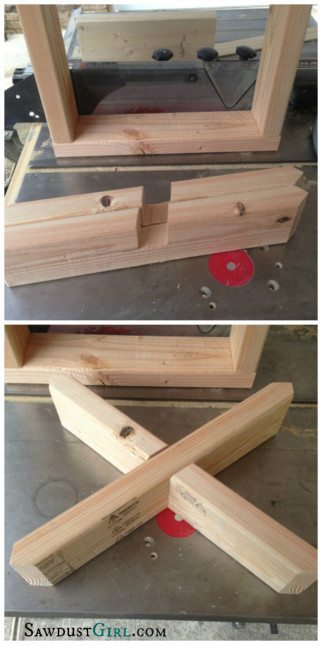
To cut out the notches, I used my miter saw and made a series of cuts about 1/8″ apart from each other — just to the halfway mark on each board. Then I broke out the wood that was left.
Now the legs should fit together like this.

Attach the leg boxes leaving an even amount of desktop reveal on the outside, front and back of legs. I show 1″ in my drawings. Follow instructions in x leg bench tutorial to secure box and then legs to desk!
Sand, stain or paint and top it off with poly or your favorite topcoat, (maybe a few coats of wax) and you should have a sturdy desk that cost you around $30.
More plans you might like:
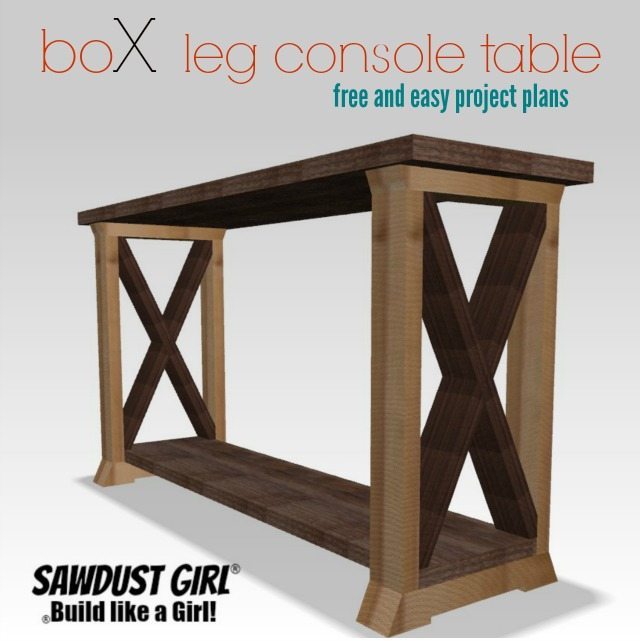
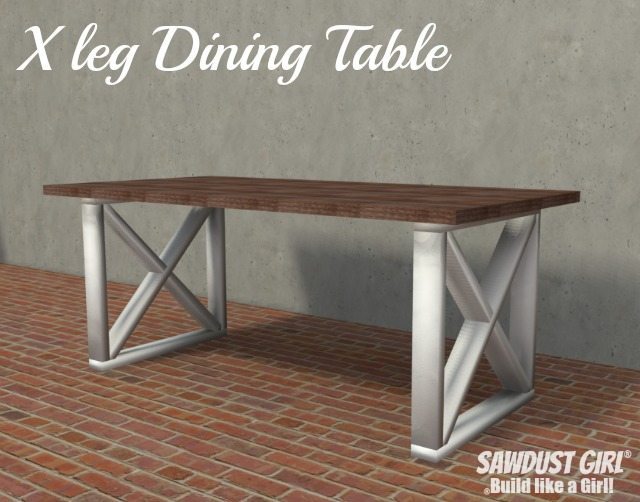
If you like this plan you might also like my plans for the X-leg Console Table and the X-leg Dining Table.
MA says
I never touched a tool in my life. You are my inspiration
Renee says
Hey Sandra,
This is EXACTLY what I was looking for! I was thinking of using hardwood flooring pieces for the tabletop though, but I’m not sure the best way to go about that. Nail/glue them to 3/4″ ply? Would I need reinforce the bottom? Do I need to leave them floating and not use glue so they can expand and contract? Any thoughts?
Thanks!
Lexie says
This is an outstanding project. Personally i see loads of outdoor gardening shelf possibilities and i maybe odd, but i see a variation for myself to make a dog grooming table. As it’s design is super sturdy and can be redwood. For a dog grooming table i would make it just 12 inches tall. As most dogs refuse to jump onto a tall wobbley table but they feel more secure on a lower one. That 12 height makes grooming your dog more pleasant to work with.
Dez says
How can I attach these legs to an existing glass tabletop?
Sandra says
Dez I don’t have any suggestions for attaching a glass tabletop. I would think you would want a horizontal support under the glass.
K says
Thanks for this! I used your plans as inspiration for making two desks for my creative space, at different heights. I used plywood for the top, trimmed out on the edges, and attached the top to the leg supports with pocket holes.
whitney says
I’m so excited I found this post!! I have been wanting to make a desk like this for a while now but havent been able to find and easy-to-follow set of instructions!! I yhink the half notch in the X is what sold me on this project!! ❤❤??
Tracey says
How do you attach the X to the table? Or do they just sit in there?
Sandra says
Instructions are in this post. https://sawdustgirl.com/20-x-leg-bench/
Autumn Leigh says
This is a great project!! I’m very low budget and don’t have a lot of space for storage so idk if I can buy clamps. Can I use another material of similar thickness?
Sandra says
Construction lumber is about as cheep as you can get for solid wood material. You could certainly use other material like plywood which you could rip into strips and laminate (glue together). You would need additional tools for that and I don’t know if a sheet of plywood would cost less in the end. It all depends on cost of materials in your area at the moment.
Shelly says
My husband and I used the leg portion of your plans, but we made them taller. I wanted a craft/sewing table, but painting bent over hurts your back. The taller desk is great. I also used an antique door that we used for the top
Sandra says
Sounds super cool! I know what you mean about working bent over. My neck gets super sore from sanding parts on my assembly table for long periods. Working on an adjustable height table for that.
Taofe says
Well executed but the design is mechanically illiterate.
Does not withstand longitudinal racking.
Uses an excessive amount of wood.
Will not sit well on an uneven floor.
The x-timber is in the wrong plane…….
Always a good idea to look at traditional forms and constructions and ask, “why did they do it like that”.
These are the result of centuries of evolution. Strength, economy and asthetics.
Practical is good. If you inderstand pin joints, encastre joints, bending moments, second moment of area, torsional index/constant, trusses, stress distributions etc–you will look at a structure or framework and instictively know it is right, better when it is truely brilliant and walk away thinking “if only I had known that before’.
What you do IS great. Admire your drive and enthusiasm. Bookwork, study and learning will speed you up in the future. Take the knowledge of many life times that already exists and push beyond it.
Please keep going I would really like you to show the potential that you evidently have.
Sandra says
This is definitely not a plan for “fine furniture”. It’s a quick and dirty plan to build a simple, chunky desk out of construction lumber. The X is simply for design, it’s not structural.
No cabinet or furniture piece will sit well on an uneven floor without the help of levelers or…shoving a wedge under a leg or two. There are lots of things you can do to fix that problem.
Hannah Joyner says
How did you cover up that nail holes in the legs?
Sandra says
Wood putty. If you’re staining, make sure it’s stainable.
Jennifer says
So did you use the 2x4s for the leg boxes? In the materials you said we needed four 96″ 2x4s I’m not understanding because we obviously need more than four don’t we?
Sandra says
Each leg including the X can be made out of two 2×4’s. You just have to plan out your cuts. I added a sketch-up drawing to show you how.
Erica says
You are great Sandra. The poster above who offered the advice may have good points, but I don’t understand people who get online with seemingly good points but start out with a phrase like “design is mechanically illiterate.” That was aggressive, a summary judgment and unhelpful; he or she might ask themselves why they felt they needed to say that like that. Keep up your posts and work.