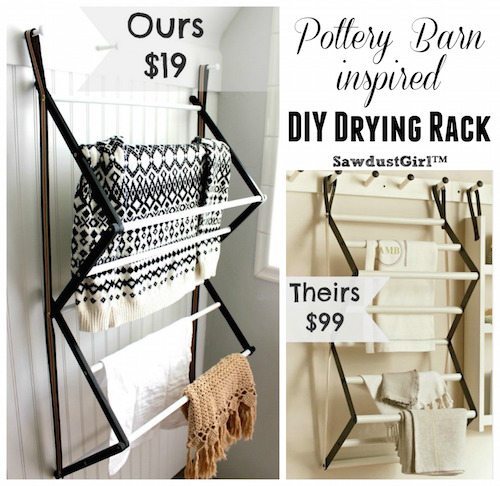
I saw this hanging drying rack on the Pottery Barn website and ordered one for Christmas. Even though I think $100 is a little much to pay for such a simple piece (hello, I just made one for under $20), I was willing to pay to have one less thing that I needed to do over the holiday. Several backorders later, I decided to put this on my V-Day list and make it myself. My mom saw it loved it so much that I made one for her too! Yellow for my mom, black for my manly man who doesn’t mind doing laundry.

Hanging Drying Rack
Materials for one Hanging Drying Rack
- 5 dowels that are 5/8” by 48” ($2.58 ea.) = $12.90
- 3 yards of twill tape or ribbon ($.99/yd after 50% off coupon) = $2.99
- Grommets = $1.75
- Washers = $1.18
- On Hand
- 1/2” plywood scrap approximately 16” by 9”
- Wood Screws (I used Spax #8 x 1 1/2″ yellow zinc wood screws)
- Paint
- Wood glue
TOTAL = $18.82
Step 1: Cut Wood
Measure your space and decide on your sizing. The pegs I will be hanging my rack from 8” apart so I wanted my rack to be 24” wide and about 40 inches tall. This is my cut list, but adjust to your needs.
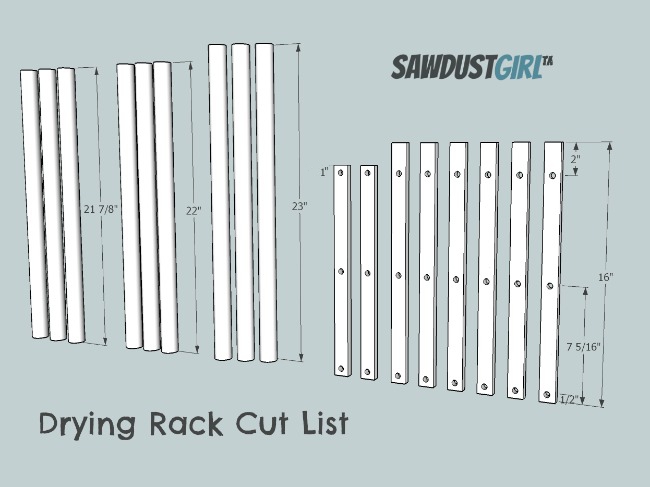
You will need 3 sets of dowels, the first group will be one inch shorter than your overall desired width (for me 24” – 1 = 23”) then the next group will be one inch shorter than the first, and the last group needs to be 1 1/8” shorter than the first group. Next you will need to rip some 1/2 inch plywood into one inch strips. You will need 6 strips to be around 16 inches, and 2 strips to be 14” inches.
Step 2: Prep Dowels
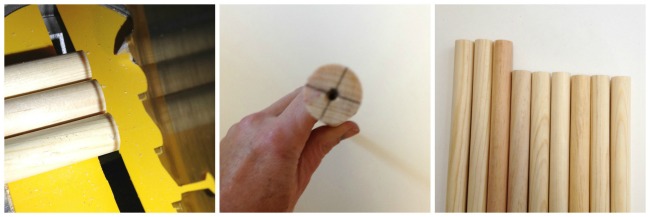
Lightly sand the dowels to get them smooth and paint your desired color, or leave unfinished for a natural look. Using a nail or awl make a divot in the center of each dowel (a good sized, easy to find cause you are screwing in blind and you don’t want your screw to break through your dowel, sized divot!) . IF you are using SPAX wood screws that’s all you need, if you are using any other wood screw I recommend predrilling the hole so that you do not split the dowels. I have to say that I am constantly surprised by how well the SPAX screws work—they just don’t split anything!
Step 3: Prep Sides
Sand the side strips really well and then drill 5/32″ holes on the shorter slats 1/2″ from the ends and another hole in the middle. On the longer slats drill a hole 1/2″ from one end and 2” from the opposite end, and another hole centered between the two holes (again go by cut list picture, when I write it out, it is a big word salad).
Now round the ends. For the first hanging drying rack that I made, I just clamped all of the strips together and sanded on a belt sander to create the rough shape, then finished with the hand sander. This was a very fast method and worked OK, but it was hard to keep them all even and my ends ended up a bit on the wonky side.
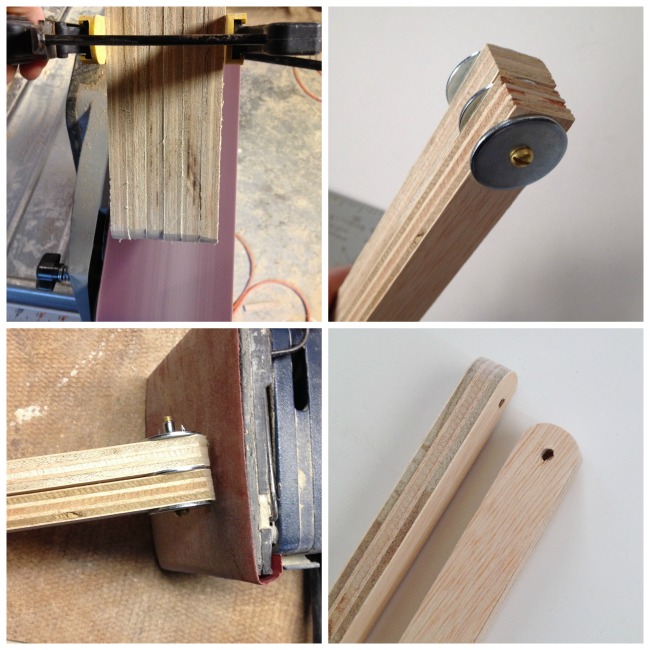
For my second drying rack, I came up with a way to easily create perfectly even rounded corners. I took 1”washers and bolted them through the slats and then sanded down to the washer. All of the ends turned out the same and were perfectly round pretty darn good to the naked eye. Sand and paint color of your choice or leave natural.
Step 4: Prep Ribbon/Tape
Cut the ribbon in half and use fray stop on all of the ends,
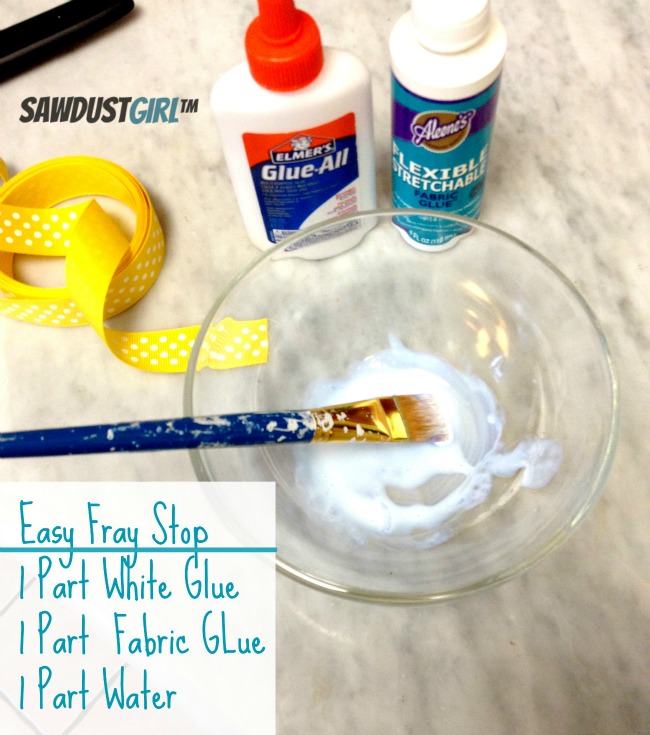
If you don’t have fray stop you can mix equal parts water, white glue, & fabric glue to create your own.
Fold the ribbon down 1 inch from the bottom edge and put a grommet into the center of the fold. Then fold the top of the ribbon down 6″ and put a grommet through creating a loop.
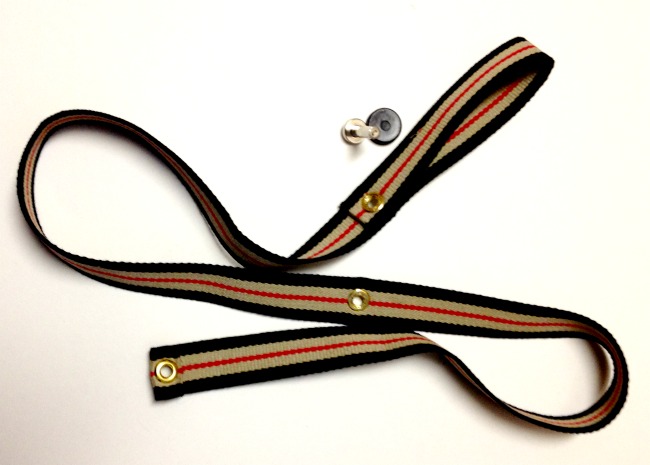
Now fold the ribbon in half with the grommets meeting so that you find the center of the ribbon between the grommets. Place a grommet through this mark and repeat all steps for the other ribbon.
Step 5: Assembly
Pair up all of the side pieces so that they each have a twin. Set aside the shortest dowels. Then using a bit of wood glue on the dowel ends, screw dowels in between all of the pairs through the middle hole. Such that the 16″ sides have 2 pairs with the 23″ dowel between them, and one 16″ dowel with a 22″ dowel, and the 14″ pair have a 22″ dowel. Then add another 22″ and 23″ dowel respectively at the 2″ holes on two of the 16″ sides
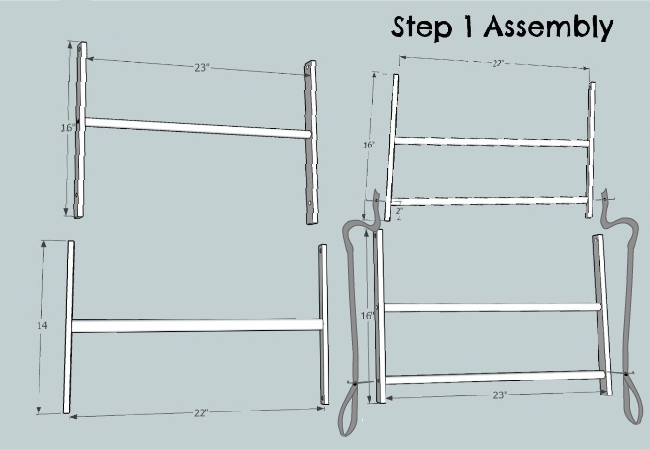
On the 2″ hole of the 23″ x 16″ segment, add the top loop grommet and on 2″ hole on the 22″ x 16″ segment screw in the bottom grommet. If this reads like a bunch of gibberish, just follow the above diagram.
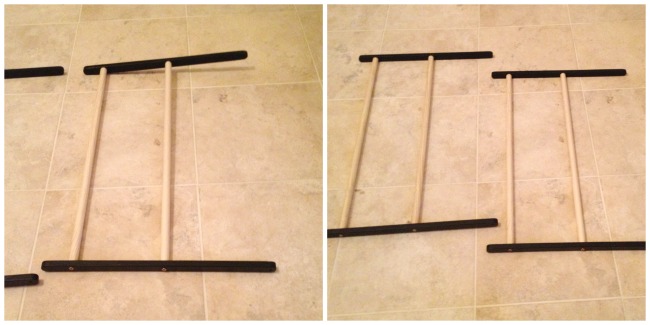
Make sure all of the sections lay flat before the glue dries. You may need to tweak and rotate them a bit to get them all flat.
Now put all of the sections together using the shortest dowels you set aside earlier and placing the narrower sections on the inside of the wider sections. Use a healthy amount of wood glue on the dowel ends and get 2 washers between the side pieces. The washers will allow the pieces to rotate on each other without binding up. The glue will help to keep the dowel from rotating and the screw from getting loose with use.
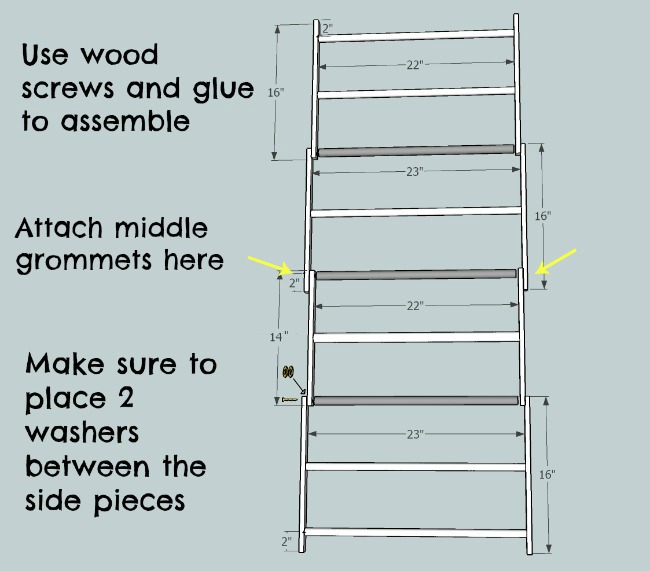
Be sure to include the middle grommets of the ribbons in the middle joints. The key is to tighten the screws all the way, and then back them out a bit just till the ribbons, and joints move easily.
 One advantage to this drying rack is that it is very portable, just fold together and tuck it into the closet when not in use, then take it out and you can use it in any room that has hooks or pegs available to hang on.
Machiel says
Awesome job and the best part other than the cost saving is the fun you had and the satisfaction that you made one yourself
Kim says
I so need this. Or maybe 2 of these. Great job!
Parker says
Very good explanation and illustration for an item I most definitely want!
Feral Turtle says
I built one similar to the Ballard design and then I moved my laundry room and have no room for it in there 🙁 This is a great idea Sandra. I bet hubby loves it too!
jb @BuildingMoxie says
as someone who just got a drying rack as a christmas gift. Great project; expertly presented.
Debbie Fulton says
Sawdust Girl, FYI you can use clear fingernail polish as a fray stop. All you do, is take the side edge of the polish brush,run it along the edge of ribbon. Let dry. You can coat more than once, if you like.
Sandra says
Oh cool. That’s a good trick to know. Thanks
Liv says
Really love this! What width are your twill tape and grommets?
Rhonda says
Where did you get your peg shelf? I want this system too but like the price of the DIY version better!
Sandra says
The DIY price is to MAKE it yourself. 🙂 This is a tutorial to do that.