• Home
  • About
    • Personal Posts
  • Privacy
  • Shop
    • My Account
    • Checkout
    • Email
    • Facebook
    • Instagram
    • Pinterest
    • Twitter
    • YouTube
Sawdust Girl®

Sawdust Girl®

Renovation, cabinet building and woodworking plans and tutorials. Build like a Girl®

  • My Home
    • Clinton TN House
      • Clinton TN House in Progress
    • Maryville TN House
      • Maryville TN House Tour – Completed Rooms
      • Maryville TN House in Progress
        • Basement
        • Basement Storage Closet
        • Bedroom Office
        • Craft Room
        • Dining Room
        • Entry
        • Garage
        • Guest Bedroom
        • Hallway
        • Jack and Jill Bathroom
        • Kitchen
        • Kitchen Entry
        • Laundry Room
        • Library
        • Living Room
        • Loft
        • Madison’s Room
        • Master Bedroom
        • Master Closet
        • Pantry
        • Porch
        • Powder Room
        • Wes’ Office
    • Illinois House
    • Calderwood Cottage
  • My Workshop
    • Clinton Workshop
  • Build & Breakfast
  • Cabinet Making 101
    • Cabinets
    • Doors
    • Drawers
  • Projects and Plans
    • Countertops
    • Beds
    • Benches
    • Bookshelves
    • Desks
    • Gift Ideas
    • Holiday
      • Christmas
      • Halloween
    • Home Accessories
    • Kids
    • Kitchen Cabinets
    • Lockers
    • Nightstands
    • Organization accessories
    • Recipes
    • Sewing
    • Tables
    • Vanities
    • Wardrobes
    • Woodworking
      • Wood Finishing
    • Workshop
    • Workshop Storage and Organization
  • Remodeling 101
    • Baseboard and Trim
    • crown molding
    • Demolition
    • Door and Window Casings
    • Door Installation
    • Drywall
    • Electrical work
    • Flooring
    • Home Maintenance
    • Painting
    • Plumbing
    • Resources
    • Safety
    • Tile
    • Wall and Ceiling Treatments
  • Sawdust Squad
  • The Sawdust Diaries
    • Andrea
    • Ava D.
    • Beckie F.
    • Cara C.
    • Courtney B
    • Fawn T.
    • Jenn D.
    • Kelly C.
    • Kristy K.
    • Lara T.
    • Malisa B.
    • Marnie D.
    • Robin C.
    • Val F.
  • Tools
    • Products
    • Tool Reviews & Overviews
    • Inspiration & Ideas

Skull Candlesticks – Cheap and Easy DIY Halloween Decorations

All Posts, Halloween, Kids, Projects and Plans

Make these spooky skull candlesticks for about $5 each! It will only take about 30 minutes to make these easy DIY Halloween decorations.  They rival Halloween decorations you would find at a Halloween Superstore for upwards of $15 each.

$5 spooky skull candlesticks

Cheap and Easy DIY Halloween Decorations

Be on the lookout for inexpensive lamps on your next thrift store run and stock up on a few dollar store skulls and get you spray paint ready.

Supplies:

-2 lamp purchased at Goodwill (about $3 each)
-3 plastic skulls purchased at the dollar store ($1 each)
-1 can of satin black spray paint (the cheap stuff from Lowes- $1)

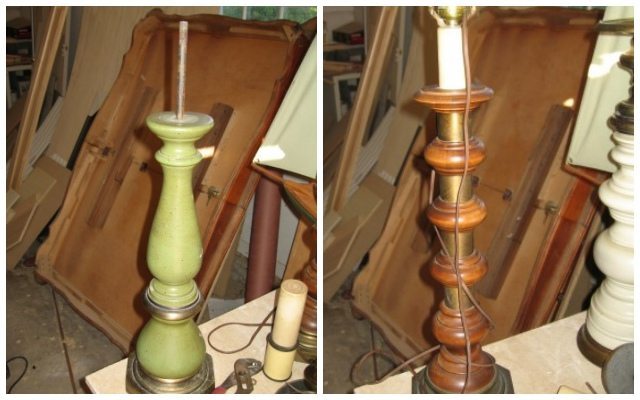
Step 1: disassemble lamps

 Most lamps come apart by twisting the socket and using a screwdriver or pliers to hold the screw or nut on the bottom of the lamp.
How to make Halloween Decorations - Spooky Skull Lamps

Step 2: Paint

After you take your lamps apart, paint all the pieces.  You won’t put them back together the same way so make sure you paint each piece completely.  (Top, bottom, sides…)
*Do not paint the threaded rod, washers or nuts.  You’ll be using those again and they don’t work too well with paint in the treads.
Making DIY Halloween decorations.

Step 3:  Drill Holes in the Skulls

Use a drill bit that matches the diameter of the threaded rod you removed from your lamp and drill a hole all the way through each skull.  The skulls will be inserted onto the rods.  You may want the skulls to sit straight or you may want them tilted.  Decide how you want to arrange them before you drill the holes.

Halloween DIY Skull Candlesticks

Step 4:  Assemble your Skull Candlesticks

Mess around configuring all the parts until you find a design your happy with. Like I said in step 3, it’s preferable to do a dry run before you drill the holes in the skulls.  Take into consideration that you’ll be sitting a candle on the top so have one of the wider diameter pieces on the top.

Use the lamps original rods, washers and nuts to secure all the pieces of your skull candlesticks together.  The threaded rods are threaded on both ends.  Adding the skulls means not using all the original lamp parts because you only have so much threaded rod to work with.  That’s why it’s good to get a couple different lamps so you have lots of parts to work with.  Alternately, you can purchase long threaded rods at the home improvement store in the plumbing and electrical section.  You need a hacksaw or reciprocating saw to cut that so depending on what tools you have available to you, that may or may not be a good option.
$5 diy skull candlesticks

Optional Step 5: Paint the SKULLS

It’s completely up to you to leave the skulls white or paint them.  Depending on how cheap your skulls look, painting might make them look less cheap.  As was the case with my project.  I took my candlesticks back apart to paint the skulls.
$5 diy skull candlesticks
After painting my skulls, I used sandpaper to scuff some of the paint back off.  They looked way too uniform so I distressed them a little.
Halloween decorations to make
Then put them back together again.
These skull candlesticks are easy diy Halloween Decorations anyone can make. For $5!

Candles

These skull candlesticks are kept together with nuts on each end of the threaded rod.  So…there’s a nut where the candle will sit.
Easy Halloween Crafts to make
No problem, candles are wax.  You can either cut or melt a concave area in the bottom of the candle so it will sit flat. Or, your candles might already be a little concave (like mine were) so they sit flat without doing anything.
DIY skull candlesticks. Make this Halloween Decorations for only $5!
$5 diy skull candlesticks
Total cost for both candlesticks: $10

Other easy DIY Halloween decorations and projects:

  • Coffin Party Invitations
  • Spooky Coffin Door Wreath
  • Creapy Halloween Candle Sconce
  • Halloween Tombstones
  • Spooky Halloween Stick Wreath
  • Yummy Halloween Marshmallow Pops
  • Halloween Subway Art
  • Halloween Mad Gab (Fun Party Game)

September 14, 2010 · Leave a Comment

« Halloween Subway Art
Library »

Leave a Reply Cancel reply

Your email address will not be published. Required fields are marked *

Categories

New Post email notification signup

You Subscribed!

Legal Stuff

Terms of Use

Privacy Policy

Disclosure

Recent Posts

  • Lodge Update – Floors, Cabinets, Countertops, and Appliances
  • Lodge Kitchen Cabinet Progress
  • Halloween Mad Gab – Halloween Party Ideas
  • Concrete Backsplash or Vertical Wall Treatment
  • Building and Installing a Giant Faux Beam on the Ceiling

Disclaimer:

Although it is my intention to provide accurate plans and clear instructions, not all plans have been tried and tested. Using plans or information found on SawdustGirl.com indicates that you agree with the Terms of Use policy and will accept full responsibility for the process and outcome of any project you attempt. All plans are for private use only. Plans and information published on SawdustGirl.com may not be reproduced, republished or distributed in any manner without written permission from Sandra Powell, Sawdust Girl. Actual projects built using Sawdust Girl plans may be published on your own site without instructions or "tutorial" as long as you provide a link to my original post with full post title or "SawdustGirl.com" as link title.

Copyright © 2022 · anchored theme by <a target="_blank"