• Home
  • About
    • Personal Posts
  • Privacy
  • Shop
    • My Account
    • Checkout
    • Email
    • Facebook
    • Instagram
    • Pinterest
    • Twitter
    • YouTube
Sawdust Girl®

Sawdust Girl®

Renovation, cabinet building and woodworking plans and tutorials. Build like a Girl®

  • My Home
    • Clinton TN House
      • Clinton TN House in Progress
    • Maryville TN House
      • Maryville TN House Tour – Completed Rooms
      • Maryville TN House in Progress
        • Basement
        • Basement Storage Closet
        • Bedroom Office
        • Craft Room
        • Dining Room
        • Entry
        • Garage
        • Guest Bedroom
        • Hallway
        • Jack and Jill Bathroom
        • Kitchen
        • Kitchen Entry
        • Laundry Room
        • Library
        • Living Room
        • Loft
        • Madison’s Room
        • Master Bedroom
        • Master Closet
        • Pantry
        • Porch
        • Powder Room
        • Wes’ Office
    • Illinois House
    • Calderwood Cottage
  • My Workshop
    • Clinton Workshop
  • Build & Breakfast
  • Cabinet Making 101
    • Cabinets
    • Doors
    • Drawers
  • Projects and Plans
    • Countertops
    • Beds
    • Benches
    • Bookshelves
    • Desks
    • Gift Ideas
    • Holiday
      • Christmas
      • Halloween
    • Home Accessories
    • Kids
    • Kitchen Cabinets
    • Lockers
    • Nightstands
    • Organization accessories
    • Recipes
    • Sewing
    • Tables
    • Vanities
    • Wardrobes
    • Woodworking
      • Wood Finishing
    • Workshop
    • Workshop Storage and Organization
  • Remodeling 101
    • Baseboard and Trim
    • crown molding
    • Demolition
    • Door and Window Casings
    • Door Installation
    • Drywall
    • Electrical work
    • Flooring
    • Home Maintenance
    • Painting
    • Plumbing
    • Resources
    • Safety
    • Tile
    • Wall and Ceiling Treatments
  • Sawdust Squad
  • The Sawdust Diaries
    • Andrea
    • Ava D.
    • Beckie F.
    • Cara C.
    • Courtney B
    • Fawn T.
    • Jenn D.
    • Kelly C.
    • Kristy K.
    • Lara T.
    • Malisa B.
    • Marnie D.
    • Robin C.
    • Val F.
  • Tools
    • Products
    • Tool Reviews & Overviews
    • Inspiration & Ideas

DIY Decorative Wood Spheres

All Posts, Projects and Plans

I wanted some really large wood spheres as a decorative accent.  I found some iron ones that were almost $200 each so  I thought I’d try my hand at wood bending.  It turned out to be quite easy and I got two large, 24″ wood spheres out of one $6 pine 1×3.

DIY Decorative Wood Spheres

DIY Decorative Wood Spheres

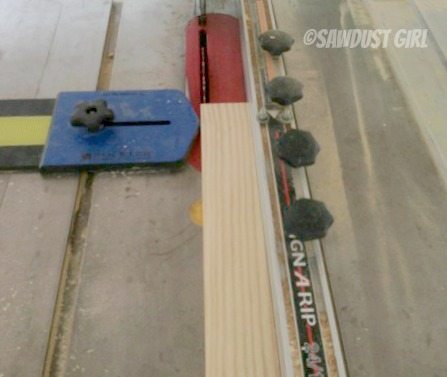
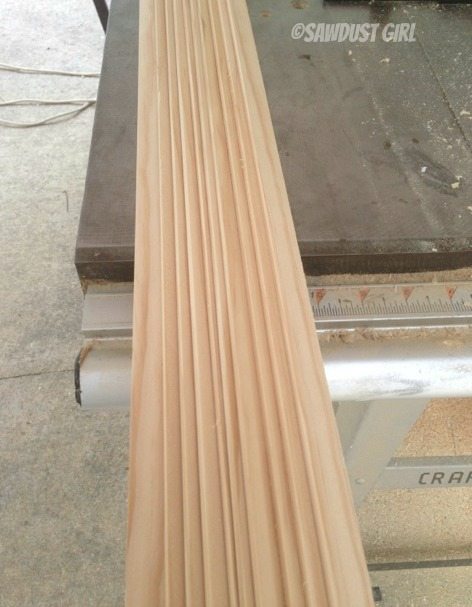
To make my own strips, I used a table saw, thin rip jig from Rockler and cut a bunch of thin strips of pine from a 1×3.
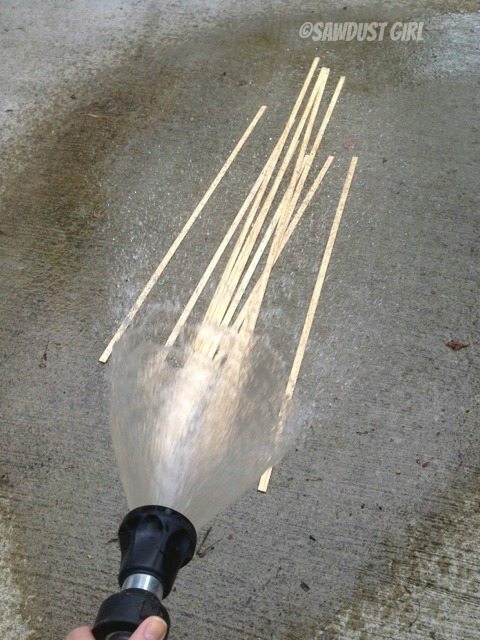
cutting-strips-on-table-saw

DIY-wood-strips

Wet the strips

I tossed the pile of strips on the driveway and sprayed them water; just enough to wet them throughly.
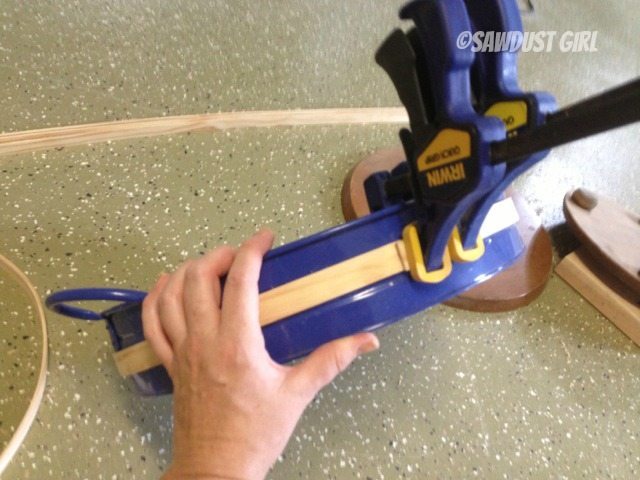
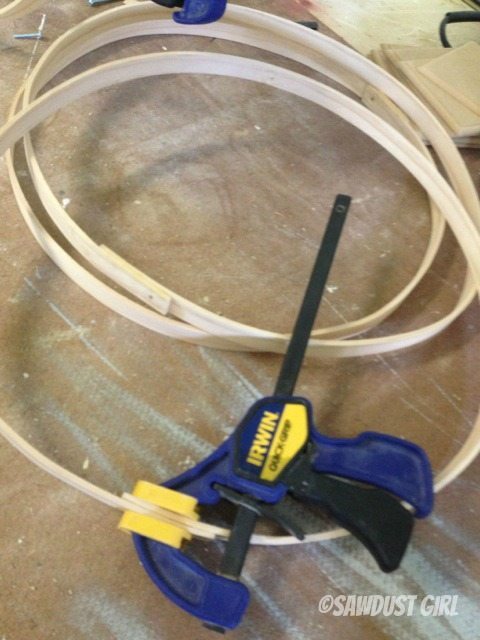
How to bend wood

Shape to dry

Next I wrapped the strips around a circular object that was the right size…I had to search for just the right item.  Luckily I had a serving tray that was just right.  I clamped the ends to hold the strips in place while they dried.
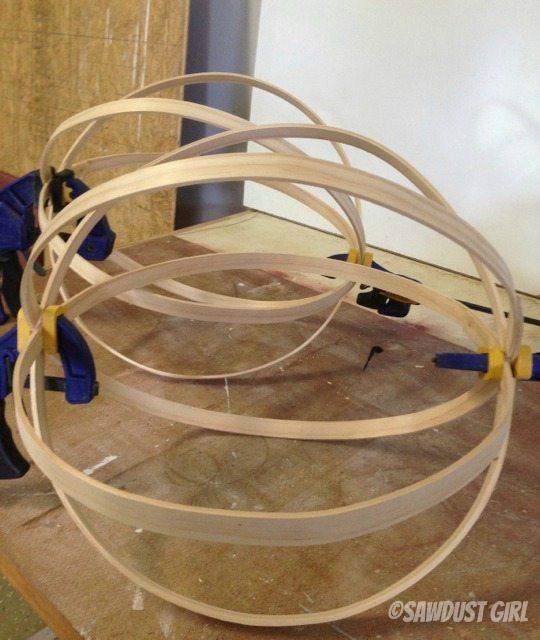
DIY Decorative Wood Spheres

Glue up

Once dry, I glued and clamped the wood strips into a circle and let the glue dry.

How to bend wood

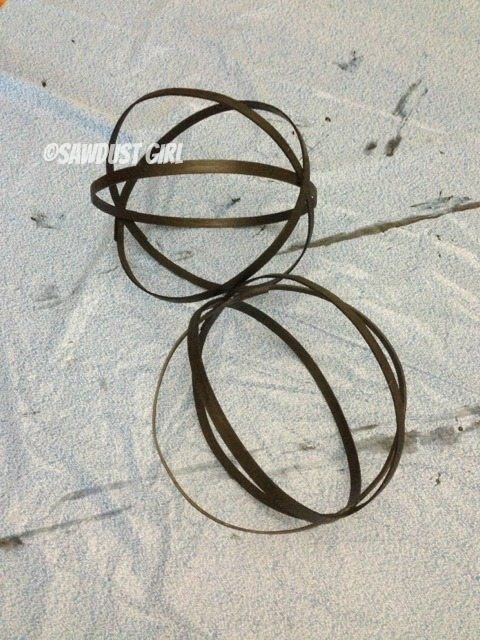
Then I glued the circles together creating a sphere.

DIY Decorative Wood Spheres

Paint

I painted my spheres with a brush…spray paint would probably be easier but I didn’t have any and I did have paint in a can…so that’s what I used!

DIY Decorative Wood Spheres

Use and enjoy!

DIY Decorative Wood Spheres

console-table-decorative-wood-spheres

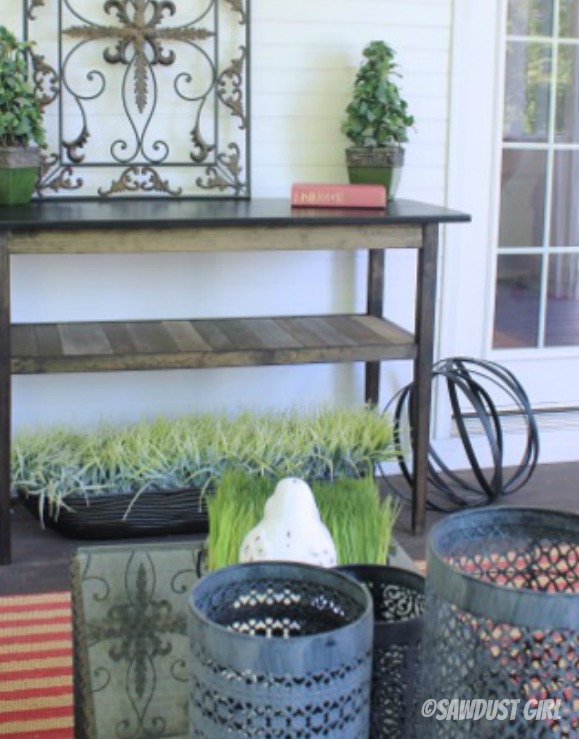
And if you want to make this console table, it’s easy and cheap too!  Check out my other project tutorials and free woodworking plans.

October 24, 2013 · 15 Comments

« Built-in Playroom Reveal
DIY Faux Overmantle = No More Holes in the Wall »

Comments

  1. Lindsay @ Makely says

    October 24, 2013 at 8:27 am

    Wow, Sandra! Those look amazing! And I’m glad to know about wood bending, too. I’ve always wondered how that was done.

    Reply
  2. Mable Burt says

    October 24, 2013 at 12:01 pm

    This is such a brilliant idea. I have been looking for something like this for ages. Thank you so much for sharing.

    Reply
  3. Roeshel says

    October 24, 2013 at 12:01 pm

    So cool, Sandra! I wondered how they were wood because of the shape! Thanks for the lesson! 🙂

    Reply
  4. melissa*320 sycamore says

    October 24, 2013 at 1:56 pm

    I had no idea you could do this with wood! Love them, Sandra!

    Reply
  5. Katie @ Addicted 2 DIY says

    October 24, 2013 at 2:07 pm

    I love this! I’ve been wanting to give this same idea a try for a while. I think this will be added to my list of upcoming projects. Thanks!

    Reply
  6. Lauren H says

    October 24, 2013 at 2:14 pm

    Sandra, I love these! I planned to try this with some veneer tape but thought “too flimsy”. Will have to try your version once I get my table saw fixed…and a thin rip jig.

    Thanks for sharing! Beautiful!

    Reply
  7. Kristian G says

    October 24, 2013 at 3:20 pm

    These do look amazing, I really would like to try these myself! In your tutorial pictures, it looks like there is some type of fastener holding the loops together, is that necessary. Also what type of glue did you use to hold these lovelies together! Thank you – for your inspirations!

    Reply
    • Sandra says

      October 24, 2013 at 4:24 pm

      No there is no fastener, just glue. My go-to wood glue is Titebond. I drilled holes in the strips because I originally planned on holding the combined “hoops” together to create a sphere with a bolt but it made it too thick. So you can see the holes, which I wouldn’t do again (and why I didn’t say in the tutorial, Drill some holes you won’t end up using LOL). The wood is overlapped at the ends which you have to have in order to glue the ends together. If you just tried to glue the wood end to end it probably wouldn’t hold up because there wouldn’t be enough surface to give the joint strength.

      Reply
  8. Jackie says

    October 24, 2013 at 6:26 pm

    Love how big these are! Thanks for sharing your tips on how to bend the wood into rings!

    Reply
  9. jamie says

    October 24, 2013 at 10:12 pm

    Love the spheres! And you make them look so easy to make! That would have been awesome if we both made peace signs!

    Reply
  10. Carrie says

    October 27, 2013 at 12:14 am

    Looks awesome, Sandra! Make me some, haha!

    Reply
  11. Darlene says

    October 28, 2013 at 12:13 am

    What thickness are the strips you cut? I didn’t see it mentioned.

    Reply
    • Sandra says

      October 28, 2013 at 8:50 am

      They’re somewhere between 1/8″ – 1/4″ thick.

      Reply
      • Darlene says

        October 28, 2013 at 10:23 pm

        Thanks! Got myself a Dewalt last night just like yours from Home Depot for 599.00 and a saw table came with it for free. Got the one with wheels so it can be moved around. Eeeeeeeeee!! Can’t wait to get it out of the box and play!!

        Reply
  12. Lisa says

    January 1, 2014 at 12:58 pm

    I LOVE this!!! Thanks for sharing! It reminds me of a light fixture I like from Ballard Design and I mentioned to my husband that “someone” should be able to make the light… 🙂 You may be my new best friend if he figures that one out ~ LOL!!

    Reply

Leave a Reply Cancel reply

Your email address will not be published. Required fields are marked *

Categories

New Post email notification signup

You Subscribed!

Legal Stuff

Terms of Use

Privacy Policy

Disclosure

Recent Posts

  • Lodge Update – Floors, Cabinets, Countertops, and Appliances
  • Lodge Kitchen Cabinet Progress
  • Halloween Mad Gab – Halloween Party Ideas
  • Concrete Backsplash or Vertical Wall Treatment
  • Building and Installing a Giant Faux Beam on the Ceiling

Disclaimer:

Although it is my intention to provide accurate plans and clear instructions, not all plans have been tried and tested. Using plans or information found on SawdustGirl.com indicates that you agree with the Terms of Use policy and will accept full responsibility for the process and outcome of any project you attempt. All plans are for private use only. Plans and information published on SawdustGirl.com may not be reproduced, republished or distributed in any manner without written permission from Sandra Powell, Sawdust Girl. Actual projects built using Sawdust Girl plans may be published on your own site without instructions or "tutorial" as long as you provide a link to my original post with full post title or "SawdustGirl.com" as link title.

Copyright © 2022 · anchored theme by <a target="_blank"